Friday, July 31, 2009

CRM Quick Campaign - Unsubscribe option

We can create a marketing list for group of contacts, accounts or leads and against these records we can create a Quick Campaign. This Quick Campaign would ask for the type of activity to be created for these selected records.

We were required to setup a marketing list of our contacts for a mailer to be sent to them frequently. We created a Quick campaign for these contacts and selected the activity as Email. The email template provided includes an “Unsubscribe” option which can be used for getting mails back from the contact who don’t wish to receive mails thereafter.

Below is the screenshot where an activity type is selected along with the assign to options. Here, you can set the “Assign” accordingly. “Me” option says that the owner/sender of all the emails would be the logged in user while “Assign to another user or queue” option would allow you to select a particular user and this user would be the owner/sender of these emails.
When any of the contact clicks on unsubscribe link, the “To” field will get set to this selected user.


In body of this template email you can set the template message with Unsubscribe link. To provide the Unsubscribe link select the Text and click on Unsubscribe button.


This wizard ends with creating campaign and the process of sending of mails starts. The success/failures can be evaluated from the Quick Campaign just created.
When the contact clicks on Unsubscribe link the unsubscribe subjected mail would be mailed back to the sender of these mails as set above.

When the unsubscribe mail is received that particular contact from the marketing list gets updated automatically and its “Do Not send marketing materials” is set to”No” as shown in the screenshot below.


But this auto subscribe may not work and can be reasoned due to two factors:

1) The “set auto unsubscribe option” in the System settings under Marketing tab should be set and to do this follow these below steps:
a) Go to Settings ==> Administration ==> System Settings
b) In system settings go to Marketing tab and set auto unsubscribe option to “Yes”.


2) The contact for which the auto unsubscribe should have worked must not have duplicate email address duplicating with another contact, account, lead, or user. Knowing this, even resolving the email address will not set the “Do Not send marketing materials” to “No” i.e. would not auto unsubscribe this contact.

Wednesday, July 29, 2009

How to use Parameters in Workflows/Plugins

CRM Plugins and Workflows provide the ability to pass external information to the plugins as well as receive information from plugin that can be used for further processing.

Plugins:


In case of Plugins, you can use the Secured Parameter and Unsecured Parameter that is available during Plugin registration to pass static information that can be used by the Plugin.
It is better to use the unsecured parameter as this is available in offline as well.


These parameters are available as parameters to the constructor of the Plugin.


public class AccountCreateHandler: IPlugin
{
public AccountCreateHandler(string unsecure, string secure)
{
// Do something with the parameter strings.
}
public void Execute(IPluginExecutionContext context)
{
// Do something here.
}
}

Workflows:

Workflows are allow for Input as well as Output Parameters. You can use the Input Parameters to pass static information to the Workflows. The Output parameter feature of Workflow is very interesting. The Output parameter defined in the Workflow Plugin, becomes available in the CRM Workflow window. You can use this output parameter in any of the Workflow steps.
It can be used in Wait/If condition block as a value to be checked for.


It can also be used in Create/Update step. Here the Output parameter becomes available only for the attributes that match the parameter data type.


If you had some complex logic to be evaluated before you decide who to assign the records to… you can create a Lookup type of Output parameter and assign the record to this.

Monday, July 27, 2009

Convert / Migrate Goldmine Email History and documents to Dynamics CRM

We have noticed that a lot of Goldmine users are migrating to Dynamics CRM with the requirement to have the Goldmine History brought over in CRM.

While it is very easy to get the Company/Contact information from Goldmine to CRM, one of the sore points is bringing in Email history to CRM. You will find all of the Pending/Open activities of Goldmine in the Cal table and the Closed activities in Conthist table.

The Cal/Conthist table stores all the details of the activity like the date/time, the type, the owner etc of the activity. The Ref field stores the subject and the Notes stores the description of the activity. This is true for all types of activities except Emails.

In case of Email, the email body is stored not in the Notes of the Cal/Conthist but it is a separate table called “Mailbox” to store the email body. The RFC822 attribute of the Mailbox stores the actual content of the email body. “LinkRecid” is the attribute that will help you link the two tables.

The data in this field includes the email in HTML and plain text format and requires to be processed before they can be added as the Email body in CRM. To start with it would be a good idea to use the Regular Expression class (RegEx) to parse out all HTML elements from the email body. This is essential as the email body in HTML format sometimes contains the Style tags and script tags which may cause a problem when taken to CRM and also it would not appear well formatted. It is always a good idea to parse out all HTML elements and take the email body as plain text in CRM.

One more important point to remember is to parse out all newline characters like “\r” or “\n” from the email text. CRM email body accepts the message in HTML format so these can be replaced with the HTML newline tags like "<BR>".

If you want to identify the contact to which the email was sent or any activity is associated with, you can check for the (oc: ) tag in the activity ref attribute. This tag contains the name of the secondary contact with which the activity is associated.

Coming to email attachments. GM stores the physical file path in its table. During the migration process, you can look for the file at the given physical file path and write the attachment to CRM. This information can be found in the ContSupp table. So you can link the Conthist/Cal record with the ContSupp table to get the attachment file path.

Hope this helps in conversion of Email history of Goldmine and shows you the intricacies involved in doing this through development.

For those who would not like to reinvent the wheel there are a number of product migration utilities and services in the market by third party developers who can provide you with this already existing details including Inogic. Inogic has a unique way of approaching this migration where it has developed a migration tool for Goldmine that migrates Contacts/Pending/History/Emails/Attachments, Linked Documents to CRM and it provides this utility in a combination service by testing it with your Goldmine database and handholding you through your live migration and providing minor customization all at a FIXED COST to place your Goldmine data into Dynamics CRM.

You can check out further details of this on our website.

Thursday, July 16, 2009

Sorting a CRM view by a Picklist Attribute causes an error

One of the best features of CRM is the ability to create your own views and be able to sort on any column of the view as and when you wish without having to redesign the view.

While this works great with all types of entities and attributes, we once came across with a bug when we tried to sort the view by the Status Reason Column. Status Reason column is a picklist type of attribute.

Upon further research we found that this fails for any Picklist attribute and only when one of the records present in the view has a null value set for the picklist attribute on which you are sorting the view.

To search for such null value records, you can look for the “Does not Equal” condition and select all the available picklist options.

You can just open this record and reset the value of the status reason and now the sorting on this attribute will work just fine.

Monday, July 13, 2009

Price List Lookup does not show up any Price Lists in Opportunity form

The Price List Lookup on the Opportunity form, displays the price lists for the currency selected on the Opportunity. If no price list has been created for the specified currency it would not show any price lists in the lookup.

In our case this was not the case. Here is what caused it…

We once happened to remove the Price List attribute from the Opportunity form as the customer was not going to use the Price Lists. We had plugns in place to set the Price List by default on the create event of the Opportunity.

But when we removed the Price List from the Form we got the following error

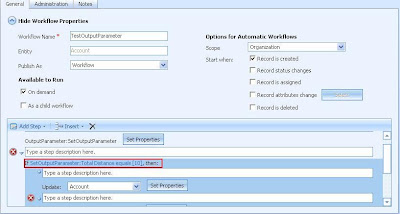
So we planned to put the field back on the form and explained to the customer that price lists would need to be provided on the form so you might as well select the appropriate price list manually from the form.

But what stunned us, is that after putting the field back on the form, the lookup no longer seems to work. It will always bring up an empty lookup window even though we have price lists created in the same currency as that of the Opportunity.


The Price List Lookup works on all other entities except this one as we had initially removed this attribute from the form and later added it back.

On further investigation we found that our adding the attribute back did not bring it to the same state as the original form provided by Microsoft. If you compare the customization file of the original Opportunity entity from MS with the one after you manually added the Price List attribute back… you would notice they are not the same. The original form has the following script that is missing when we added the attribute to the form

Script from our customized Opportunity entity:

<cell id="{2bf4485c-3d3e-444f-ac11-8a6262083d88}">
<labels>
<label description="Price List" languagecode="1033" />
</labels>
<events>
<event name="setadditionalparams" application="true" active="true">
<script><![CDATA[
var oLookup = event.srcElement;
AddTransactionCurrencyParam(oLookup);
]]></script>
<dependencies>
<dependency id="transactioncurrencyid" />
</dependencies>
</event>
</events>
<control id="pricelevelid" classid="{270BD3DB-D9AF-4782-9025-509E298DEC0A}" datafieldname="pricelevelid" />
</cell>

Script from our customized Opportunity entity:

<cell auto="false" showlabel="true" locklevel="0" rowspan="1" colspan="1" id="{2acdf564-bd2b-4392-9a93-52a133f856be}">
<labels>
<label description="Price List" languagecode="1033" />
<label description="Tarifs" languagecode="1036" />
<label description="Preisliste" languagecode="1031" />
<label description="Lista de precios" languagecode="3082" />
</labels>
<control id="pricelevelid" classid="{270BD3DB-D9AF-4782-9025-509E298DEC0A}" datafieldname="pricelevelid" disabled="false">
<<parameters>
<AutoResolve>true</AutoResolve>
</parameters>
</control>
</cell>

And this is the reason that the price list does not work after you add it back…

Resolution: Either populate this field through scripting by copying the customer pricelist to the Price List automatically(this does away with the need to lookup the price list) or replace the Original Opportunity customizations back from an unmodified CRM system.

Wednesday, July 8, 2009

How to disable the "Do you want to view only the webpages content that was delivered securely? popup for custom pages added to CRM

We had a custom page developed for a customer using CRM Live install. In this case we had the customer host the custom pages locally within their intranet on a IIS server. The URL of this website was added in the IFRAME on the CRM Form.

We noticed that as soon as we added the IFRAME, the customer would receive the following alert "Do you want to view only the webpages content that was delivered securely?".

This was because of the change in the security level of the pages. While CRM Live is hosted on a secure "HTTPS" protocol to provide more secure access to CRM, our custom pages uses "HTTP" protocol, so every time when CRM is accessed you get this prompt.

To remove this follow the below steps.

Go to Tools --> Internet Options --> Security Tab. Here select the proper zone under which your custom pages or the "HTTP" pages came.


Now select "Custom Level" button.

Here go to Miscellaneous --> display mixed content and select "Enable" option as shown in the below screen shot.


With this done, you will not be prompted anymore.