Tuesday, November 30, 2010

Workflows - Behind the scene

We were recently working on designing a tool that deletes workflow job. We thought it would be easy to just filter out all job that related to a workflow by the workflow id and then delete that’s it.

But like always we were in for a surprise. Just thought putting it down would help others in resolving this mystery.

Each Workflow has a unique id just like any other entity. But if you search for workflow jobs using this id to look for all jobs related to this workflow, you would be in for a surprise. It would not return all of the jobs that you are expecting. The reason being each time you revise a workflow i.e unpublish and publish the workflow once again, it creates a new workflow entry in the tables. If you want to look for the workflow jobs related to a particular workflow then you need to look for the workflow id assigned to each of its versions.

For workflow, you would find the following definitions available in the tables.


There will be only 1 definition record in CRM for a workflow no matter how many times you revise it.


But each time you publish a workflow it will create a new activation record.


The activation workflow record will have its parent workflowid set to the workflow definition id.

The workflow definition record will store the id of the currently active version of the workflow.

If you unpublish a worklfow and publish it again, it will add another row to the table and the status would now be as follows:


Note the activeworkflowid of the Definition record now refers the Guid of the latest version of the workflow that is published.

Now if you want to look for system jobs for this workflow, you will need to search for jobs that have their workflowactivationid set to any of the workflowid listed above in the table.

Hope this helps you find your way through the maze of workflows!!!

Tuesday, November 23, 2010

Debug script in Microsoft Dynamics CRM

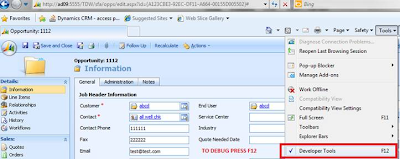
In Internet Explorer 8 (IE 8 )Microsoft provided a way to debug the scripts.

With Internet Explorer 8 and JScript Libraries, debugging scripts has become much easier. To debug the script, Please follow the step below.
  1. When working with Microsoft Dynamics CRM try to reproduce the conditions where an error is occurring press F12 to open the Internet Explorer developer tools.


  2. On the Script tab, to the right of the Start Debugging button, use the drop-down to locate your JScript library.


  3. Set a breakpoint by clicking on the left margin within your function.

  4. Click Stop Debugging to stop debug.


  5. If your script is in the Onload event, you may need to select the Microsoft Dynamics CRM window and press F5 to reload the window.
For more information, see the MSDN topic Debugging Script with Developer Tools. http://msdn.microsoft.com/en-us/library/dd565625(VS.85).aspx

Hope this helps!

Friday, November 19, 2010

CRM 2011 - Dialogs Explored

Dialogs are the new feature addition to CRM 2011.

Just like we had the ability to extend CRM using plugins and workflows, we now have the option of Dialogs as well.

What is different in Dialog?

Dialog runs synchronously like the Plugins but they have the option of providing user interface to accept custom information required for processing.

I took an example of a situation where, you want to add custom logic that will do the following if the user tries to make an Account inactive.

  1. Check if it has a parent account associated with it, if so let the user know about it

  2. Confirm if they want to de-activate the parent account as well.

  3. If yes go ahead and de-activate it

  4. Check if the account has Child accounts associated with it, if so let the user know

  5. Disable the Child accounts as well if the users wants.

Dialogs let you design a wizard like user interface for user input. In this example we have tried to use all the features that the dialog offers. The aim here is to demonstrate the various features of Dialogs.

Check if it has a parent account associated with it, if so let the user know about it

This can be done through the if condition that was available within workflows as well.

Confirm if they want to de-activate the parent account as well.

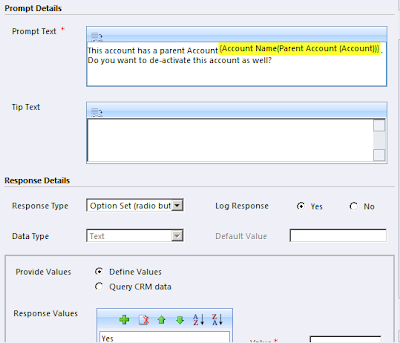
Here we shall make you of the Page feature that has been added within dialogs. We shall design a user interface that will ask the user the question and get the Yes/No response back.


For response we have set the type to be Option Set (Radio button). We have defined the values as Yes and No.

This page is then called from the Dialog as the next step


If yes go ahead and de-activate it

We can check the user response to our question in the earlier step and based on that proceed further. Here we have called another Child workflow that is designed to de-activate the account passed to it. The parameter can be passed by selecting the attribute of the Account entity on which the workflow needs to be executed.


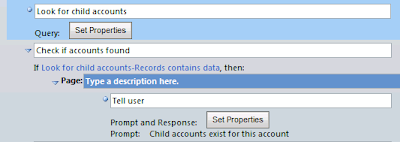
Check if the account has Child accounts associated with it, if so let the user know

We need to design a query that will let you search for child accounts.

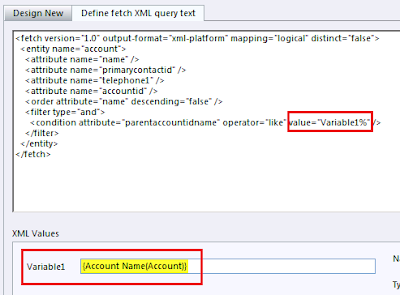
Here is the trick to designing a parameterized query. When designing the query, user the like condition and specify a dummy name in the query as shown below


There after switch to the Define fetch XML query text tab.


Change the query value to Variable1%. Once you write that, you have the Variable1 showing up on the XML values section. There select the Account Name attribute of the account entity.

This will now search for accounts where parent account = current account.

To see if the query returned results, use the following condition


Disable the Child accounts as well if the users wants

The dialogs do not allow us to loop through the query results and perform action on each of the record found. But it supports calling of Workflows. So the last step is performed by making a call to a workflow assembly.


You can pass the responses received from the user on a page designed in the dialog to the Custom Workflow Assembly.


Dialogs are fun and if put to correct use, it is a very strong tool that has been provided to us.

Wednesday, November 3, 2010

Displaying CRM emails using SSRS 2008

Email body in Dynamics CRM is stored in HTML format and when we try to display the data as is in the SRS report, it shows up with all the HTML tags.
Microsoft Dynamics CRM reports strip the HTML content and display it in Plain text format.
Now with SSRS 2008, you can display them with part of the HTML formatting. It does not support all the HTML tags as yet, but some basic tags are supported that help provide a presentable view of the email body.

Let’s take an example, we will create sample email as shown below.


To show same content in SSRS report 2008 we need to follow the below steps:

  1. Place a textbox control on report and within it place the PlaceHolder by right clicking inside textbox and choose PlaceHolder.

  2. Set the properties of the 'PlaceHolder', change Markup type to HTML.

  3. Extract description(body) of email by query eg. Select description from filteredemail where activityid='A0773451-3DE3-DF11-9EAB-0003FFD4167C'

  4. Set the expression value of the placeholder to description, from dataset fields.( For e.g. Fields!description.Value).

  5. Review the report to see the following result.


Hope this helps...Time to move on to SSRS 2008!

Tuesday, October 26, 2010

Field Level Security in CRM 2011

CRM 2011 will now allow to decide permissions not just at the record level but also “Field Level”. This means that you can decide if a user has the permission to that attribute at the time of Create or Update or simply view the data for that attribute.

Currently, this feature is only available for the custom attributes that you add. They are not available for the system attributes. When you create a new attribute you can enable “Field Level Security” for that attribute.


Once the attribute has been defined for Field Security, it becomes available for defining the security levels for different roles.

Similar to the Security roles, you can now create Field Security Profiles


The profile lists out all the attributes setup for Field Security and you can edit the permission to Read, Update and Create.

Note any security that you apply here is not just available/applicable on the CRM forms, but also programmatically. So if you try to edit a custom attribute of an entity for which you do not have permission to edit, field security will be enforced and you will not be allowed to update the record. You will receive an error.

Field security can also be specified at the time of sharing a record.


You can specify the permission to each user with which the record has been shared and the permission for the secured fields.

Friday, October 22, 2010

Issues with class level declaration in CRM 4 Plugins and Workflows

It is important that you avoid class level declaration and initialization of variables in Plugins and Workflows.

Let us discuss the issues that one can face with Plugins. Plugins as you know is executed synchronously. But if there happen to be multiple calls made to the same plugin assembly and class, a new object for the Plugin is not always created. Instead the same object is reused. So if you have initialized a class level variable at the start and not in the Execute method, it will be initialized only once at the start and there after for subsequent calls the plugin will reuse the last value stored in the variables much like the static variables.

An example of this would be

public class MyPlugIn : IPlugin
   {
      ICrmService _service = null;
      Bool _myBool = false;

public void Execute(IPluginExecutionContext context)
   {
       //Check if particular field contains data then set the _myBool as true
   {
       _myBool = true;
   }
      //Update record with _myBool Field.
   }
   }

_mybool is initialized to be false only once at the start. If for some execution the condition succeeds and the value is set to true. The next call to this plugin would use the _mybool value as true by default not initialize it to false.

This behavior can be replicated using the Bulk Edit feature of Dynamics CRM. If you have a plugin registered for the Update method and you use the Bulk Edit feature to update multiple records at one go, the plugin would fire for each of the records modified but the _mybool variable will only be initialized once.

It would be advisable to ensure that class level variables are initialized in the Execute method each time.

Workflow Issues:

If you happen to declare the ICrmService variable at class level in a workflow assembly and make a call to that assembly in step 1 of the workflow and have step 2 that performs another action in the same workflow, the workflow would go into Waiting and not close with a completed or failed status.

The Workflow error message will display the following error for the Workflow job.

Workflow paused due to error: Unhandled Exception: System.Workflow.Runtime.Hosting.PersistenceException: Type 'Inogic' in Assembly 'Inogic, Version=1.0.0.0, Culture=neutral, PublicKeyToken=null' is not marked as serializable. at System.Workflow.Runtime.WorkflowExecutor.Persist(Activity dynamicActivity, Boolean unlock, Boolean needsCompensation) at System.Workflow.Runtime.WorkflowExecutor.System.Workflow.ComponentModel.IWorkflowCoreRuntime.PersistInstanceState(Activity activity) at System.Workflow.ComponentModel.Activity.MarkClosed() at System.Workflow.ComponentModel.Activity.MarkCompleted() at System.Workflow.ComponentModel.ActivityExecutionContext.CloseActivity() at System.Workflow.ComponentModel.ActivityExecutorOperation.Run(IWorkflowCoreRuntime workflowCoreRuntime) at System.Workflow.Runtime.Scheduler.Run() Inner Exception: System.Runtime.Serialization.SerializationException: Type 'Inogic' in Assembly 'Inogic, Version=1.0.0.0, Culture=neutral, PublicKeyToken=null' is not marked as serializable. at System.Runtime.Serialization.FormatterServices.InternalGetSerializableMembers(RuntimeType type) at System.Runtime.Serialization.FormatterServices.GetSerializableMembers(Type type, StreamingContext context) at System.Runtime.Serialization.Formatters.Binary.WriteObjectInfo.InitMemberInfo() at System.Runtime.Serialization.Formatters.Binary.WriteObjectInfo.InitSerialize(Object obj, ISurrogateSelector surrogateSelector, StreamingContext context, SerObjectInfoInit serObjectInfoInit, IFormatterConverter converter, ObjectWriter objectWriter) at System.Runtime.Serialization.Formatters.Binary.WriteObjectInfo.Serialize(Object obj, ISurrogateSelector surrogateSelector, StreamingContext context, SerObjectInfoInit serObjectInfoInit, IFormatterConverter converter, ObjectWriter objectWriter) at System.Runtime.Serialization.Formatters.Binary.ObjectWriter.Serialize(Object graph, Header[] inHeaders, __BinaryWriter serWriter, Boolean fCheck) at System.Runtime.Serialization.Formatters.Binary.BinaryFormatter.Serialize(Stream serializationStream, Object graph, Header[] headers, Boolean fCheck) at System.Runtime.Serialization.Formatters.Binary.BinaryFormatter.Serialize(Stream serializationStream, Object graph) at System.Workflow.ComponentModel.Activity.Save(Stream stream, IFormatter formatter) at System.Workflow.ComponentModel.Activity.Save(Stream stream) at System.Workflow.Runtime.Hosting.WorkflowPersistenceService.GetDefaultSerializedForm(Activity activity) at Microsoft.Crm.Workflow.CrmWorkflowPersistenceService.SaveWorkflowInstanceState(Activity rootActivity, Boolean unlock) at System.Workflow.Runtime.WorkflowExecutor.Persist(Activity dynamicActivity, Boolean unlock, Boolean needsCompensation)

This is again because of the declaration of the CRM service object at the class level. The variable is not released after the completion of job if the variable is defined at class level and hence conflicts with the steps that follow in the same workflow job.

[CrmWorkflowActivity("Customer Search")]
Public partial class CustomerSearch: Activity
{
public static ICrmService crmservice = null; // or make it as function level reference
…… Execute(…….) { }
………..
}

Moving the ICrmService object declaration from Class level to the Execute method ensure that the object is released upon the completion of the job.

protected override ActivityExecutionStatus Execute(ActivityExecutionContext executionContext)
{
ICrmService crmservice = null;
Processing…..
}

hopefully this solution will help you to avoid custom WF error. Any feedback on this blog is commendable.

Wednesday, October 20, 2010

Multiple Form Layouts for a single entity in CRM 2011

Another of CRM 4 shortcomings covered in CRM 2011.

There is often a request to have certain fields available/shown to only a certain set of users based on their security role. CRM 2011 have brought in field level security but it has also added the concept of designing multiple forms for a single entity.

While in CRM 4.0 requests for hiding or displaying a field was taken care of through scripting, this is now available in CRM 2011 as a feature. You can create multiple forms and then assign a particular form to a certain security role.

You can create a new form by choosing the Main Form option


Design the form as required and then assign security role to the form


Note: You can notice the checkbox shown on this form at bottom “Enabled for fallback”. This notifies that the form will be shown to the users with roles which did not have any form explicitly assigned for them. There will always be one form that has this option enabled.


If a user has different roles as a result of which there are multiple forms for an entity that can be used by the user, the form that gets displayed by defult depends on the order provided for the forms.


The default form displayed can be changed by the user who has access to more than one form layout by choosing the appropriate form from the Form Navigator. The form last chosen is recorded as the form to be used by the user for the next time.


Note each individual form supports its layout and is independent of the other form layouts. Changes done to the form like left navigation, header, footer, body changes will get applied to individual form only.

Check back with us soon for more features to be explained…

Monday, October 18, 2010

How to Show address using Bing Map in CRM 2011?

CRM 2011 provides a different feature to use java script as compared to CRM 4. In CRM 2011 you cannot write script directly in form event. Here they have provided a facility to create form library where you can write your own java script function. Only after creating a form library user will be able to call the function on form or field event.

To use the script on field or form event you will need to add a event handler, where you can specify the web resource library file and function name.

Follow the steps to create a form library file as shown below in the Screen shot.

• Click on Add button to add new form library


• You can add existing web resource or can add new web resource. Fill the details as below screen shot. To add the script click on Text Editor button and write the script.


• To use this function on Form load event you need to add event Handler and write the function as below screen shot.

• Select the library name in which you have write the script function and function name as below screen shot.

• Now save and publish the entity.

Note: if user is doing any modification on form library file then you need to go to web resource and select file and Publish it.

When you will open records, the Bing map will plot location in map.

Hope this help to understand how to use Bing map in CRM 2011.

Wednesday, October 6, 2010

Unveiling CRM 2011 features

Blog – 2: CRM 2011 features continued…
Welcome back! and we are pleased again to share some more CRM 2011 features with you.

Document Management

This provides the ability to integrate SharePoint site with CRM. By using this feature you can store the documents related to CRM in SharePoint and to manage this documents from within CRM itself. It also provides ability to create folder automatically but it needs SharePoint Server 2010 site and base site collection, this site hosted must have the Microsoft Dynamics CRM List component installed.

Goals

CRM 4.0 had the concept of defining a quota for the sales people but this was more of an information only kind of an area. There was no actual calculation or evaluation being performed behind the scenes to evaluate the sales person performance.

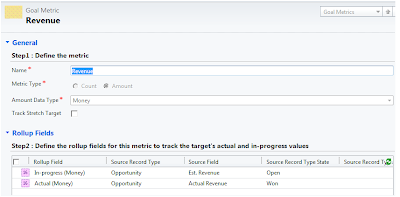
Now you can specify the goals for the fiscal quarter, fiscal year or for custom defined period. You can specify the timeframe and target at Goal level and criteria can be specified at Goal Metric level. Goal Metric holds the Actual and In Progress details. To calculate the actual value of the goal you can provide goal criteria. Similarly you can provide details for In Progress condition, for instance currently active but not yet completed. Check below example for more details,

We specified Goal for Quarter 3. Target is to meet the amount total as $325,000.00. Now here we specified the Time frame and Target.

Now goal Metric “Revenue” will provide details on criteria’s,

In Goal Metric you can specify is it the Count/Amount type of metric? The Rollup Fields section specifies criteria’s,
- First criteria for In-Progress: for calculation purpose use field “Est. Revenue” and for condition status = Open
- Second criteria for Actual: for calculation purpose use field “Actual Revenue” and for condition status = Won


This has given the scope to the users to define the Goals that need to be monitored. It need not necessarily be Revenue Goals, you could also define Goals for the Sales rep based on the number of cases resolved…

CRM 2011 has brought out a lot of other changes and we are still into exploring them in detail.
We will post again with some more exciting details on CRM 2011 soon in our next blog …

Monday, October 4, 2010

Exploring the new CRM 2011

Finally! We are rolling into the much awaited beta version of CRM 2011.While we are still exploring its new features; we are pleased to share some great features. You can find some of these new useful features of CRM 2011 listed below.

- Ability to create a custom Activity type
- Dynamic Marketing List
- Bulk Delete feature
- Recurring Appointment
- Auditing feature
- Document management feature that can be integrated with SharePoint
- Goal Feature
- Rollup

New activity Type

Now you can create new type of activity: ‘message’ like shown in below screen shot.


Dynamic Marketing List

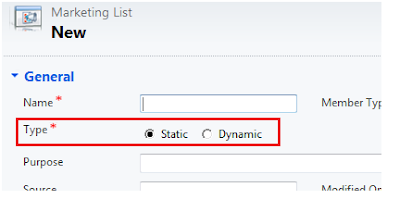
As the name suggests, it is a Marketing List which holds the members that can be added or removed dynamically. For this MS provides an ability to associate user query with the marketing list and the members are identified based on the query results.

For a Dynamic marketing list, you can specify a query that is evaluated to populate the updated list of members each time you open the marketing list.
Under Static, the members in the marketing list will change only when you manually add or remove members from the marketing list.


Bulk Delete

To relieve us of the trouble of manual deletion of records, finally we have the ability to delete multiple records using Bulk deletion wizard. The feature was earlier provided in CRM 4.0 live but not in on-premise version. Now it is included in CRM 2011 on-premise as well. Here you need to specify the criteria for an entity. The records found in specified criteria will be deleted from system. Also CRM provides ability to schedule this Job so it periodically runs and deletes the records automatically.

Recurring Appointment

Now you can create appointment which will be scheduled recursively as in MS outlook.
Example: Creating appointments for services in calendar on a periodic interval (recurrence)
You can specify the recurrence duration. The recurring appointments are created in the system immediately. If you edit a recurrence the existing appointments already created for this schedule is altered accordingly.


Auditing

Auditing Data featured in CRM 2011 provides you the ability to audit multiple entities. When you enable auditing, you can keep a track of the changes done to a particular record, a particular field, or by a particular user. This will also create logs for the changes that are tracked. By default system tracks all fields, but if needed you can specify which attributes to use for auditing.


CRM 2011 has brought out a lot of other changes and we are still into exploring them in detail.
We will post again with some more exciting details on CRM 2011 soon in our next blog 2…

Friday, August 6, 2010

Odd/Even Page Header/Footer using SRS Reports

There have been times where you need to provide a different header on one page and another on the second page or say every alternate page. This concept has been provided in MS Word, where you are allowed to setup a Odd Page Header and an Even Page Header. Should you want to incorporate this same feature in your Reports designed using SRS Reports, there is no easy way out as setting up a odd page header and an even page header.

To set up an Odd/Even page header in SRS Reports, you can make use of the Global Field Page Number. This field auto-sets the Page Number depending on the page on which the control is placed for reading the page number.

Say you want a separate image or text to be displayed on odd and even pages, you can place both the text and images on the header section of the report. You can then set the visibility property of the controls to conditionally evaluate the Page Number and display the control only if the condition evaluates to true.

Wednesday, July 28, 2010

XRM sdk de-mystified

Well, it has been a while now since the XRM sdk is out and we have been exploring it.

XRM sdk does make programming a lot more easier and most certainly there are a lot fewer lines of code that need to be written.

With the CrmSvUtil tool you can generate the classes for all the custom entities and customizations that you may have added to you CRM system and this allows you to use strongly typed entity classes instead of the use of Dynamic Entities in the earlier version of the SDK. And this then does away with the need to add Web service reference to your applications.

List of customizations supported by the XRM platform.

1. You can develop custom portal applications that run externally and access CRM data.

2. You can develop custom pages that are called from sitemap and ISV from within CRM. For this you need to copy the following files to GAC

Microsoft.Xrm.Client
Microsoft.Xrm.Portal
Microsoft.Xrm.Portal.Files
Once these files are copied in GAC, your custom pages work just as usual.

3. Support for IFD – In case of pages that were designed to be accessible through CRM IFD access as well, it was earlier required to have the CRM connection created in the context of the impersonator.

Code blocks in this case were executed within the context of “using cmimpersonator()”. The same can be applied for code written using the XRM SDK and these are then available for use in the IFD environment as well.

4. You can use XRM SDK to write code within Workflows as well. The XRMDataContext accepts IWorkflow plugin context as a parameter for establishing CRM connection.

5. However, for reasons knows to MS alone, support for XRM code to be used with plugins has not been provided. This delays the acceptance of XRM sdk as the tool for CRM development.

6. XRM SDK is basically a kind of data layer access to CRM and hence it only provides functionality related to data access such as Create/Update/Delete/Read. It does not support MetaData Service messages.

7. Though it does provide LINQ functionality to read/retrieve data from CRM, it does not match the capabilities provided by the traditional sdk message to retrieve data. We particularly found an issue when reading the display names of lookups or picklist type of attributes that was easily accessible in earlier versions of the SDK.

Given that reading data is an integral part of CRM development I would really appreciate discussion with regards to the above issues noticed.

All said and done… XRM is a great step towards simplifying development, though further improvements might help a great deal. Perhaps it could be our limited understanding of the XRM sdk that might have us believe so. I would like to open the XRM sdk for discussion through this blog for the benefit of the entire community.

Monday, July 26, 2010

Pre-Image & Post Image Explained !

Plugins in Dynamics CRM, allow you to register images against the steps of a plugin assembly. Images are a way to pass the image of the record that is currently being worked upon prior or after the action has been performed. In general it could be said, it is the image of the record as is available in the SQL backend.

Two types of Images are supported, Pre-Image and Post Image.

In case of Pre-image, you get the image of the record as is stored in the SQL database before the CRM Platform action has been performed.
Post Image, returns the image of the record after the CRM Platform action has been performed.

As developers, you may have at times, received the following error when trying to implement a plugin.


It is there important to understand when the images would be available and what state of the record would be returned in these images.

Say you were to register a “Pre-Image” for a plugin registered in Pre-Create Stage. We just mentioned above, that the image is a copy of the record as is stored in the SQL backend. Since this is the create stage and the record has not even been created as yet, there is no record in the SQL backend that can be returned in the Pre-Image and hence any call for the image would fail with the above error message.

The following table explains the Pre-Image Availability


The following table explains the Post-Image Availability


Hope this help demystify the Images..

Thursday, July 22, 2010

How to display fixed number of rows in a table using SRS Report

There are times when you would like to restrict the number of rows that are being displayed on one page in a table. By default if you add a table to a report and set the datasource to a dataset, it will list out all the rows of the dataset in there and if the table data exceeds the report page then it moves to the next page.
Suppose now you want to make sure that there should be note more than 3 rows on each page in the table, you can achieve this by making the following changes to your report.
Say the default query being used to retrieve data is the following

SELECT productdescription, quantity, priceperunit, extendedamount FROM FilteredQuoteDetail

And it will display the following result set.


To fix the rows of the page you need to change the Query to create a custom column in the query that you can use for grouping the rows on a page. Lets call that the page number for each of the record.
We have used the Row_Number() function to group the rows so that there are only 3 rows on each page.

SELECT productdescription, quantity, priceperunit, extendedamount, page = (CASE WHEN (Row_Number()
OVER (ORDER BY productdescription) % 3 = 0) THEN (Row_Number() OVER (ORDER BY productdescription) / 3) - 1 ELSE (Row_Number() OVER (ORDER BY productdescription)
/ 3) END)
FROM FilteredQuoteDetail


It displays the following result set.


Now you need to add the list the on the report page and Group this list by the page column as shown in the below screenshot.


Now add the table under this list. As shown in the below screenshot.


Now you run this report then data display in 2 pages.

There you are!!!