Showing posts with label Polaris. Show all posts

Wednesday, May 8, 2013

Problem Importing UR12 customizations with Web Resources added in a Pre-UR12 environment

With UR12 Microsoft included new fields and dependencies that prevents us from importing a solution exported out of a UR12/Polaris environment to a Pre-UR12 organization. To resolve CRM Team now ships the Down-level utility along with the latest version of the CRM SDK.

We however came across an issue that was apparently not detected by the Down-level tool and had to be resolved manually by editing the customization file.
The situation here was that we had added a web resource on the account entity form. In the latest version the properties window has the following option


  The feature was missing in the earlier version of the install. When you import this solution to an earlier UR, you see the following error


 When we downloaded the log file we found the cause of the error as stated below.


The import file is invalid. XSD validation failed with the following error: 'The element 'parameters' has invalid child element 'ShowInROF'. List of possible elements expected: 'Url, PassParameters, Security, Scrolling, Border, Preload, IsPassword, Height, Width, AltText, SizeType, HorizontalAlignment, VerticalAlignment, Data'.'.


< < < < < ERROR LOCATION > > > > >


< ShowInROF> false< /ShowInROF> < PassParameters> true< /PassParameters> < Security> false< /Security> < Scrolling> auto< /Scrolling> < Border> false< /Border> < /parameters> < /control> < /cell> < /row> < row> < /row> < row> < /row> < row> < /row> < row> < /row> < row> < /row> < row> < /row> < row> < /row> < row> < /row> < row> < /row> < row> < /row> < row> < /row> < row> < /row> < row> < /row> < row> < /row> < row> < /row> < row> < /row> < row> < /row> < row> < /row> < row height="auto"> < /row> < /rows> < /section> < section showlabel="false" showbar="false" IsUserDefined="0" id="{ca3b45e5-5018-4cd2-8a57-c14fe7224449}" name="{ca3b45e5-5018-4cd2-8a57-c14fe7224449}" columns="1" locklevel="0" labelwidth="115" celllabelalignment="Left" celllabelposition="Left"> < labels> < label description="General" languagecode="1033" /> < /labels> < rows> < row> < cell id="{c41a075f-5bfa-433b-85a4-199a613dc642}"> < labels> < label description="Caption" languagecode="1033" /> < /labels> < control id="xxx_name" classid="{4273EDBD-AC1D-40d3-9FB2-095C621B552D}" datafieldname="xxx_name" /> < /cell> < /row> < row> < cell id="{a7d9469b-ac...'."


To resolve this issue we need to extract the solution which we are trying to import to CRM.


Open the customizations.xml file and search for the “<ShowInROF>” parameter, remove these parameter where all you find from that file and save the file.


  After saving the file zip all the files together and import in CRM. This time you can successfully import the solution in CRM.

Hope this saves some time for others with similar issues


Wednesday, April 24, 2013

Show Calendar in workplace post Polaris

This blog post addresses the way one can add Calendar on workplace which was previously available on CRM 2011. This can also be achieved in Polaris following below steps.


1) Click on options under file menu.


2) Then select workplace tab and under workplace check Tools option as shown below


3) Once you save this you will be able to see tools group with calendar in Workplace area as shown below


Now you can also see your daily activities on workplace area as shown below


In addition to this, you can also set calendar as default on the home page. Please follow steps:

1) Click on option under file menu.


2) Select General tab, set Default pane as Workplace and Default tab as Calendar as shown below, and then click Ok.


3) Then you can see calendar as default page when you open CRM for the first time


Hope this article helps!


Wednesday, March 13, 2013

Change the URL of Dynamics CRM provisioned under Office 365


One can now change the URL of Dynamics CRM provisioned under Office 365. This can be done from the login portal under “Admin” section where “manage” option was not previously available.

As shown in the screen below, under Microsoft Dynamics Click on Manage & a new window will open. Here you can change your URL & save the changes. The old url will be in-effective after 24 hours & you won’t be able to access your CRM using old URL. So you need to update your outlook synchronizations, bookmarks or any other related settings.


Now you can launch the CRM with the changed URL.


Hope this article Helps!

Tuesday, February 5, 2013

Use ExecuteMultipleRequest for performance improvement in bulk data load and other operations


 A new request called ExecuteMultipleRequest has been added to the Update rollup 12 for the Bulk Data Load. Using this request, multiple request can be executed with the single server call. The main advantage of this request is that it will definitely improve the performance since in one round trip to the server, it actually posts more than 1 message to be executed. With reduced round trips for each individual request the performance improvement is exponential.

ExecuteMultipleRequest accepts the collection of different request and executes each request in a order they appear in the collection. This request will optionally returns the response of each request or error occurred while executing the request. Each message request in the input collection is processed in a separate database transaction.

Members of ExecuteMultipleRequest:

1.    Requests: It is a collection of message requests to execute.

2.    Settings: It contains settings that define whether execution should continue if an error occurs executing a request and if responses for each message request processed are to be returned.
Below is the example, where different requests like Create/Update are added to ExecuteMultipleRequest collection and submit it for processing in a single round trip.
                    // Create an ExecuteMultipleRequest object.
                    ExecuteMultipleRequest requestWithResults = new ExecuteMultipleRequest()
                    {
                        // Assign settings that define execution behavior: continue on error, return responses.
                        Settings = new ExecuteMultipleSettings()
                        {
                            ContinueOnError = true,
                            ReturnResponses = true
                        },
                        // Create an empty organization request collection.
                        Requests = new OrganizationRequestCollection()
                    };
                   //create account entity
                   Entity accountEntity=new Entity("account");
                   //set name for the account
                   accountEntity.Attributes["name"] = "New Account "+new DateTime();
                   //create CreateRequest object
                   CreateRequest createRequest = new CreateRequest { Target = accountEntity };
                   //add to ExecuteMultipleRequest Collection
                   requestWithResults.Requests.Add(createRequest);
                   //retrieve contact entity
                   Entity contactEntity = _service.Retrieve("contact", new Guid("FC298C3B-2E4F-     E211-9DED-1CC1DE6DAA3E"),                                      new Microsoft.Xrm.Sdk.Query.ColumnSet());
                   //set Business Phone for the contact
                   contactEntity.Attributes["telephone1"]="1234567";
                   //create UpdateRequest
                   UpdateRequest updateRequest = new UpdateRequest { Target = contactEntity };
                   //add to ExecuteMultipleRequest Collection
                   requestWithResults.Requests.Add(updateRequest);
                   // Execute all the requests in the request collection using a single web method call.
                   ExecuteMultipleResponse responseWithResults = (ExecuteMultipleResponse)_service.Execute(requestWithResults);
                        if (responseWithResults.IsFaulted)
                        {
                            // Display the results returned in the responses.
                            foreach (var responseItem in responseWithResults.Responses)
                            {
                                // A valid response.
                                if (responseItem.Response != null) { }
                               
                                // An error has occurred.
                                if (responseItem.Fault != null) { }
                              
                            }
                        }

Members of ExecuteMultpleResponse:

1.    IsFaulted: It can be used  to identify if any of the messages submitted failed. Once you have identified an error you can loop through the response item to read the error description per message failure.

2.    Responses: Indicates the collection of responses.

Note: This request will only work on organizations that have UR12 applied or on Online organizations that have been upgraded to Polaris.


For further read on this, you can also refer to Microsoft CRM SDK documentation on ExceuteMultiple here.


Monday, January 28, 2013

Custom Workflow Activities for Microsoft Dynamics CRM Online

With Polaris it is now possible to register Custom workflow assembly for CRM Online as well. In continuation of our earlier series here where we provided the steps to use the Developer Kit, we have now added the steps to create Workflow activities for CRM Online using the new version of the developer toolkit that is available in the latest SDK and can be downloaded from http://www.microsoft.com/en-in/download/details.aspx?id=24004

To register the workflow in CRM Online follow below steps:

Open the Visual Studio; go to File → New Project → Dynamics CRM → Dynamics CRM 2011 Package and Click Ok. 


After that Connect to Dynamics CRM Server


On click of Ok button the package will open then add a new project to this package. Right click on solution → Add → New Project.


The below window will be pop up to select the project type. Select Dynamics CRM 2011 Workflow Library, give the project name and click Ok.


Once the project is loaded add a Class file for the workflow. To do this right click on project click “Add New Item”.


Select the Class type as Workflow Activity Class. This will generate the Class with the Execute method


You can implement your logic indicated by // TODO: as given in the below screen shot.


Once the logic has been implemented double click on “RegisterFile.crmregister” see below screen.


This will open the below file, here change the IsolationMode to “Sandbox”.


Build the solution and deploy. After that go to CRM and create a Workflow as per your requirement and add the Custom workflow assembly to this workflow as shown in below screen shot.


After adding the assembly activate the workflow. This will activate your workflow and you can check your workflow is running successfully.

Possible Errors during deploying the package:


1.      You may get an error “Plug-in assembly does not contain the required types or assembly content cannot be updated” this is because you may have changed the Class name or assembly name or Default Namespace and this class name or assembly or Default Namespace name has not been updated in the “RegisterFile.crmregister” file. You must update the changes in the “RegisterFile.crmregister” file.
2.      You may also get an error “Error registering plugins and/or workflows. Description name must be specified Parameter name: description”. This is because when we add a new Workflw Activity Class file in the project it will ask for the below assembly information.

 
All the above information are required, if you miss any of the above information you may get an error “Error registering plugins and/or workflows. [Parameter Name] name must be specified Parameter name: [Parameter Name]”


Monday, January 21, 2013

Process - Driven UI Explored

CRM in Cross-Browser has been one of the best improvements. CRM works much faster in Chrome and Fire Fox. So the forms that would take a few seconds to load prior to this update now is like click and its open :)
 

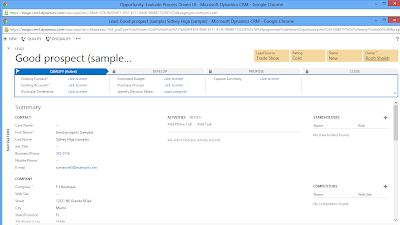
Some of it may have to do with the new Process-Driven UI made available for the Sales and Service Process.
 

What’s with the Process-Driven UI?

The idea is to make the UI more intuitive and process-driven rather than requiring users to create records manually through the sales process as well as reduce the number of clicks and popup forms required.


The top panel includes the milestones defined for the entire lead qualification process. This panel will let you know the progress made and stage at which the current lead is in the sales process.


The process steps are configurable. You can configure the process steps using the Edit Sales Process option in the … menu


The social section of the form has the activities, feeds and notes section incorporated in a single section that can be easily switched between without popups. Ability to quickly add Phone call and Task has been included just like we had the notes section in earlier version where we could just type in to add a new note.


Qualifying a lead is now just a click without any popups again. There is a button added separately for Qualify and Disqualify. Upon qualify it will auto-create Account and Contact depending on the information included in the Lead along with the Opportunity.


Using the Navigation panel you can navigate to the other associated entity grids included in the form. But note you can no longer create a new record for these associated entities from this view. It is just a listing of the associated records that you can click to view but cannot add a new record for that entity like it was in the traditional UI.


Is the Process Driven UI customizable?


Yes. The process-driven form is available under the specific entity. While the earlier forms were called Information, the process-driven form is named by the entity name.

You are open to edit and customize this form to include additional fields/controls. 

New addition is you can now include web resources in the process-driven UI as well as the classic UI and still have the forms open in Read-Optimized mode.


One observation made is, though you are allowed to add script libraries, but if you include one of those you lose the process driven top panel and it is replaced with the ribbon associated with classic form.
 

How to Enable Process Driven UI?

In existing organizations that are being upgraded, Process-Driven UI needs to be manually enabled by the user.
 

This section provides you with the feature to migrate the existing forms to the new UI & enable the new forms

Note: Once the new forms are enabled, it cannot be rolled back or disabled. However the new forms do have an option in the menu to “Switch to Classic forms”.

How to update to polaris ?

Follow the below steps

Step1

Go to the Administration Tab and click on "Product Updates"


Step2

Click on Update button to Update your system to Process-Driven UI. Remember once you Updated to Polaris the changes cannot be rollback.


Step3


Step4

Click on  " Yes "


Step5


Step6    

when you will click on " Migrate customization to the new forms " then the below page appears in new window


Step7

After reading the above page click on Enable the new forms


Simply click on YES and you are ready to explore Polaris ….!


Thanks!