As mentioned in earlier blog Microsoft Dynamics CRM developers can now write custom code from within Visual Studio by using tools and can automatically deploy that code to the CRM from within the visual studio itself. In this part we walk through the development and deployment of Workflow and Web Resources
- Open Visual studio 2010. New Dynamic CRM template will be installed as given in the below screen shot.
The Toolkit supports the create, update, delete and deployment of Workflows (both XAML and custom workflow activities), Silverlight applications and other Web resources including Jscript and HTML.
Create and Deploy a Workflow Library:Use the following procedure to create and deploy a workflow library:
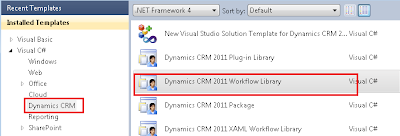
1. Select the Dynamic CRM 2011 Workflow Library project as given in the below screen shot
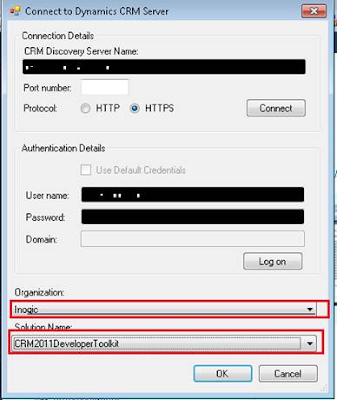
2. User will be prompted for the following information. Specify the login information as well as Organization and the solution where you would like to deploy your components.
3. In the workflow project, right-click the workflow project node and select
Add and then select
New Item.
4. In
Add New Item – Workflow dialog box, in the
Dynamics CRM group of installed templates select the
Workflow Activity Class template as given in the below screen shot.
Enter the
Name of the class you would like to be generated, and then click
Add.
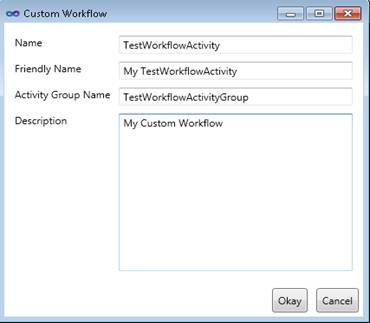
5. In the
Custom Workflow dialog box specify field values for your workflow activity according to the descriptions in the following table.
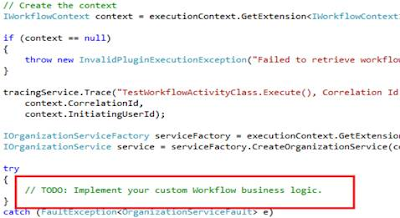
6. Open the generated class and add your custom workflow business logic where indicated by the comment // TODO: Implement your custom Workflow business logic.. as given in the below screen shot.
This action also updates the
RegisterFile.crmregister in the CRM Package project to store the Workflow registration information as given in the below screen shot.

7. In the
Properties of the workflow project, on the
Signing tab, check the
Sign the assembly check box and set the strong name key file of your choice.
At a minimum, you must specify a new key file name and do not protect your key file that uses a password.
8. Right-click the
CRMPackage project and select
Deploy as given below.
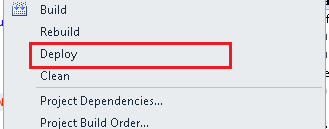
This builds the dependent projects and deploys the workflow activity to the Microsoft Dynamics CRM server. Any subsequent changes to the workflow activity are reflected to the server during the build and deploy process.
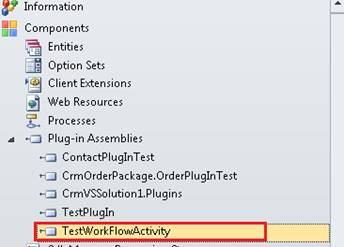
9.Right- The Workflow activity that we have created gets added to the solution as given in the below screen shot.
4)
New Visual Studio Solution Template for Dynamics CRM 2011:When you use the
New Visual Studio Solution Template for Dynamics CRM 2011 project template option to create a new solution, a Silverlight application project is created.
The Developer Toolkit allows for the inclusion of multiple Silverlight application projects. The procedure to add a new Silverlight web resource consists of either adding a new or Silverlight application project or an existing Silverlight XAP file.
To Create and Deploy a New Silverlight Web Resource
1. In the Visual Studio solution explorer, right-click the solution and select
Add and then select
New Project.
2. In the
Add New Project dialog box, select the
Silverlight Application template, specify a name for the project and then click
OK.
3. In the
New Silverlight Application dialog box, clear the
Host Silverlight application in a new Web site check box, and then click OK.
4. In the
CrmPackage project right-click
References and select
Add Reference.
5. In the
Add Reference dialog box, select the
Projects tab and select the Silverlight application project you created. Click
Add to add it to the
Selected projects and components list and then click
OK.
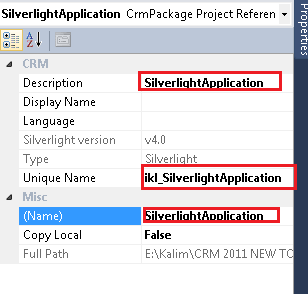
6. Right-click the new reference you added in the previous step and select
Properties.
7. Specify the
Description, Display Name, and
Unique Name properties you want to use when you create the Silverlight web resource as given in the below screen shot
8. When you are ready to deploy your Silverlight web resource, right-click the
CrmPackage project and select
Deploy from the context menu.
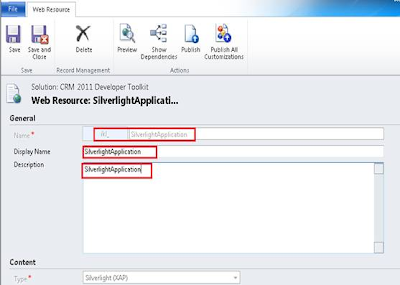
9 The Silverlight Project that we have created gets deployed to the solution as a .XAP file as given in the below screen shot.
To Add and Deploy an Existing Silverlight Web Resource
1. In the
CRMPackage project, right-click the
WebResources folder, and then click
Add Existing Item.
2. In the
Add Existing Item – CrmPackage dialog box, select the XAP file of the Silverlight applications that you want to add.
3. In the
WebResources folder, right-click the Silverlight application, and then click
Properties.
4. In the
Properties, specify the Microsoft Dynamics CRM metadata attributes. This includes the
Description, Display Name, Silverlight version, and
Unique Name, that you want to use when you create the Silverlight Web Resource.
5. To deploy the Silverlight web resource, right-click the
CrmPackage project and select
Deploy from the shortcut menu.
To Add an Existing Silverlight Web Resource to the Project
1. In the
CRM Explorer, expand the
Web Resources folder and the Silverlight (XAP) to select the Silverlight web resource.
2. Right-click the Silverlight web resource and select
Add to Packaging Project from the shortcut menu.
Working with Other Web ResourcesNote : The web resource types other than Silverlight web resources are added to the CrmPackage project.1. In the
CRMPackage project, right-click the
WebResources folder and in the shortcut menu select
Add and then
New Item.
2. In the
Add New Item – CrmPackage dialog box select one of the following file templates:
• HTML Page
• Icon File
• JScript File
• Style Sheet
• XML File
• XSLT File
3. In my case I have added HTML page and Script file. As soon as I completed with adding of these files, these files will be displayed in the CRM package as given in the below screen shot.
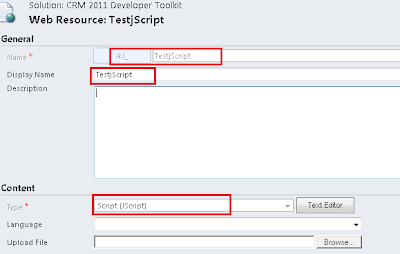
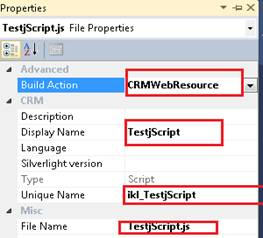
4. In the
Properties, specify the Build Action to “
CRMWebResource” to create web resource on build of the solution. Specify as
Description, Display Name, and
Unique Name properties you want to use when you create the web resource as given in the below screen shot.
5. After adding these web Resource components all will be deployed in the solution as given in the below screen shot