Thursday, February 25, 2010

How to Sort CRM views by more than one attribute

Quite often there stems a need to have the CRM views sorted by more than one column being displayed. Say you would first like to sort accounts by Type followed by City and then by the account name.

Using the CRM view designer, we can only provide the sorting for one column.

You can however achieve this by using CRM shortcut key combination of Ctrl+Shift+Mouse Click on the selected columns of the view.

By default this view is sorted by Account Type.

The Sorting works in the sequence in which the columns are clicked.

Since we are looking for sorting by Type à City à Name

First click on Type column then City and in the end Name. This should then give you the following results.

Hope this makes working with CRM views a lot easier!!!

Thursday, February 11, 2010

Experience with recovering a CRM database marked as SUSPECT

Unfortunately we had our CRM down because the CRM database was marked suspect in SQL. Had a tough time getting it back. Here we share our experience and the steps/commands that helped us get our system back up and running. These may not be the only way of fixing it and perhaps not everyone’s problem would be solved by following these but I hope some of the points below would perhaps get you closer to retrieving your data back.

- Stop the SQL server service.
- Go to Physical location of the suspected database and rename the database.
- Create new database of the same name to suspected database name.
- Remove the newly created database after this rename suspected database to original suspected database name
- Start the SQL server service.
- Open SQL server Management Studio and find “new Query”
- Click on new query , new command window will be open.(See below the screen)


- Select the master database.
- After that in command window type below the statements
o ALTER DATABASE SET EMERGENCY
o ALTER DATABASE SET SINGLE_USER
o DBCC CheckDB ('', REPAIR_ALLOW_DATA_LOSS) WITH NO_INFOMSGS
o ALTER DATABASE SET MULTI_USER

Once these commands are successfully processed the database would be available. Note that the DBCC statement above may result in some data loss if any part of the data is corrupt. But if you do not have a SQL backup for you to restore then this is the only option you have…
-------------------------------------------------------
Posted by: Inogic
For more information/discussions (documents, sample code snippets, detailed work flow or diagrams),
Please be free to visit the following links or email us:
Web: http://www.inogic.com
Blog: http://inogic.blogspot.com
Email: news@inogic.com
-----------------------------------------------------

Tuesday, February 9, 2010

InoLink: QuickBooks - Dynamics CRM Integration Version 2.0 Released

We have come up with the next version of InoLink: QuickBooks - Dynamics CRM Integration

InoLink: QuickBooks is an integration link developed to integrate QuickBooks with Dynamics CRM. After detailed evaluation of the feedback received over a period of time we have come up with this version.

What’s new in this version?

1. The general look and feel has been vastly improved for seamless integration with Dynamics CRM.

2. Better user experience in terms of use of Ajax for user feedback to processes.

3. Additional feature added to the Promote Account functionality to support the Alternate Contact and multiple address feature of QuickBooks.

4. Ability to unlink existing linked accounts from Dynamics CRM to QuickBooks in case you want to no longer link the two records.

5. It now supports import of QuickBooks product types such as Inventory, Non-Inventory, Services, Other Charges, Inventory Assembly products.

6. Huge changes in the Sales Order/Invoice promote functionality to account for the discount and tax calculations.

7. Ability to associate discount with Discount type of Line items in QuickBooks so that they are taken over to QuickBooks correctly.

8. Once an account is linked to a customer in QuickBooks, ability to calculate tax of the order/invoice based on the Tax % in QuickBooks has been provided.

9. Closes the Sales Order in QuickBooks when an invoice associated with it has been promoted from CRM. This makes sure that promoting invoices from CRM does not leave the Sales Order in QB open.

For detailed information on the features of InoLink: QuickBooks Dynamics CRM Integration click here

Thursday, February 4, 2010

Sharing access in Dynamics CRM

Dynamics CRM has the concept of record ownership. A record can only be owned by single user and not by a team or more than one users. Depending on the security roles defined it is possible to restrict a user to have access to only records owned by them.

However in most practical situation where people work in teams it would be required to allow a group of persons to have access to certain records in addition to the records owned by them. In such case you can use the concept of “Sharing” that is available in Dynamics CRM. Note when you share a record with a group you are only making the record accessible to them and for all other purposes the owner is still the original user and a single user at that.

To share records, first select the records you want to share. On the Actions toolbar, click More Actions, and then click Sharing. As shown in the below screenshot.


When you share a record, you can define the level of permission that you would like to provide the other users with whom you wish to share the record.


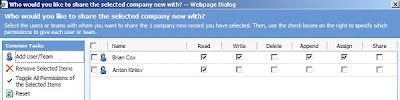
Now in the above screen a record has been shared with Brian giving him all permission to the record except delete. This enables Brian to be able to view this record in the Active Records view and also update the record or create activities for this record.

However Anton can only see the record in his active view. But when he open the record it will be available in read-only mode and he would not be able to make any changes to this record.

Programmatically the sharing is controlled by SecurityPrincipal object. To get a list of users/teams with which a record has been shared you will need to use the RetrieveSharedPrincipalsAndAccess message. This message needs to be provided with the TargetOwned Class. If you provide an instance of an account to this message. It will return an array of PrincipalAccess class that will list out all the users/teams and the level of access of each of these on the entity provided. This message can be excuted using the Execute method of the CRM service class.

Other messages to look out for are
GrantAccessRequest
ModifyAccessRequest
RetrievePrincipalAccessRequest

-------------------------------------------------------
Posted by: Inogic
For more information/discussions (documents, sample code snippets, detailed work flow or diagrams),
Please be free to visit the following links or email us:
Web: http://www.inogic.com
Blog: http://inogic.blogspot.com
Email: news@inogic.com
-----------------------------------------------------

Monday, February 1, 2010

CRM Relationship Behavior (contd) - Cascading rule for Relationship Behavior

We had written on CRM Entity Relationships in one of our earlier post on this blog. To take this further today we would like to discuss the way the settings for the Cascading Rules affect the related entities when an action is performed on the main entity.

Cascading Rules:

Following action can be taken on the parent entity
- Assign
- Delete
- Merge
- Reparent
- Share
- Unshare
The cascading rules let you decide the action to be taken on the child entities when any of the above action is taken on the Parent. This helps you decide how to handle the child entities and if you want them to behave differently than the parent entity.

Say suppose you want Delete the parent entity, what action should be taken for the related child entities. Ideally you may want the child to be deleted along with the parent. But sometimes you may want it otherwise. You want to keep the child entities and delete the association with the Parent. You can define this using the cascading rules.

The following options are available.

Cascade All:
Perform the action on the primary entity as well as related entity.
e.g. if an account is assign to another user from current user then all its related contact will get assigned to the new user.

Cascade None:
Perform the action on the primary entity but not on the related entity.
e.g. if we delete a contact and do not want to delete the activity related to the contact, use Cascade None.

Cascade Active:
Perform the action on the primary entity. Also it performs the action on related entities which are active or open.
e.g. If we delete an account from CRM, using this rule we can avoid the deletion of related invoice and orders.

Cascade User-Owned:
Perform the action on the primary entity. It performs the action on cascade entity only if the related entity has same owner as that of the primary entity.
e.g. We can delete all the contacts related to an account which have the same owner and leave others untouched using this rule.

Remove Link:
Perform the action on the primary entity and remove the link of related entity. Do not perform any action on the related entity.
e.g. If we want to just delete the account and remove the link of account from contact, we can use this rule.

Restrict:
Perform the action only and only if no related entity exists. If any related entity exists the action is cancelled. This rule is applied on “Delete” action only.
e.g. If we don’t want to allow user to delete an account having any contact then we can use this rule to disallow user from performing “Delete” operation.

Understanding the way the relationships work goes a long way in working with Dynamics CRM. It helps you provide simple solutions to seemingly tough tasks.

-------------------------------------------------------
Posted by: Inogic
For more information/discussions (documents, sample code snippets, detailed work flow or diagrams),
Please be free to visit the following links or email us:
Web: http://www.inogic.com
Blog: http://inogic.blogspot.com
Email: news@inogic.com
-----------------------------------------------------