Tuesday, December 27, 2011

Import data now allows you to Create the entities as well

CRM 4.0 made available the feature to import data into CRM using the Import feature. But this was only restricted to importing data in existing entities.


In CRM 2011 this feature has now been extended to go one step further and even create the entity in CRM to hold the data in case an entity for that does not already exist. CRM 2011 also provides us the capability to define the entity attributes as well while importing the data.

Let me explain the step one by one to give the exact understanding of the dynamic concept.

-Click on “Import Data” button


- A dialog to import your CSV data will be displayed as given in the below screen shot.

- After that Dialog to which we want to map the data will be displayed. In that window select the “Create New” as given in the below screen shot. Provide the name for the new entity along with the Primary Field name.
- After that a window to map the attributes to the data will be shown as given below. -For mapping of each column we can create new field as given in the below screen shot. Please make sure to provide mapping for primary field for Ex: in our case “Name”.
- After that a window showing the mapping summary will be displayed as given below.
- After that click on submit button

-After successfully importing the data, you will notice that the custom entity has also been created in CRM. You have to add the fields on the form as it is not implicitly added to the form


Tuesday, December 20, 2011

ODATA Properties and Methods Explored…

Here are some of the ODATA context properties that would help us during debugging and understanding the behavior of the context when performing various operations.
1. DataServiceContext.Entities:
Gets a list of all the records currently being tracked by the DataServiceContext. While using OData service, we frequently get the error that context already tracking the record. With the "Entities" property, we can check total records tracked by context. As well as after adding record to the set, we can check whether context.Entities count increases.

2. DataServiceContext.IgnoreMissingProperties:
Gets or sets whether the properties read from the type must be mapped to properties on the client-side type. Always set this property to true. This helps when say you have downloaded the ODATA reference and developed your application based on that and later there are additional attributes added to the entities. With this property set to True it will ignore the new properties that were added later on and not throw an error regarding missing properties.

3. DataServiceContext.Links:
Gets the collection of all associations or links currently being tracked by the DataServiceContext object which are added using AddRelatedObject, AddLink and SetLink methods.

4. DataServiceContext.AddLink(source, sourceProperty, target):
Adds the specified link to the set of objects the DataServiceContext is tracking. Before adding a link, both source and target must be tracked by context.
Example: context.AddLink(parentRecord, "relationshipName", childRecord);

5. DataServiceContext.SetLink(source, sourceProperty, target):
Notifies the DataServiceContext that a new link exists between the objects specified and that the link is represented by the property specified by the sourceProperty parameter. Before adding a link, both source and target must be tracked by context.
Example: context.AddLink(childRecord, "relationshipName", parentRecord);

6. DataServiceContext.AddRelatedObject(source, sourceProperty, target):
Adds a related object to the context and creates the link that defines the relationship between the two objects in a single request.
Example: context.AddLink(childRecord, "relationshipName", parentRecord);

Note: AddLink and SetLink are very useful methods as using these we can make a compound request (i.e. can add parent and child together). This will only work when your parentLink (a field that is lookup to parent) is not required on child record. When we tried to create an invoice with invoice details, it was giving an error and only invoice header gets created. This is because for Invoice detail, invoiceid is a required field and it cannot be created without and invoice id provided. However this does work in cases, where the child entity can be created independently and the parent entity is not a required attribute in the child entity.


-------------------------------------------------------
Posted by: Inogic
For more information/discussions (documents, sample code snippets, detailed work flow or diagrams),
Please be free to visit the following links or email us:
Web: http://www.inogic.com
Blog: http://inogic.blogspot.com
Email: news@inogic.com
-----------------------------------------------------

Friday, December 16, 2011

Performing CRUD Operations synchronously in CRM 2011 through JSON

Synchronous methods to create, update and delete the records for the Account entity through JSON. These methods works synchronously.

Create Records: To create the record into the CRM, you need to create an object for that record. After that you need to create the object of the XMLHttpRequest and open this request through “POST” method and need to call the send method with this jsonEntity (create from the target record).

function createRecord( ) {
var account = new Object( );
account.Name = "Create Sample";
account.Telephone1 = "555-0123";
account.AccountNumber = "ABCDEFGHIJ";
account.EMailAddress1 = "someone1@example.com";

var jsonEntity = window.JSON.stringify(account);
var createRecordReq = new XMLHttpRequest( );
var ODataPath = Xrm.Page.context.getServerUrl( ) + "/XRMServices/2011/OrganizationData.svc";
createRecordReq.open('POST', ODataPath + "/" + "AccountSet", false);
createRecordReq.setRequestHeader("Accept", "application/json");
createRecordReq.setRequestHeader("Content-Type", "application/json; charset=utf-8");
createRecordReq.send(jsonEntity);

var newRecord = JSON.parse(createRecordReq.responseText).d;
//Alert the Id of the created record
alert("Id is: " + newRecord.AccountId);
}

Update Record: Update record request is same as the create but for the Update we need to set the Additional request header for the Method in the XMLHttpRequest. Here we have added the “MERGE” method. As shown below.
updateRecordReq.setRequestHeader("X-HTTP-Method", "MERGE");

And when we open the request, we need to pass the guid of the record. As given in the below script.

function updateRecord( ) {
var account = Object( );
account.Name = "Update Name of this Account";
var jsonEntity = window.JSON.stringify(account);
var updateRecordReq = new XMLHttpRequest( );
var ODataPath = Xrm.Page.context.getServerUrl( ) + "/XRMServices/2011/OrganizationData.svc";
updateRecordReq.open('POST', ODataPath + "/" + "AccountSet" + "(guid'" + "E72B45B9-58E0-E011-B700-00155D005515" + "')", false);
updateRecordReq.setRequestHeader("Accept", "application/json");
updateRecordReq.setRequestHeader("Content-Type", "application/json; charset=utf-8");
updateRecordReq.setRequestHeader("X-HTTP-Method", "MERGE");
updateRecordReq.send(jsonEntity);

}

Delete Record: This is same as update request but here we need to call the Method delete and call send method with the null parameter.

function deleteRecord( ) {
var deleteRecordReq = new XMLHttpRequest( );
var ODataPath = Xrm.Page.context.getServerUrl( ) + "/XRMServices/2011/OrganizationData.svc";
deleteRecordReq.open('POST', ODataPath + "/" + "AccountSet" + "(guid'" + "E72B45B9-58E0-E011-B700-00155D005515" + "')", false);

deleteRecordReq.setRequestHeader("Accept", "application/json");
deleteRecordReq.setRequestHeader("Content-Type", "application/json; charset=utf-8");
deleteRecordReq.setRequestHeader("X-HTTP-Method", "DELETE");
deleteRecordReq.send(null);

}


-------------------------------------------------------
Posted by: Inogic
For more information/discussions (documents, sample code snippets, detailed work flow or diagrams),
Please be free to visit the following links or email us:
Web: http://www.inogic.com
Blog: http://inogic.blogspot.com
Email: news@inogic.com
-----------------------------------------------------

Tuesday, December 13, 2011

Read records synchronously using JSON in CRM 2011

Common knowledge is that we can make JSON requests through scripts in CRM 2011 to retrieve data from CRM entities. However, the JSON request works asynchronously i.e it does not return the results immediately and the control moves to the next line of code to be executed.

It so happened during one of our development sessions is that we had to write a script to populate the values of some attributes on a form based on the value entered in another form, similar to the usual copy the phone and email once the contact is selected. We had written the JSON code for this but because it executed asynchronously the control would return to the user even before the code execution completed and the phone and email was populated on the form. The user would click on Save and Close and reported an issue that it did not bring over the phone and email…

We can replace JSON with SOAP and get this done. But we thought of getting this done by executing JSON request synchronously now that we already has the code in there to execute the call through JSON.
function retrieveRecordsSynchronously() {

var retrieveRecordsReq = new XMLHttpRequest();
var ODataPath = Xrm.Page.context.getServerUrl() + "/XRMServices/2011/OrganizationData.svc/AccountSet";
retrieveRecordsReq.open('GET', ODataPath, false);
retrieveRecordsReq.setRequestHeader("Accept", "application/json");
retrieveRecordsReq.setRequestHeader("Content-Type", "application/json; charset=utf-8");
retrieveRecordsReq.send(null);
var records = JSON.parse(retrieveRecordsReq.responseText).d;
//Read the first account name
alert('First Account Name is: ' + records.results[0].Name);
}
As given in the above code we need to create the object of the XMLHttpRequest and need to open this request through ‘GET’ method. And after setting the header of this request we need to just call the send Method to send the request, after that we need to parse the response text of the request and from that we can read the results.

We are reading from AccountSet and it returns an array of accounts. Note it would only return 50 results at a time.

Thursday, November 24, 2011

Where are the List Members of a Dynamic Marketing List?

In CRM 4.0 there was no concept of Dynamic Marketing List. We could create only static Marketing lists until CRM 2011. Now in CRM 2011 Microsoft has introduced the concept of Dynamic Marketing list. In Dynamic Marketing List the Marketing List Members are selected based on the critieria that is set for the Marketing lists. This means that each time you open a Marketing list the criteria is evaluated against the current database records and the list of members displayed at runtime based on the results of the query specified.

Recently we were required to read the Members of a Marketing list and while we could get the list of members for the Static Marketing list from the ListMember entitiy of Dynamics CRM. But when you try to look for List Members for a Dynamic List you wont find any results in there. Thats because as stated earlier, the members are added based on the evaluation of the query at runtime.

In case of Dynamic marketing list when we retrieve the Dynamic Marketing List we will get the FetchXML in the “query” field that contains the Fetch XML Query.

In the below given code we have read the Dynamic Marketing List. The query for the Marketing List members is stored as a FetchXML request in the “query” field of the Marketing List entity. For Static marketing List the query attribute would return null value.

We have to execute the query using the FetchExpression as given in the below code.

private void RetrieveMarketingListResult(IAsyncResult result)
{
try
{
//OrganizationResponse Response = ((IOrganizationService)result.AsyncState).EndExecute(result);
//Entity listResponse = (Entity)Response["Entity"];

string fetchXMLQuery = string.Empty;
OrganizationResponse response = ((IOrganizationService)result.AsyncState).EndExecute(result);
EntityCollection results = (EntityCollection)response["EntityCollection"];
StringBuilder sb = new StringBuilder();
foreach (Entity entity in results.Entities)
{

fetchXMLQuery = entity.GetAttributeValue("query");
sb.AppendLine("List Name = " + entity.GetAttributeValue("listname"));
}

FetchExpression query = new FetchExpression()
{
Query=fetchXMLQuery
};

OrganizationRequest request = new OrganizationRequest() { RequestName = "RetrieveMultiple" };

request["Query"] = query;

IOrganizationService service = SilverlightUtility.GetSoapService();

service.BeginExecute(request, new AsyncCallback(RetrieveViesResult), service);

}
catch (Exception ex)
{
this.ReportError(ex);
}
}

After executing the query we would get the collection.

NOTE: There are chances that the results of the FetchXML execution may not match what is actually displayed in CRM UI for a Dynamic Marketing List. One of the reasons is when adding marketing list members CRM only allows active records to be added as members. In case the FetchXML does not explicitly include the criteria for Active records selection the result would return active as well as inactive records. You will need to manually exclude the Inactive records from your execution process.

Friday, November 18, 2011

CRM 2011 Developer ToolKit

As mentioned in earlier blog Microsoft Dynamics CRM developers can now write custom code from within Visual Studio by using tools and can automatically deploy that code to the CRM from within the visual studio itself. In this part we walk through the development and deployment of Workflow and Web Resources

- Open Visual studio 2010. New Dynamic CRM template will be installed as given in the below screen shot.


The Toolkit supports the create, update, delete and deployment of Workflows (both XAML and custom workflow activities), Silverlight applications and other Web resources including Jscript and HTML.

Create and Deploy a Workflow Library:
Use the following procedure to create and deploy a workflow library:
1. Select the Dynamic CRM 2011 Workflow Library project as given in the below screen shot


2. User will be prompted for the following information. Specify the login information as well as Organization and the solution where you would like to deploy your components.


3. In the workflow project, right-click the workflow project node and select Add and then select New Item.
4. In Add New Item – Workflow dialog box, in the Dynamics CRM group of installed templates select the Workflow Activity Class template as given in the below screen shot.


Enter the Name of the class you would like to be generated, and then click Add.
5. In the Custom Workflow dialog box specify field values for your workflow activity according to the descriptions in the following table.


6. Open the generated class and add your custom workflow business logic where indicated by the comment // TODO: Implement your custom Workflow business logic.. as given in the below screen shot.


This action also updates the RegisterFile.crmregister in the CRM Package project to store the Workflow registration information as given in the below screen shot.


7. In the Properties of the workflow project, on the Signing tab, check the Sign the assembly check box and set the strong name key file of your choice.
At a minimum, you must specify a new key file name and do not protect your key file that uses a password.
8. Right-click the CRMPackage project and select Deploy as given below.


This builds the dependent projects and deploys the workflow activity to the Microsoft Dynamics CRM server. Any subsequent changes to the workflow activity are reflected to the server during the build and deploy process.
9.Right- The Workflow activity that we have created gets added to the solution as given in the below screen shot.


4) New Visual Studio Solution Template for Dynamics CRM 2011:
When you use the New Visual Studio Solution Template for Dynamics CRM 2011 project template option to create a new solution, a Silverlight application project is created.
The Developer Toolkit allows for the inclusion of multiple Silverlight application projects. The procedure to add a new Silverlight web resource consists of either adding a new or Silverlight application project or an existing Silverlight XAP file.

To Create and Deploy a New Silverlight Web Resource

1. In the Visual Studio solution explorer, right-click the solution and select Add and then select New Project.
2. In the Add New Project dialog box, select the Silverlight Application template, specify a name for the project and then click OK.
3. In the New Silverlight Application dialog box, clear the Host Silverlight application in a new Web site check box, and then click OK.
4. In the CrmPackage project right-click References and select Add Reference.
5. In the Add Reference dialog box, select the Projects tab and select the Silverlight application project you created. Click Add to add it to the Selected projects and components list and then click OK.
6. Right-click the new reference you added in the previous step and select Properties.
7. Specify the Description, Display Name, and Unique Name properties you want to use when you create the Silverlight web resource as given in the below screen shot


8. When you are ready to deploy your Silverlight web resource, right-click the CrmPackage project and select Deploy from the context menu.
9 The Silverlight Project that we have created gets deployed to the solution as a .XAP file as given in the below screen shot.


To Add and Deploy an Existing Silverlight Web Resource

1. In the CRMPackage project, right-click the WebResources folder, and then click Add Existing Item.
2. In the Add Existing Item – CrmPackage dialog box, select the XAP file of the Silverlight applications that you want to add.
3. In the WebResources folder, right-click the Silverlight application, and then click Properties.
4. In the Properties, specify the Microsoft Dynamics CRM metadata attributes. This includes the Description, Display Name, Silverlight version, and Unique Name, that you want to use when you create the Silverlight Web Resource.
5. To deploy the Silverlight web resource, right-click the CrmPackage project and select Deploy from the shortcut menu.

To Add an Existing Silverlight Web Resource to the Project

1. In the CRM Explorer, expand the Web Resources folder and the Silverlight (XAP) to select the Silverlight web resource.
2. Right-click the Silverlight web resource and select Add to Packaging Project from the shortcut menu.

Working with Other Web Resources

Note : The web resource types other than Silverlight web resources are added to the CrmPackage project.

1. In the CRMPackage project, right-click the WebResources folder and in the shortcut menu select Add and then New Item.
2. In the Add New Item – CrmPackage dialog box select one of the following file templates:

• HTML Page
• Icon File
• JScript File
• Style Sheet
• XML File
• XSLT File

3. In my case I have added HTML page and Script file. As soon as I completed with adding of these files, these files will be displayed in the CRM package as given in the below screen shot.
4. In the Properties, specify the Build Action to “CRMWebResource” to create web resource on build of the solution. Specify as Description, Display Name, and Unique Name properties you want to use when you create the web resource as given in the below screen shot.


5. After adding these web Resource components all will be deployed in the solution as given in the below screen shot

Monday, November 14, 2011

CRM 2011 Developer ToolKit

Recently Microsoft has developed Developer Toolkit for Microsoft Dynamics CRM 2011 that is integrated with Visual Studio to accelerate the development of custom code for Microsoft Dynamics CRM 2011 solutions. Microsoft Dynamics CRM developers can now write custom code from within Visual Studio by using tools and can automatically deploy that code to the CRM from within the visual studio itself.

The Developer toolkit for Microsoft Dynamics CRM 2011 can be downloaded from the Link http://www.microsoft.com/download/en/details.aspx?id=24004

Supporting operating systems are windows7,Windows server 2008.

- After downloading the exe run the crmdevelopertools_installer.msi.
- After successful installation open Visual studio 2010. New Dynamic CRM template will be installed as given in the below screen shot.


The benefits of Developer Toolkit are listed below.

- The Toolkit supports the create, update, delete and deployment of CRM Plug-ins, Workflows (both XAML and custom workflow activities), Silverlight applications and other Web resources including Jscript and HTML.
- Easily generate strongly typed proxy classes without having to run CrmSvcUtil.exe.
- Works with Dynamics CRM Online, On-premise and IFD deployments.

Let me discuss the components one by one

1) Dynamic CRM 2011 Package:1.1) In your new solution, the CrmPackage project is a manifest project that contains all components to be deployed to Microsoft Dynamics CRM combined with their deployment settings. By default, the outputs from each other project are added as references to this project in so that they can be deployed to the server.

So CRMPackage project is required if you want to deploy any component on the CRM server.


1.2) Components are added to the package by adding projects as a reference or by adding components under the WebResources folder.
1.3) The RegisterFile.crmregister contains registration information for plug-ins and custom workflows created by the toolkit. This information is used to register these components during deployment.

2) Plug-in Project:

The Plugins project contains a base class named Plug-in that implements the Microsoft.Xrm.Sdk.IPlugin interface. All plug-in classes generated through the Create Plug-in option of the CRM Explorer will derive from this class. This class simplifies some of the common code that is required by many plug-ins, including the following:

• Obtaining execution context from the service provider.
• Obtaining the tracing service from the service provider.
• Instantiating the Organization Service proxy.

Additionally, the validation method verifies several typical plug-in events and provides a pattern for the developer to extend.

Initially, the derived class’ implementation calls the base class’ implementation before continuing with its own, more specific implementation.

After validating that the plug-in should execute, the base class calls up to the Execute method of the derived class, passing through the execution context and Organization Service proxy.

Use the following procedure to create and deploy a plug-in.

1. Select the Project as given in the below screen shot.


2. User will be prompted for the following information. Specify the login information as well as Organization and the solution where you would like to deploy your components.


3. CRM Explorer is displayed in the visual studio where all the components of the organization specified will be displayed as given in the below screen shot.


locate the entity that you want to create the plug-in for. Right-click the entity and then select Create Plug-in as given in the below screen shot.

User will be prompted for the information’s as given in the below screen shot where we have to give information regarding the events and entity name on which we have to register the Plug-in as given in the below screen shot.


• If the current project already has an existing plug-in assembly registered, you can also use the Add Plug-in shortcut menu option on the existing plug-in assembly and then select the entity you want it to apply to.

4. In the Create Plug-in dialog box, click OK to generate the plug-in code. This action also updates the RegisterFile.crmregister in the CRM Package project to store the plug-in registration information as given in the below screen shot.


5. Open the class that is generated and locate this comment // TODO: Implement your custom Plug-in business logic. Add your custom plug-in business logic to that method.

6. In the Properties of the plug-in project, on the Signing tab, select the Sign the assembly check box and set the strong name key file of your choice.

Deploying your solution

7. Right-click the CRM Package project and select Deploy as given in the below screen shot.


This builds the dependent projects and deploys the plug-in to the Microsoft Dynamics CRM server. any changes to the plug-in are reflected to the server during the build and deploy process.

8) The steps that we have added to the Plug-in gets added to the solution as given in the below screen shot. The Plug-in assembly on which you are currently working displayed in the Green colour.


9) When you click on the any component it will be opened from within the crm Explorer without having need it to open explicitly from browser as given in the below screen shot.

Double click on the entity and it will be opened in your solution itself in separate Tab as given in the below screen shot.


To Add a Step to a Plugin
1. Right-click a plug-in that is part of a plug-in assembly that is included in the current solution and select Add Step.
2. In the Create Plug-in dialog box, configure your step as given in the below screen shot.


Now CRM development made a lot easier.

Tuesday, November 1, 2011

Activity Feeds now available in Dynamics CRM 2011

Microsoft recently released Activity Feeds in its November update of Dynamics CRM Online 2011. These would however automatically be available to only those CRM organizations that one would subscribe to from this point on. For all existing organizations you need to download it from the pinpoint site http://dynamics.pinpoint.microsoft.com/en-IN/applications/microsoft-dynamics-crm-activity-feeds-12884926310

We installed this solution on CRM Online organization but I believe this can also be imported to an On-Premise organization.


It is quick to install and you can get it up and running in a matter of few minutes.


After you import the solution, you would find the following changes to your sitemap
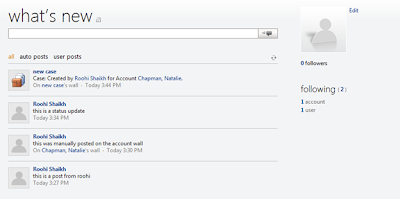
A new option “What’s New” added to the Workplace.


Configuration options in Settings --> System


Lets first configure the entities to start receiving feeds from them.
You need to create a new Post configuration record through the Activity Feeds Configuration option. You need to create one record each for each entity that you want to setup for Activity Feeds.

In the entity name you need to enter the CRM entity logical name. So instead of Case, you would enter incident.


After you click on Save, you will find the Rules auto-created for this entity. I understand that these rules are predefined and there is no option to create a new rule. Also these rules are only available for certain entities. When I create a record for account entity, no rules were created for them.


For this configuration to take effect, you need to click on the All Customizations ribbon button. This will publish the entity customization for the set entity.


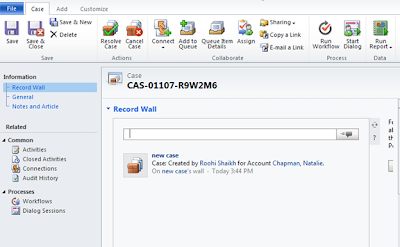
In our case, when we click on the All Customizations, it will modify the Case entity form to add the Record Wall.


If you have multiple forms designed for an entity, the publish fails.


You need to then manually add the tab for Record Wall. Instructions for these are provided here http://help.crm.dynamics.com/help/5.0.9688.1531/1033/LIVE/content/source_af_add_record_walls.htm
Once an entity is set up for activity feeds, you can then open any record for that particular entity and click on Follow to start receiving updates for that record.


Any updates to the record wall of the records that you choose to follow would be displayed to you on your Personal Wall.


With the auto-feed rules automatically created for the case entity, each time a new case is created or any of the actions on the case is performed that is being tracked by the activities feed, an update would automatically be posted for the Case on the its wall and would also be reflected on the wall of the users that follow that record.

You can also follow the feeds of another user. For this you need to open the User record and then click the follow button on the user record wall to start receiving updates posted by that user.


You are now set to collaborate in CRM on different CRM entities including custom entities!


To make the wall available on Custom entity you need to create a record in the Post configuration for the custom entity. In the entity name type the schema name of the custom entity and check the Enable walls checkbox.


Make sure you publish this custom entity after creating the configuration record.

Monday, October 31, 2011

Team Ownership now available in CRM 2011

In CRM, an entity could be designed to be User Owned or Organization owned. The User Owned ownership setting has now been changed in CRM 2011 to be User or Team Owned. This means that you can now assign a record to either a Team or an individual owner.

Let us now explore the behavior of records owned by a Team.

Using the Assign option you can now assign to a user or a Team.


Earlier you could only select a user.


In CRM 2011, you can define Teams and also assign Roles to the team. With each team, a Queue specific to the team is also created alongside.

The security role permission level has also been modified to accommodate the concept of Team. The user level permission now also extends to the team. This means that a user with user level permission can now work on records owned by themselves as well those that is owned by the team to which they belong.


The one that gives higher/maximum permission is applied to the user. Say a user does not have permission to invoice module. But the team to which they belong have the permission to Create/Read/Write user level invoice records, an Invoice assigned to the Team would be visible to the user.

All users of a team would have access to the record assigned to the Team.

With the concept of Team they have tried to reduce the need to Share the records. Earlier if you needed to provide another user access to a record owned by you, you had to share the record with them. Now if they are part of your team they have access to your records.

To explain technically, a new attribute Owning Team has now been added to each User/Team Owned entity. The OwningTeam will store the name of the Team if it has been assigned to a Team.


You can now programmatically assign Team to a record using the Assign Request. You can check here for the code. http://msdn.microsoft.com/en-us/library/gg327897.aspx

Tuesday, October 18, 2011

Enable Scripts on Bulk Edit form in CRM 2011

CRM 2011 includes the feature to enable script on the bulk edit form. By default the scripts are disabled for bulk edit forms.

To enable the script for Bulk edit forms check the below syntax

<event
active=["0" "1" "true" "false"]
application=["0" "1" "true" "false"]
attribute="String"
BehaviorInBulkEditForm="String"
eventType=["DataEvent" "ControlEvent"]
name="String">
<dependencies />
<Handlers />
<InternalHandlers />
</event>

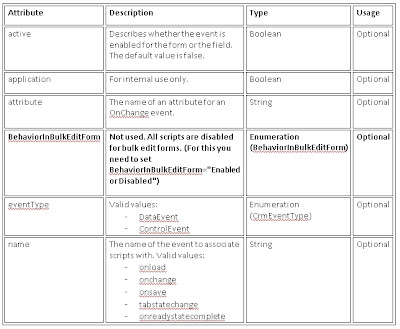
See below detailed descriptions for the attributes.


Steps to enable the script on bulk edit form:
- Include the entity for which you would like to enable the bulk edit script and export the solution.
- Open the customization.xml
- Add BehaviorInBulkEditForm="Enabled" to the event handlers as shown below


<event name="onload" application="false" active="false" BehaviorInBulkEditForm="Enabled" >
<event name="onsave" application="false" active="false" BehaviorInBulkEditForm="Enabled" >

- Save and Import the solution, publish it.
- Now your script will work on bulk edit form.

This way you can let your users use bulk edit freely with your custom script also executing just fine. Earlier, usually if there was custom business logic to be performed plugins were advised as it would allow the custom business logic to be executed for all records that were edited through Bulk Edit.

Friday, October 14, 2011

Different operators used with workflow

There are six different operators used in e workflow.

1. Set to: This operator is used to set value of the field of any data type.


2. Append with: This operator can only be used with text field. It will append specified field's value or the default value to the existing value. This operator has introduced in CRM 5.


3. Clear: This operator can be used with all data types. This will clear the field's value.


4. Increment by: This operator can only be used with decimal fields. This will increment the existing value with the specified field's value or default value.
5. Decrement by: This operator can only be used with decimal fields. This will decrement the existing value with the specified field's value or default value.
6. Multiply by: This operator can only be used with decimal fields. This will multiply the existing value with the specified field's value or default value.


Bulk or Mass edit is the great feature in CRM that allows us to edit multiple records at a time. But it will only allows us to set the value, we cannot perform above operations in bulk edit. With the help of workflows, we can perform above operations on multiple records.