Monday, November 30, 2009

Unable to connect to the remote server Error

“Unable to connect to the remote server Error”, this error occurs because the connection is lost with the server. When you make authenticated calls, the client opens the connection and then closes it as well. The connection is not re-used. If you make such calls repeatedly to the server, all available connections get exhausted. This can be fixed by modifying one of the TCP/IP parameters to increase the # of connections available. You would also need to insert a delay in your code using the Sleep statement to reduce the number of calls that are being made repeated to the server.

Solution:


1. Open registry editor.


2. Go to the following directory path to navigate to the registry key: “HKEY_LOCAL_MACHINE\SYSTEM\CurrentControlSet\Services\Tcpip\Parameters”

3. Look for the TcpTimedWaitDelay key name. If not found, add it by selecting Edit > New > DWORD Value from the menu bar. Rename the key name to “TcpTimedWaitDelay”. (see below the screen)


4. Double-click inside the right pane again to set the value of TcpTimedWaitDelay. Select Decimal as the Base, and enter 30 in the Value data field.(see same as below the screen)

5. Look the MaxUserPort key name. If not found, add it by selecting Edit > New > DWORD Value from the menu bar named “MaxUserPort”. Set its value to a decimal value between 5000 and 65534


6. You must restart Windows for these settings to take effect

Sunday, November 29, 2009

How to Track the Next Action and Last Touch dates on Account

Quite often you need to monitor and have workflows designed based on the "Last Touch Date" or the "Next Action" date. While the former should reflect the last interaction made with the customer, the later is to keep track of the next upcoming interaction with the customer.

End users often believe the Modified date reflected on the Account form, is the "Last Touch Date". Well, that is not true. The Modified date on the Account Form is only updated when any changes are made directly to any of the attributes on the account form. Even adding of a note to the account does not update the "Modified Date". To track the true "Last Touch date", you would require to write a custom plugin or perhaps a Workflow could do the job as well.

How to track "Last Touch Date" using Workflow.

You need to trap the create/update/status change events of all the activities that you need to track for an account. Assuming that we would set the regarding to Account for each activity that we create.

1. New Worklow - Set the entity as Appointment - Event Create, Update and Status change


2. Add step to Update entity as shown as below screenshot.

3. Choose Regarding(Account) as shown as below screenshot.


4. Select custom date attribute for tracking "Last touch" set date = Workflow execution as shown in the below screenshot.

How to track "Last Touch Date"/Next Action Date using Plugins.

You need to write Plugin to trap the create/update/chnage status events of the activities. In the Post event, read the account associated with the activity and update the "Last Touch Date" with today's date.

For the next action date, in each of these events, you need to read the account associated with the activity. Using the RollupActivitiesforAccount “TargetRollupActivityPointerByAccount” you can get the next due activity and update the "Next Action Date" to this date.

You receive an Sql Error when Importing Customizations

You may come across the following error when you try to import the customizations for an entity that already exists in the system.

This error is often a result of data type mismatch between the attributes in the new customization file being imported and the entity attributes already defined in CRM. Say for example an entity has an attirbute of the type picklist in CRM. However the same attribute is now defined to be of the data type int in the new customization file that needs to be imported. CRM allows for onyl unique attribute names. Now since it already has an attribute of the same name but a different data type it cannot overwrite that attribute with the new data type defined in the customization file.

To fix the problem, you need to delete the existing attribute from CRM entity. Publish the entity customizations. Now try to re-import the customization file. It will import without any SQL errors.

Wednesday, November 18, 2009

Tips on using Mail Merge Functionality in Dynamics CRM

Like most Contact Managers, Dynamics CRM too provides the Mail Merge ability. Recently we spent quite some time trying this out and we would like to share some of the findings that I am sure would assist other beginners in this area

1. Mail Merge functionality has been added as a privilege and so only users with the necessary privileges would be allowed to perform a mail merge. Mail merge is also available through the Web interface.

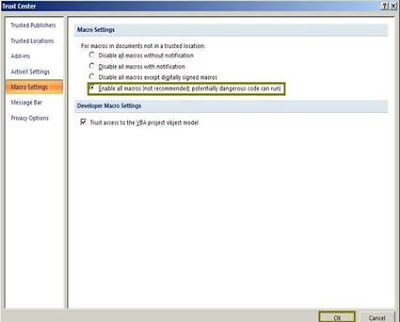
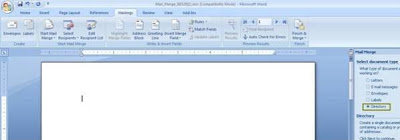
2. When the Mail merge process opens the Microsoft Word window to allow for designing of the Template make sure of the following

a. Enable Macros


b. Make sure the CRM addin is enabled and you have to click on this for the CRM mail merge to begin.
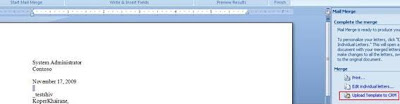
3. Though Mail merge can be used from Web interface as well, having Outlook client installed brings up some additional features like ability to “Upload” the mail merge template directly to CRM.


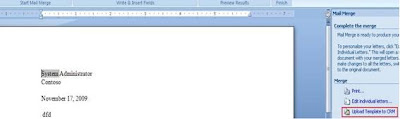
4. There are two ways to upload Mail Merge templates to CRM, one being design the template using the “Create Mailmerge template” button in MS word.

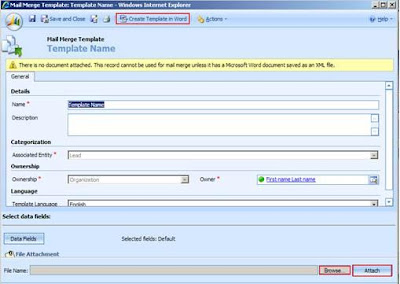
Save the Template file in Microsoft Word XML format.
Attach this document to CRM.
If you had the CRM Outlook client installed and Outlook running, the Word Mail merge wizard would display the “Upload Template” option.


Choosing this would automatically upload the document to CRM.

5. Mail Merge functionality is available for only selected System entities like
· Quote
· Lead
· Opportunity
· Account
but all custom entities are available for selection for Mail Merge

6. Only for the Quote entity would you find the “Related Products” entity in the data fields selection window.

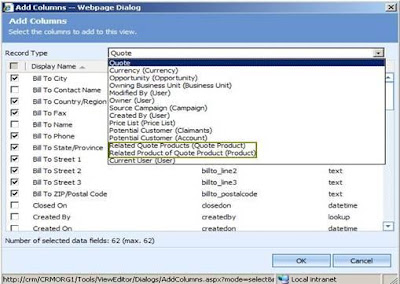
No other one-to-many relations of any entity would be available for mail merge. However all lookup attributes would have their related entities available for selection in the data fields.

7. To design a mail merge template that lists out all the exported entries in a single document instead of creating one document per exported line of data choose the Mail Merge type to be “Directory”.


After you insert the mail merge fields and click on preview, it would still display each record on a separate page. To check the results as a list in a document, complete the merge and export the merge to another document to see the entire list in a single document.

Wednesday, November 11, 2009

Issues with deleting a picklist option from a Picklist attribute

CRM allows you to add/update/delete the picklist options of a picklist attribute. However, like most other contact managers that store the text/reference of the deleted picklist option in the records where it had been used, CRM does not store the reference. It differs in this regard. Once a picklist option has been deleted, all existing records that had used this value would be reset to “Default Value”.

While checking out the picklist option sequencing in detail to explain it to our customer we found that CRM by default will always bring back the value of the deleted option.

Here we take an example of Contact record and “Lead Source” picklist attribute.

1. We have added a pick list value with name “Test” in lead source picklist.

2. Now we have selected the test option in a contact record.

3. Now we go ahead and delete the “Test” option from “Lead Source”..

4. If you go back to the contact record that had this value assigned to it, it would now have been reset to “Default Value”


Now unless you save this record, it would automatically get the next option that you add with the same “Value”.

Another point worth mentioning is that if you had deleted one of the picklist options and published the customizations, the next time you add a new option to this picklist it would bring back the value of the deleted option. The value is editable in CRM 4.0 so make sure you change this value unless you were adding this as a replacement to the earlier deleted option.


Now we have deleted the test and publish the entity.

In below screen shot we are adding a another picklist option “Test123”, it will bring up the same value as that of “Test” the deleted option.


Now even if we edit the value and set it to say 200002, any further options that you add do not increment automatically to use the next sequence number i.e 200003 but rather would still bring up 200000 as the value by default for every new option that you add hence forth.

I am not sure if this is a feature or a bug, but I would rather have preferred it remember the last sequence number assigned and increment it from there on.