Wednesday, January 30, 2013

Supported ways of accessing URL addressable Forms/Reports Scripts.

While using CRM there may be conditions in which user wants to open forms and reports programmatically. For this we can write the scripts which will open the forms and reports.
Open CRM forms using script:
The form can be open using openEntityForm(); method.
          Syntax :  Xrm.Utility.openEntityForm(name,id,parameter);
 
Parameters :
 
Ø  name: (Required ) The logical name of an entity.
 
Ø  id: (Optional) The string representation of a unique identifier or the record to open in the form. If not set, a form to create a new record is opened.
 
Ø  parameters: (Optional) A dictionary object that passes extra query string parameters to the form. Invalid query string parameters will cause an error.
 
Example:
1.     To Open Blank new entity record :
          Xrm.Utility.openEntityForm("contact");
2.     To Open Existing CRM Form :
    Xrm.Utility.openEntityForm("contact","A85C0252-DF8B-E111-997C-00155D8E4810");
3.  To open Form with default value set using parameter  
 
function OpenNewContact() {
 var parameters = {};
 
//Set the first name of contact to “Scott”
parameters["firstname"] = "Scott";
 
 //Set text in the Description field.
 parameters["description"] = "Description  for this record";
 
//Set the Parent Customer field value to “John”.
 parameters["parentcustomerid"] = "2E862A5A-7D0F-E211-8090-00155D000501";
 parameters["parentcustomeridname"] = " John ";
 parameters["parentcustomeridtype"] = "account";
 
 //Set Do not allow phone to "Do Not Allow".
 parameters["donotphone"] = "1";
 
 // Open the window.
 Xrm.Utility.openEntityForm("contact", null, parameters);
}
 
Open Report using script:
We can also run the report using script. We just have to pass the url to window.open(); method. Below example shows how to open the report.
Syntax : window.open(url);
url need the following parameters:
Ø  action: Two possible values for this parameter are run or filter.
 
·         When run is used, the report will be displayed using the default filters.
·         When filter is used, the report will display a filter that the user can edit before clicking the Run Report button to view the report.
 
Ø  helped:(optional) The value should correspond to the report FileName attribute value.
 
Ø  Id :This parameter is the report ReportId attribute value.
 
Example:
function OpenReport() {
try {
//call function which will return encoded url
var url=getReportURL(filter,AllContacts,'35F560E6-1606-E211-A8FC-00155D000501');
window.open(url);
}
catch(e){
alert("OpenReport  Error >> "+e.description);
}
}
 
//function to create and encode url
function getReportURL(action,fileName,id) {
   var orgUrl = Xrm.Page.context.getClientUrl();
   var reportUrl = orgUrl +
    "/crmreports/viewer/viewer.aspx?action=" +
    encodeURIComponent(action) +
    "&helpID=" +
    encodeURIComponent(fileName) +
    "&id=%7b" +
    encodeURIComponent(id) +
    "%7d";
   return reportUrl;
  }
 

Monday, January 28, 2013

Custom Workflow Activities for Microsoft Dynamics CRM Online

With Polaris it is now possible to register Custom workflow assembly for CRM Online as well. In continuation of our earlier series here where we provided the steps to use the Developer Kit, we have now added the steps to create Workflow activities for CRM Online using the new version of the developer toolkit that is available in the latest SDK and can be downloaded from http://www.microsoft.com/en-in/download/details.aspx?id=24004

To register the workflow in CRM Online follow below steps:

Open the Visual Studio; go to File → New Project → Dynamics CRM → Dynamics CRM 2011 Package and Click Ok. 


After that Connect to Dynamics CRM Server


On click of Ok button the package will open then add a new project to this package. Right click on solution → Add → New Project.


The below window will be pop up to select the project type. Select Dynamics CRM 2011 Workflow Library, give the project name and click Ok.


Once the project is loaded add a Class file for the workflow. To do this right click on project click “Add New Item”.


Select the Class type as Workflow Activity Class. This will generate the Class with the Execute method


You can implement your logic indicated by // TODO: as given in the below screen shot.


Once the logic has been implemented double click on “RegisterFile.crmregister” see below screen.


This will open the below file, here change the IsolationMode to “Sandbox”.


Build the solution and deploy. After that go to CRM and create a Workflow as per your requirement and add the Custom workflow assembly to this workflow as shown in below screen shot.


After adding the assembly activate the workflow. This will activate your workflow and you can check your workflow is running successfully.

Possible Errors during deploying the package:


1.      You may get an error “Plug-in assembly does not contain the required types or assembly content cannot be updated” this is because you may have changed the Class name or assembly name or Default Namespace and this class name or assembly or Default Namespace name has not been updated in the “RegisterFile.crmregister” file. You must update the changes in the “RegisterFile.crmregister” file.
2.      You may also get an error “Error registering plugins and/or workflows. Description name must be specified Parameter name: description”. This is because when we add a new Workflw Activity Class file in the project it will ask for the below assembly information.

 
All the above information are required, if you miss any of the above information you may get an error “Error registering plugins and/or workflows. [Parameter Name] name must be specified Parameter name: [Parameter Name]”


Monday, January 21, 2013

Process - Driven UI Explored

CRM in Cross-Browser has been one of the best improvements. CRM works much faster in Chrome and Fire Fox. So the forms that would take a few seconds to load prior to this update now is like click and its open :)
 

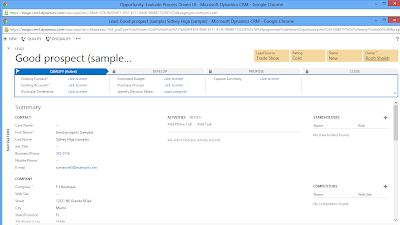
Some of it may have to do with the new Process-Driven UI made available for the Sales and Service Process.
 

What’s with the Process-Driven UI?

The idea is to make the UI more intuitive and process-driven rather than requiring users to create records manually through the sales process as well as reduce the number of clicks and popup forms required.


The top panel includes the milestones defined for the entire lead qualification process. This panel will let you know the progress made and stage at which the current lead is in the sales process.


The process steps are configurable. You can configure the process steps using the Edit Sales Process option in the … menu


The social section of the form has the activities, feeds and notes section incorporated in a single section that can be easily switched between without popups. Ability to quickly add Phone call and Task has been included just like we had the notes section in earlier version where we could just type in to add a new note.


Qualifying a lead is now just a click without any popups again. There is a button added separately for Qualify and Disqualify. Upon qualify it will auto-create Account and Contact depending on the information included in the Lead along with the Opportunity.


Using the Navigation panel you can navigate to the other associated entity grids included in the form. But note you can no longer create a new record for these associated entities from this view. It is just a listing of the associated records that you can click to view but cannot add a new record for that entity like it was in the traditional UI.


Is the Process Driven UI customizable?


Yes. The process-driven form is available under the specific entity. While the earlier forms were called Information, the process-driven form is named by the entity name.

You are open to edit and customize this form to include additional fields/controls. 

New addition is you can now include web resources in the process-driven UI as well as the classic UI and still have the forms open in Read-Optimized mode.


One observation made is, though you are allowed to add script libraries, but if you include one of those you lose the process driven top panel and it is replaced with the ribbon associated with classic form.
 

How to Enable Process Driven UI?

In existing organizations that are being upgraded, Process-Driven UI needs to be manually enabled by the user.
 

This section provides you with the feature to migrate the existing forms to the new UI & enable the new forms

Note: Once the new forms are enabled, it cannot be rolled back or disabled. However the new forms do have an option in the menu to “Switch to Classic forms”.

How to update to polaris ?

Follow the below steps

Step1

Go to the Administration Tab and click on "Product Updates"


Step2

Click on Update button to Update your system to Process-Driven UI. Remember once you Updated to Polaris the changes cannot be rollback.


Step3


Step4

Click on  " Yes "


Step5


Step6    

when you will click on " Migrate customization to the new forms " then the below page appears in new window


Step7

After reading the above page click on Enable the new forms


Simply click on YES and you are ready to explore Polaris ….!


Thanks!

Thursday, January 10, 2013

Maplytics in times of UR12


Native Bing Maps Integration coming in with UR12

UR12 is scheduled for a phased roll out starting next week. With one of the offerings being Bing Maps Integration. This integration is made available as a setting that when activated by the users would show a link to open Bing Maps and automatically plot the address entered on the specified record.

What is Maplytics and why should you want to use it?

Maplytics continues to work towards being a “more than simple” address plotting on the map.  It is a geographical analytics tool. Some of the features supported include
·     Support for all entities that have address fields. You would be able to see any address included on any entity on the Map
·     Map is essentially dependent on Geo-coding data. Maplytics comes bundled with Bing Maps subscription that allows for use of Bing Maps Spatial service that will let you batch Geo-code bulk data. This does away with the need to worry about getting the data Geo-coded.
·      Save geographical search as static Personal Views in CRM
·      Ability to print the route and routing directions using multiple way-points.
·      Maplytics builds upon the inherent Dashboard feature of Dynamics CRM to provide Maplytics Dashboards to provide analytics based on CRM data including Sales
·     Color-coding CRM data plotted on the Map for better analysis and geographic representation of the data
·     Usual mapping solution would include Road View or Aerial View. You can now get a Street View of the address using Maplytics


Who is Maplytics for

Maplytics is still a must-have for business driven by geography and geographic data.

For more information check out the product details here