Sunday, May 29, 2011

How to get the Total Results returned Record Count for a given query

In CRM2011 it is now possible to get the Total count of records returned by a query using Fetch XML.

Using Query expression:

You can set the ReturnTotalRecordCount property to True.


Using FetchXml:

You can set the same property as shown below.

<fetch mapping='logical' count='10' returntotalrecordcount='true'>
<entity name='account'>
<attribute name='accountid' />
<attribute name='accountnumber' />
<attribute name='address1_city' />
<attribute name='address1_telephone1' />
<attribute name='name' />
<order attribute='name' />
<filter>
<condition attribute='address1_city' operator='like' value='a%' />
</filter>
</entity>
</fetch>

This can be helpful to show Record 1 of kind of status labels.

Hope this helps!

Wednesday, May 11, 2011

How to remove the default ISV buttons of CRM 4.0 from CRM 2011 after upgrade

Once you upgrade from CRM 4.0 to CRM 2011, you would find a new menu item ISV showing up in the CRM 2011 menu bar.

You never saw them before in CRM 4.0… that’s because by default CRM disables the showing up of these buttons in CRM 4.0. These buttons come along with CRM 4.0 to display the features and functionality of adding custom button.

Now you see them in CRM 2011 and you want that taken off…

Listed below are the steps to remove these buttons from your system.
- Create new solution which only contain the Application Ribbon component
- Now export this solution and extract the exported zip on your machine
- Open customization.xml file in edit mode
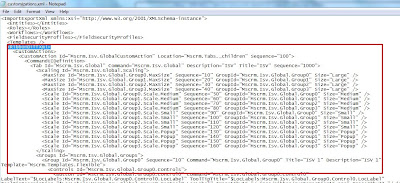
- You will find a similar code as shown below in the customization file


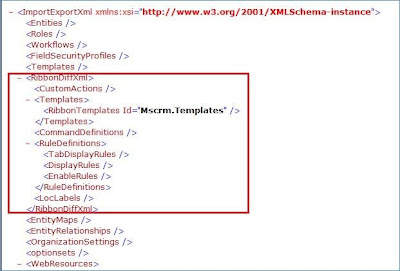
- You need to remove the Custom actions section so that this file now includes only the following nodes.

- Save the customization.xml file. Zip the file and import this customization.
- Refresh CRM to find the Menu items taken off.

Monday, May 2, 2011

How to pass field values to Form

Sometimes you have requirement to open the particular type of new record with some default values already filled. This can be achieved by passing the field values to the query string.

To open the new record form

https://<ServerUrl>/main.aspx?etn=<entity type code>&pagetype=entityrecord

Pass field values as query string parameters

http://<ServerUrl>/main.aspx?etn=<entity type code>&pagetype=entityrecord&extraqs=<fieldschemaname>=<value>

If you need to pass the multiple field values then just append those field-value combination string at the end with the “&” as a separator.

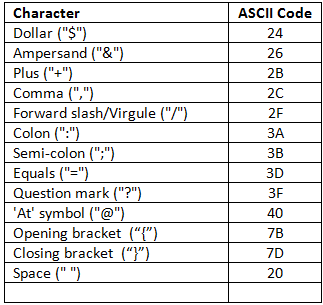
Note while generating the URL you need to take care of some characters. Instead of directly placing the character you need to use the ASCII code for that character. Below table will provide you with the list of mostly used characters while creating URL. You should prefix the “%” character before the ASCII code.


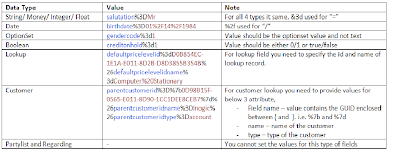
Now below example will give you an idea on how to generate URL for different type of fields, the name of the field (i.e. schema name) must be specified in lower case only.

(Blue is the actual field name and its related attribute name like for lookup there are 2 names and brown is the actual value)

Below is the total URL with all above field values passed to the new contact form,
"http://<ServerName>/main.aspx?etn=contact&pagetype=entityrecord&extraqs=birthdate%3D01%2F14%2F1984%26salutation%3DMr%26gendercode%3d1%26creditonhold%3d1%26defaultpricelevelid%3dD0B854EC-1E1A-E011-8D2B-D8D3855B354B%26defaultpricelevelidname%3dComputer%20Stationary%26parentcustomerid%3D%7b0D98B15F-0565-E011-8D90-1CC1DEE8CEB7%7d%26parentcustomeridname%3DInogic%26parentcustomeridtype%3Daccount"

Hope this helps!

Wednesday, April 27, 2011

Filtering in Crm 2011

In Crm 2011 new functionality provided that allows us to filter our views same as Microsoft Excel filtering functionality.

We can filter the columns from within the Grid as shown in below screen shot.


Click on Filter button that enables filtering for each column as shown in below screen shot.


The drop down shows the following options for filtering.


Click on Custom filter option and specify the conditions based on which records will be filtered.


Now records will be shown only for those potential customer whose name begins with “b” as shown in below screen shot.


We can save our views as shown in below screen shot.


Specify the name of your view and it will be shown to your views list as shown in below screen shot.


Hope this helps!!!

Saturday, April 23, 2011

Group by using FetchXML

In Microsoft Dynamics CRM 2011 FetchXML includes grouping and aggregation features which let us to use aggregate functions like sum, count etc.

Using Group by we can calculate sum, avg, min, max, count. But, Group by clause is not supported through LINQ in CRM.

You can only specify one aggregate attribute in a query and you cannot use the distinct keyword. To create an aggregate attribute, set the keyword aggregate to true, then specify valid entity name, attribute name and alias(variable name). You must also specify the type of aggregation you want to perform.

<fetch distinct='false' mapping='logical' aggregate='true'>
<entity name='entity name'>
<attribute name='attribute name' aggregate='count' alias='alias name'/>
</entity>
</fetch>"

Below is the example to get sum of total amount of all won quotes:
string quotes = @"
<fetch distinct='false' mapping='logical' aggregate='true'>
<entity name='quote'>
<attribute name='totalamount' alias='totalamount_sum' aggregate='sum'/>
<attribute name='statecode' groupby='true' alias='state' />
<filter type='and'>
<condition attribute=' statecode ' operator='eq' value='won' />"+
"</filter> "+
"</entity> "+
"</fetch>";

EntityCollection quotes_result = _service.RetrieveMultiple(new FetchExpression(quotes));
foreach (var q in quotes_result.Entities)
{
Decimal wonQuoteAmount = ((Money)((AliasedValue)q["totalamount_sum"]).Value).Value;
}