CRM supports various Deployment methods and unfortunately for the developers the method to connect to each of these differs. So here are the login functions for each of the Deployment methods supported by Dynamics CRM.
On Premise CRM connection:
On premise uses AD for authentication.
CrmService service = new CrmService();
service.Url = "http://" + servername + "/mscrmservices/2007/crmservice.asmx";
service.CrmAuthenticationTokenValue.OrganizationName = "orgname";
service.CrmAuthenticationTokenValue.AuthenticationType = 0;
service.Credentials = new System.Net.NetworkCredential("username", "Password", "DomainName");
OR
crmService.Credentials = System.Net.CredentialCache.DefaultCredentials;
Live CRM connection:
CRM Live uses Passport authentication. It requires a reference to the Idcrlwrapper be added. The Idcrlwrapper is available along with the SDK as helper files.
Make sure you have copied the msidcrl40.dll to the system32 folder before you try to run this code.
CrmDiscoveryService discoveryService = new CrmDiscoveryService();
discoveryService.Url = "https://dev.crm.dynamics.com/MSCRMServices/2007/Passport/CrmDiscoveryService.asmx";
RetrievePolicyRequest policyRequest = new RetrievePolicyRequest();
RetrievePolicyResponse policyResponse = (RetrievePolicyResponse)discoveryService.Execute(policyRequest);
// Retrieve a Windows Live ticket from the Live
service.LogonManager lm = new LogonManager();
string passportTicket = lm.Logon("LiveWindowsUserId", "password", "crm.dynamics.com", policyResponse.Policy, "Production");
RetrieveCrmTicketRequest crmTicketRequest = new RetrieveCrmTicketRequest();
crmTicketRequest.OrganizationName = "OrganizationName";
crmTicketRequest.PassportTicket = passportTicket;
RetrieveCrmTicketResponse crmTicketResponse = (RetrieveCrmTicketResponse)discoveryService.Execute(crmTicketRequest);
CrmAuthenticationToken token = new CrmAuthenticationToken();
token.AuthenticationType = 1;
token.CrmTicket = crmTicketResponse.CrmTicket;
token.OrganizationName = crmTicketResponse.OrganizationDetail.OrganizationName;
Now, once you have the token assign it to the crmservice object as we do in on premise.
Hosted CRM connection:
This uses SPLA authentication. You need to use the userid and password provided to you by your hosting provider. You would also need to get the discovery URL from them.
From the discovery service URL you can retrieve the list of organizations.
RetrieveOrganizationsRequest orgRequest = new RetrieveOrganizationsRequest();
orgRequest.UserId = username;
orgRequest.Password = password;
RetrieveOrganizationsResponse orgResponse = (RetrieveOrganizationsResponse)disco.Execute(orgRequest);
//Find the desired organization with which you want to connect.
//Retrieve the ticket.
RetrieveCrmTicketRequest ticketRequest = new RetrieveCrmTicketRequest();
ticketRequest.OrganizationName = organization;
ticketRequest.UserId = username;
ticketRequest.Password = password;
RetrieveCrmTicketResponse ticketResponse = (RetrieveCrmTicketResponse)disco.Execute(ticketRequest);
//Create the CrmService Web service proxy.
CrmAuthenticationToken sdktoken = new CrmAuthenticationToken();
sdktoken.AuthenticationType = 2;
sdktoken.OrganizationName = organization;
sdktoken.CrmTicket = ticketResponse.CrmTicket;
Now, once you have the token assign it to the crmservice object as we do in on premise.
Thursday, March 5, 2009
Monday, March 2, 2009
How to add the CrmService Web Reference for non-default CRM Organization or for CRM Live environment.
As a beginner in programming for Dynamics CRM but with knowledge of .NET, you would definitely like to first be able to add the CrmService Web Services Description Language (WSDL) to your Visual Studio project by using the URL of your Microsoft Dynamics CRM server.
CRM 4 additionally supports multi-tenancy and hence in the Enterprise edition of CRM you can have more than one Organization setup on your CRM server. While you could use the usual steps for adding a web-reference for the default Organization, if you need to pick up the customizations for a non-default organization you would need to follow the below steps.
These same steps need to be used when adding a reference for the CRM Live environment.
To obtain the Web reference for Microsoft Dynamics CRM Live you must first save a copy of the Web Services Description Language (WSDL) file to your development computer.
1. Open a Web browser and enter the URL for Microsoft Dynamics CRM Live. For example: https://demo.crm.dynamics.com/
2. Sign in using your Windows Live ID account.
3. In the Navigation pane, click Settings.
4. In the Settings pane, click Customization.
5. In the Customization area, click Download Web Service description files. 6. Click Download CrmService.asmx description (WSDL).
7. When the Web browser opens with the WSDL, save it as an XML file to the SDK\Bin folder or to your Visual Studio project folder. The procedure for saving the file will be different depending on the Web browser you are using. Also, the WSDL XML file can be saved to any convenient local location.
8. Open your Visual C# or Visual Basic .NET project in Microsoft Visual Studio. 9. In the Solution Explorer window, right-click your project name and choose Add Web Reference.
. In the Add Web Reference wizard, type the URL for the CrmService WSDL XML file that you previously downloaded into the URL box, and then click Go. For example:
C:\\CrmServiceWsdl.xml
11. When the CrmService Web service is found, change the text in the Web reference name box to Crmsdk and then click Add Reference.
The Microsoft Dynamics CRM Live Web service is now added to your project. In your source code you can refer to the classes available in this SDK.
Optionally, CRM SDK provides dll’s (Microsoft.Crm.Sdk and Microsoft.Crm.SdkTypeProxy) which can also be used for login and creating CRM service object.These assemblies contains types needed when you develop plug-ins and custom workflows. These assembly also includes the same set of entity classes, such as account class.
However, these are are template classes of default CRM install and the customizations of your organization cannot be found using this as can be through adding web reference of that organization as explained above. When working with entity instances, you should use the Microsoft.Crm.Sdk.DynamicEntity class. When you are using Dynamics Entity class it is possible to refer to any custom entity or custom attribute by setting the appropriate name to the Entity or Property.
Friday, February 27, 2009
List of Events available to trap in Scripts when saving a Dynamics CRM Form
CRM 3.0 has limited event detection made available using scripting. However It is now possible to detect which user action was performed to Save the form using the event.Mode property in the OnSave event.
You can gain more detailed information about the user actions in the OnSave event by referencing the event.Mode values. These values represent the buttons clicked by the user to save the record.
The following event modes are supported:
You can gain more detailed information about the user actions in the OnSave event by referencing the event.Mode values. These values represent the buttons clicked by the user to save the record.
The following event modes are supported:
| Entity | Event Mode | Value |
| All | Save | 1 |
| All | Save and Close | 2 |
| All | Save and New | 59 |
| Task, Phone Call, Letter, Fax, Appointment | Save as Completed | 58 |
| All | Deactivate | 5 |
| All | Reactivate | 6 |
| All | user-owned entities Assign | 47 |
| Send | 7 | |
| Lead | Qualify | 16 |
| Lead | Disqualify | 15 |
By checking the value of event.mode we can find out which button user has clicked and based on this take further action.
To cancel the Save operation event simply use the script below:
event.returnValue = false;
Wednesday, February 25, 2009
Add SRS report to CRM Form
In course of implementation of Dynamics CRM, a number of clients have asked us to display reports designed using Sql Reporting Services (SRS) within CRM as a tab or may be as a option to the Main Menu. This helps the user to quickly check reporting. I have described a simple way to achieve this in Dynamics CRM
This can be done using following steps.
- Create SRS report.
- Get the rdl file from the project.
- Open IE and type http://servername/reports without port number as shown below
- Create SRS report.
- Get the rdl file from the project.
- Open IE and type http://servername/reports without port number as shown below

- Click on “Upload File” each time for each of the “.rdl” files which we are sending you with this mail and then click OK.
- Do not change its “Name” attribute, as shown below.
- Open IE and type http://servername/reportserver without port number
- Here you will find the report with the same name as of above.
- Click on the page which will open the report in IE.
- Copy this url and use where ever you want i.e. in IFrame or aspx page which would look like:
"http://servername
- Just pass this url and you can see the reports.
You can also append "&rc:Toolbar=false" to the above url if you dont want the toolbar to be seen in the reports(refer the above image below the address bar) and "&rs:ClearSession=true" to ensure that everytime you can see fresh reports.So that the modified url will look like:
"http://servername/reportserver?%2fcrmorg1_MSCRM%TestReport&rs:Command=Render&rc:Toolbar=false&rs:ClearSession=true">
With this you can now design a dashboard report in CRM and have it added as item under Workplace and set it as the Default item to be displayed. So each time you login you see the dashboard.
Tuesday, February 24, 2009
Bulk Edit records of any entity in CRM
We can easily edit a record in crm. But what if we need to edit a field of all records with same value. So here, Instead of opening records one by one and editing it, we can also use Bulk edit feature which edits that field in one go for all records.
For some records like account,contact ,lead, Product etc, there is already an in-built feature for bulk editing these records.
For some records like account,contact ,lead, Product etc, there is already an in-built feature for bulk editing these records.
Below we have explained how to bulk edit the account records :
- Select all the records for which you need to edit fields in bulk. We have selected all the account records as shown in the screen below:

2. Now go to More actions and click on edit.

3. Then you will get the window as shown in the screen below. Here, you can edit any field which will be applied to all the selected records. We have edited the account name.

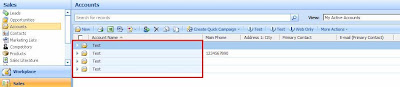
4. Only when you save this form, you will find that all the selected records have been edited with that value. Here we edited account name and all the account names of selected records will be test as shown in the screen below :
This is how Bulk edit of account entity works.
Note :- CRM does not support bulk edit for all entities like Activities ,SalesOrder.
But, if you want to Bulk edit records of Activities ,salesorder which are not supported by CRM then we can do this also.
For this, you will have to write a JavaScript on “ISV Button” and place that button on the particular entity where bulk edit feature is desired.
In that script we have to call a function which is :
“doAction('crmGrid', 'entitytypecode', 'bulkedit')”
Below is a code for adding a button for bulk editing Appointment records which will be added in the isv.config :
//Start of Script
<Entity name="activitypointer">//You can change the entity name
<Grid>
<MenuBar>
<Buttons>
<Button Icon="/_imgs/ico_18_debug.gif" JavaScript="doAction('crmGrid', '4201', 'bulkedit');" Client="Web">
//”4201” is the entity type code of Appointment
<Titles>
<Title LCID="1033" Text="Bulk Edit" />
</Titles>
<ToolTips>
<ToolTip LCID="1033" Text="Bulk Edit." />
</ToolTips>
</Button>
</Buttons>
</MenuBar>
</Grid>
</Entity>
//End of Script
We have to only change the entitytypecode according to the entities required for bulk edit.
For example : If we want to bulk edit “Salesorder” then we have to write doAction function as follows:
“doAction('crmGrid', '1088', 'bulkedit')” where "1088" is the entitytypecode of salesorder entity.
We can also bulk edit the records for entities like phonecall,email etc by changing their respective entitytype codes in the doAction function.
Subscribe to:
Posts (Atom)