Tuesday, October 18, 2011

Enable Scripts on Bulk Edit form in CRM 2011

CRM 2011 includes the feature to enable script on the bulk edit form. By default the scripts are disabled for bulk edit forms.

To enable the script for Bulk edit forms check the below syntax

<event
active=["0" "1" "true" "false"]
application=["0" "1" "true" "false"]
attribute="String"
BehaviorInBulkEditForm="String"
eventType=["DataEvent" "ControlEvent"]
name="String">
<dependencies />
<Handlers />
<InternalHandlers />
</event>

See below detailed descriptions for the attributes.


Steps to enable the script on bulk edit form:
- Include the entity for which you would like to enable the bulk edit script and export the solution.
- Open the customization.xml
- Add BehaviorInBulkEditForm="Enabled" to the event handlers as shown below


<event name="onload" application="false" active="false" BehaviorInBulkEditForm="Enabled" >
<event name="onsave" application="false" active="false" BehaviorInBulkEditForm="Enabled" >

- Save and Import the solution, publish it.
- Now your script will work on bulk edit form.

This way you can let your users use bulk edit freely with your custom script also executing just fine. Earlier, usually if there was custom business logic to be performed plugins were advised as it would allow the custom business logic to be executed for all records that were edited through Bulk Edit.

Friday, October 14, 2011

Different operators used with workflow

There are six different operators used in e workflow.

1. Set to: This operator is used to set value of the field of any data type.


2. Append with: This operator can only be used with text field. It will append specified field's value or the default value to the existing value. This operator has introduced in CRM 5.


3. Clear: This operator can be used with all data types. This will clear the field's value.


4. Increment by: This operator can only be used with decimal fields. This will increment the existing value with the specified field's value or default value.
5. Decrement by: This operator can only be used with decimal fields. This will decrement the existing value with the specified field's value or default value.
6. Multiply by: This operator can only be used with decimal fields. This will multiply the existing value with the specified field's value or default value.


Bulk or Mass edit is the great feature in CRM that allows us to edit multiple records at a time. But it will only allows us to set the value, we cannot perform above operations in bulk edit. With the help of workflows, we can perform above operations on multiple records.

Monday, October 10, 2011

Working with CRM 2011 Solutions

With Dynamics CRM 2011, Microsoft goes one step further in simplifying the process of moving the customizations from one system to another. In the CRM 2011 you can now simply export and import the customizations in the form of solutions. There are two type of solution in the CRM 2011.

1. Default Solution: This is the customizations of your entire CRM 2011 Organization.

2. Managed Solution: Managed solution is a packed and user can install it on their machine. The benefit of the Managed solution is that, it can be uninstalled if you do not wish to use any of its components any more. The deleting/uninstalling does not impact any other customization in the system. Unlike CRM 4.0 if you want to remove something, then you need to remove the fields from the Form, delete from the entity and remove the buttons from the ISV config. But in the CRM 2011, if you have imported the managed solution then you need to simply delete this solution, it will automatically remove all the components included in the solution like, Forms Customizations, Fields and Buttons.

It is advisable to package products as managed solutions.

3. Un-Managed Solution: We generally use the unmanaged solution during the development process. An un-managed solution cannot be deleted like the Managed solution. Changes made by importing the unmanaged solution are permanent and is included as a part of the existing entity customizations. If we have imported the Solution on any system as Un Managed, and if we need to remove the that, then we need to remove the each item manually from CRM.

Export the Solution:

1. Export the Default Solution: If you want to take a backup of your entire organization customization you can export the Default customization. To export the default solution, please open the CRM.

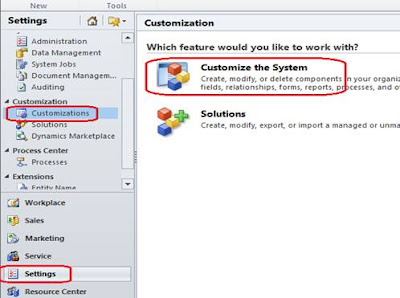
Go to the Settings --> Customizations, as shown in the below screenshot.


Now click on “Customize the System”, it will open the following window.


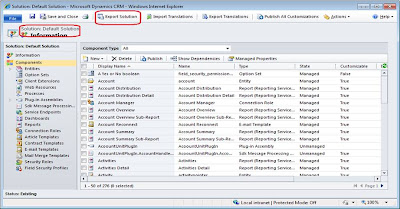
As shown in the above screenshot, you need to click on the “Export Solution” button, to export all the customizations from the CRM.

We generally export these customizations when we need to move all the customizations from one system to another. If you have any managed solution already imported in your organization. Exporting the default solution will not let you import this customization set on a new organization unless you import that managed solution on the new organization as well. The managed solution is not inherently included when the default solution is exported.

2. Export the Managed Solution: To export the solution as Managed, you need to create a solution. And add the required component in this solution.

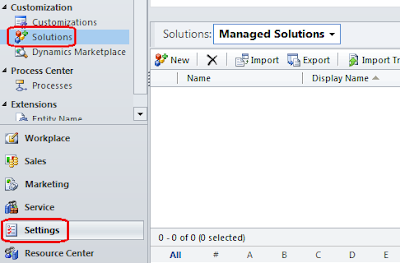
To create the new solution, open the CRM and go to the Settings --> Solutions as show in the below screenshot.


Now click on the new button to create the New Solution. And you can add the required component in this solution. Suppose if we want to export the account entity customizations, then the solution will be as follows.


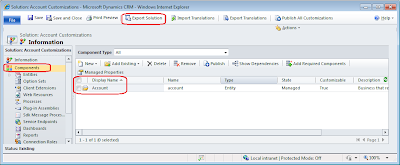
As shown in the above screenshot, we have created a solution in which we have added the Account entity. now you need to click on the Export Solution button to export the account entity customization.

In the Export Solution wizard, on the 4th Screen you need to select the option to export the customization as managed. As show in the below screenshot.


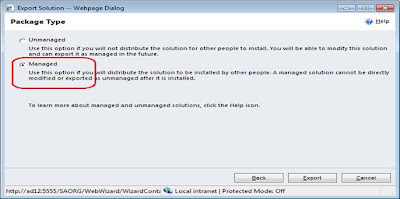
When you export the solution as a managed solution, it only exports that part of the entity customization that was not included in the default entity design. This means to say that only custom attributes or custom form layouts will be exported for the entity when the solution is exported as Managed solution.

When you import the managed solution it will merge these customizations with the existing entity design on the system where it is being imported. This allows for the original entity customizations not being lost or overridden with Import and export of customizations as was the case with CRM 4.0.

3. Export the Un-Managed Solution: To export the Solution as Un-Managed, you need to select the “Unmanaged” option, as shown in the below screen.


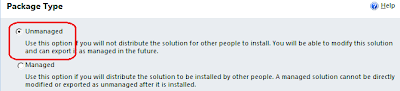
When you export the solution as Unmanaged, it exports the entire entity customization and when it is imported on another organization, existing entity customization on that organization would be overridden

Import the Solution:

To import the Managed/Unmanaged solution, please open the CRM, and Go to the Settings --> Solutions and click on the Import button. It will display the following window.


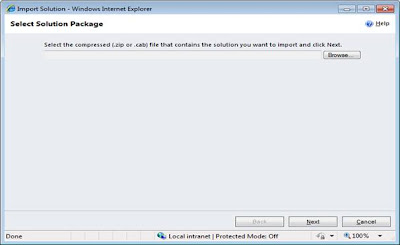
Now you need to Browse the .zip or .cab solution file to import the CRM 2011 Managed or Un-Managed customizations.

Delete or Un-Installing the Solution: To uninstall the Managed solution you need to delete the solution from the CRM. If you uninstall the Managed solution then all components which is installed by you managed solution will be deleted. Say for example you added 2 custom fields in the account entity as a part of a managed solution. If you delete/uninstall this solution from that system, then these two fields will automatically be deleted without impacting any other part of the entity customization.

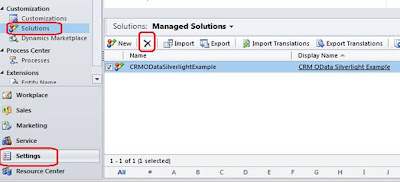
To delete the solution, open the CRM and go to Settings --> Solutions and select the solution and click on the delete button. As shown in the below screenshot.


Issues faced with managing the solutions:
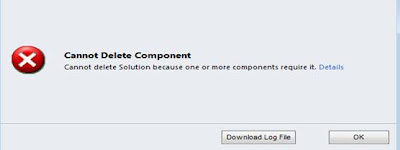
• Suppose if you install the Managed solution on the any CRM and this solution contains the some html web resources. And these are then manually added to the SiteMap and entity ribbons etc. Deleting this managed solution will give the dependency error. You cannot delete this solution because the components of this solution are used elsewhere in the project and not as a part of the managed solution. As shown in the below screenshots, we are trying to delete the below Managed Solution.


It will give the following error.


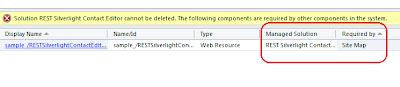
After clicking on the Details link, it will clearly shows the dependencies. As shown below.


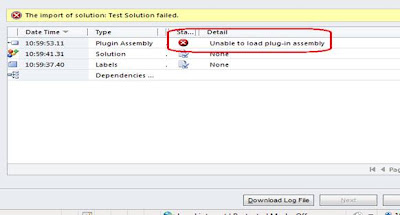
• Also if you want to Transfer the plug-in steps from one machine to another machine through the Solution, you need to make sure that the plug-in assembly is set to be registered on the database. If it is set to Disk importing this solution on another system would result in error as this assembly would not be present on the target system

Wednesday, September 28, 2011

Debugging Silverlight Web Resources in CRM2011

In CRM2011, Silverlight Web resources can be debugged in Microsoft Visual Studio. For this you need to follow below steps:

• Build your Silverlight application.

• Upload the built version of the .xap file from the Web application project ClientBin folder.

• View your Silverlight application in the context it is designed to be used in.

• In your Silverlight application project, from the Visual Studio menu, select Debug and then Attach To Process….

• In the Attach to Process dialog box, find an iexplore.exe process where the Type column value is Silverlight, x86. (See below screen shot)


• Select that process and press Attach to close the dialog box and start debugging.

• In your Silverlight application project, set a breakpoint.

• Refresh the browser window or, in the Silverlight application, perform the action that you need to test your code.

Hope this help

Wednesday, September 21, 2011

Working with Charts in CRM 2011

Dynamics CRM 2011 provides us the Charts, with the help of the Charts we can Graphically represent the Organization data. We can create the System Charts and User Charts in the CRM. The System Chats can be viewed by the All users of the Organization and the User Charts can only be view by those whom the Chart Assigned or Shared.

We can create the following different form of charts:
• Column
• Bar
• Line
• Pie
• Funnel

To create a chart, specify fields to be displayed on the category and series axes. Normally, the category axis displays data from numeric or non-numeric fields. The series axis displays data from numeric fields.

The Chart Designer supports creating only single-series charts. To create multi-series charts or comparison charts, we need to write the code.

Also we can Export and Import the Charts.

Note: We can create and attach charts to only those record types in Microsoft Dynamics CRM that support the new ribbon interface in the Web application. This is because all of the chart controls are only present in the ribbon interface of Microsoft Dynamics CRM.

We can create the charts from the CRM Views or by the Coding.

Create the Charts through CRM Views: You need to create the CRM view on the required Entity and then create the chart on this. As shown in the below screen shot we have create the view of all opportunity and then create the Sales Pipeline Chart for that view. As shown in the below screenshot.


Now open the Opportunity Entity and Create the Chart as shown in the below screenshot.


Create the Chart by the Coding:

Below we have given that how to create the Sample Chart through Coding.

To create the chart the Main things are the Fetch XML, Data XML and the Presentation XML.
 Suppose if you need to create the Sales Pipe line funnel then you need to create the following three items.
1.       Fetch XML View: For creating the fetch xml view, you need to create the Saved Query for that as given below.

                           savedquery newSavedQuery = new savedquery();
               newSavedQuery.name = "Sales Pipeline Funnel";
               newSavedQuery.fetchxml = @"
                                      <fetch version='1.0'
                                             output-format='xml-platform'
                                             mapping='logical'
                           distinct='false'>
                                             <entity name='opportunity'>
               <attribute name='name'/>
               <attribute name='customerid'/>
                         <attribute name='estimatedvalue'/>
               <attribute name='statuscode'/>
               <attribute name='opportunityid'/>
               <order attribute='name' descending='false'/>
                           </entity>
                                      </fetch>
                       ";
               newSavedQuery.returnedtypecode = EntityName.opportunity.ToString();
               newSavedQuery.layoutxml = @"<grid name='resultset' object='3' jump='name'
               select='1' icon='1' preview='1'>
               <row name='result' id='opportunityid'>
                       <cell name='name' width='300' />
                       <cell name='customerid' width='150' />
                                      <cell name='estimatedvalue' width='100' />
                                      <cell name='statuscode' width='100' />
               </row>
                                </grid>";
               newSavedQuery.querytype = new CrmNumber();

 newSavedQuery.querytype.Value = SavedQueryType.MainApplicationView;

 Guid viewId = service.Create(newSavedQuery);
2.       Presentation: Then you need to write the following Presentation for that.
string presentationXml = @"
    <Chart Palette='BrightPastel'>
        <Series>
            <Series _Template_='All' ShadowOffset='2' 
BorderColor='64, 64, 64' BorderDashStyle='Solid' 
BorderWidth='1' IsValueShownAsLabel='true' 
Font='Tahoma, 6.75pt, GdiCharSet=0' 
LabelForeColor='100, 100, 100' 
CustomProperties='FunnelLabelStyle=Outside' 
ChartType='Funnel'>
    <SmartLabelStyle Enabled='True' />
    <Points />
            </Series>
        </Series>
        <ChartAreas>
            <ChartArea _Template_='All' BackColor='Transparent' 
BorderColor='Transparent' BorderDashStyle='Solid'>
<Area3DStyle Enable3D='True' IsClustered='True' />
            </ChartArea>
        </ChartAreas>
        <Legends>
            <Legend _Template_='All' Alignment='Center' 
LegendStyle='Table' Docking='Bottom' 
IsEquallySpacedItems='True' BackColor='White' 
BorderColor='228, 228, 228' BorderWidth='0' 
Font='Tahoma, 8pt, GdiCharSet=0' 
ShadowColor='0, 0, 0, 0' ForeColor='100, 100, 100'>
            </Legend>
        </Legends>
        <Titles>
            <Title _Template_='All' 
Font='Tahoma, 9pt, style=Bold, GdiCharSet=0' 
ForeColor='102, 102, 102'>
            </Title>
        </Titles>
        <BorderSkin PageColor='Control' 
            BackColor='CornflowerBlue' 
            BackSecondaryColor='CornflowerBlue' />
    </Chart>";
 
3.       Data Xml: Below we have created the Data XML for that. In the Data XML we need to provide the Presentation and the Fetch XML view Id, as given below.
// Set the data XML string.
string dataXml = @"
    <datadefinition>
        <fetchcollection>
            <fetch mapping='logical' 
count='10' 
aggregate='true'>
<entity name='opportunity'>
    <attribute name='estimatedvalue_base' 
        aggregate='sum' 
        alias='sum_estimatedvalue_base'/>
    <attribute name='stepname' groupby='true' alias='stepname'/>
    <order alias='stepname' descending='false' />
</entity>
            </fetch>
        </fetchcollection>
        <categorycollection>
            <category>
<measurecollection>
    <measure alias='sum_estimatedvalue_base'/>
</measurecollection>
            </category>
        </categorycollection>
    </datadefinition>";
 
// Create the visualization entity instance.
savedqueryvisualization newSavedQueryVisualization = new savedqueryvisualization();
 
newSavedQueryVisualization.name = "Example Visualization";
newSavedQueryVisualization.presentationdescription = presentationXml;
newSavedQueryVisualization.datadescription = dataXml;
newSavedQueryVisualization.savedqueryid = new Lookup();
newSavedQueryVisualization.savedqueryid.Value = viewId;
 
Guid newSavedQueryVisualizationId = service.Create(newSavedQueryVisualization);
After doing the above things please call the Publish request, As given below.
//Publish the Opportunity entity customizations.
PublishXmlRequest request = new PublishXmlRequest();
 
request.ParameterXml = @"
      &ltimportexportxml&gt
            &ltentities&gt
&ltentity&gtopportunity&lt/entity&gt
&lt/entities&gt
            &ltnodes/&gt
            &ltsecurityroles/&gt
            &ltsettings/&gt
            &ltworkflows/&gt
        &lt/importexportxml&gt";
   // Execute the request.
PublishXmlResponse response = (PublishXmlResponse)service.Execute(request);
 For more details about the Charts you can use the following link.
Also you can refer the CRM 2011 SDK.