Showing posts with label crm 2011. Show all posts

Monday, January 21, 2013

Process - Driven UI Explored

CRM in Cross-Browser has been one of the best improvements. CRM works much faster in Chrome and Fire Fox. So the forms that would take a few seconds to load prior to this update now is like click and its open :)
 

Some of it may have to do with the new Process-Driven UI made available for the Sales and Service Process.
 

What’s with the Process-Driven UI?

The idea is to make the UI more intuitive and process-driven rather than requiring users to create records manually through the sales process as well as reduce the number of clicks and popup forms required.
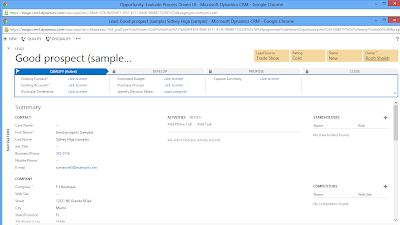


The top panel includes the milestones defined for the entire lead qualification process. This panel will let you know the progress made and stage at which the current lead is in the sales process.


The process steps are configurable. You can configure the process steps using the Edit Sales Process option in the … menu


The social section of the form has the activities, feeds and notes section incorporated in a single section that can be easily switched between without popups. Ability to quickly add Phone call and Task has been included just like we had the notes section in earlier version where we could just type in to add a new note.


Qualifying a lead is now just a click without any popups again. There is a button added separately for Qualify and Disqualify. Upon qualify it will auto-create Account and Contact depending on the information included in the Lead along with the Opportunity.


Using the Navigation panel you can navigate to the other associated entity grids included in the form. But note you can no longer create a new record for these associated entities from this view. It is just a listing of the associated records that you can click to view but cannot add a new record for that entity like it was in the traditional UI.


Is the Process Driven UI customizable?


Yes. The process-driven form is available under the specific entity. While the earlier forms were called Information, the process-driven form is named by the entity name.

You are open to edit and customize this form to include additional fields/controls. 

New addition is you can now include web resources in the process-driven UI as well as the classic UI and still have the forms open in Read-Optimized mode.


One observation made is, though you are allowed to add script libraries, but if you include one of those you lose the process driven top panel and it is replaced with the ribbon associated with classic form.
 

How to Enable Process Driven UI?

In existing organizations that are being upgraded, Process-Driven UI needs to be manually enabled by the user.
 

This section provides you with the feature to migrate the existing forms to the new UI & enable the new forms

Note: Once the new forms are enabled, it cannot be rolled back or disabled. However the new forms do have an option in the menu to “Switch to Classic forms”.

How to update to polaris ?

Follow the below steps

Step1

Go to the Administration Tab and click on "Product Updates"


Step2

Click on Update button to Update your system to Process-Driven UI. Remember once you Updated to Polaris the changes cannot be rollback.


Step3


Step4

Click on  " Yes "


Step5


Step6    

when you will click on " Migrate customization to the new forms " then the below page appears in new window


Step7

After reading the above page click on Enable the new forms


Simply click on YES and you are ready to explore Polaris ….!


Thanks!

Thursday, January 10, 2013

Maplytics in times of UR12


Native Bing Maps Integration coming in with UR12

UR12 is scheduled for a phased roll out starting next week. With one of the offerings being Bing Maps Integration. This integration is made available as a setting that when activated by the users would show a link to open Bing Maps and automatically plot the address entered on the specified record.

What is Maplytics and why should you want to use it?

Maplytics continues to work towards being a “more than simple” address plotting on the map.  It is a geographical analytics tool. Some of the features supported include
·     Support for all entities that have address fields. You would be able to see any address included on any entity on the Map
·     Map is essentially dependent on Geo-coding data. Maplytics comes bundled with Bing Maps subscription that allows for use of Bing Maps Spatial service that will let you batch Geo-code bulk data. This does away with the need to worry about getting the data Geo-coded.
·      Save geographical search as static Personal Views in CRM
·      Ability to print the route and routing directions using multiple way-points.
·      Maplytics builds upon the inherent Dashboard feature of Dynamics CRM to provide Maplytics Dashboards to provide analytics based on CRM data including Sales
·     Color-coding CRM data plotted on the Map for better analysis and geographic representation of the data
·     Usual mapping solution would include Road View or Aerial View. You can now get a Street View of the address using Maplytics


Who is Maplytics for

Maplytics is still a must-have for business driven by geography and geographic data.

For more information check out the product details here

Thursday, December 20, 2012

Add mapping for custom attribute of Order product to Invoice product

To map custom attributes of Opportunity Product to Quote Product, Quote product to Order Product and Order product to Invoice product CRM does not provide direct access to the “Mapping” page. To get the mapping page, you need to follow below steps.

Below are the steps to set the mapping of Order product and Invoice product:

1.  Replace the CRM server name in the below URL and browse the below URL in the Internet Explorer.

 Online CRM

On-premise CRM
http://crmserver/testorg/XRMServices/2011/OrganizationData.svc/EntityMapSet?$select=EntityMapId&$filter=SourceEntityName eq 'salesorderdetail' and TargetEntityName eq 'invoicedetail

2.  Then you will get the below result. Copy the Entity map id highlighted in red.

 
When you try to browse above URL, you might get the below page instead of above result in XML format.


Then you need to do below setting in the Internet Explorer.
Go to Internet Explorer à Tool à Internet options àContent à Setting (Feed and Web slices). Now uncheck the “Automatic mark feed as read when reading a feed” and “Turn on feed reading view”. Click on Ok. Then restart the Internet explorer and browse the above URL again.


3. Replace the mapping id with the entity map id you get from above URL in the below URL and then browse it.


4. You will get the below window where you can add new mappings,


Hope this helps!


Sunday, December 16, 2012

Display more than 2000 characters in SSRS report


We would like to share one of our experiences with SSRS reports. One of the reports we were building required displaying of notes that could hold more than 2000 characters.
 
 Including a text box worked fine for most of the records but we observed that the ones that had more than 2000 characters reported error. To show the entire content of the notes in SSRS reports you can try the following workaround:
 
Add a textbox with the following expression

 =IIF(Len(Fields!description.Value) >= 2000,Left(Fields!description.Value,2000) ,Left(Fields!description.Value,2000))
 
This will show the first 2000 characters.
 
For the next 2000 add a blank row and include a textbox with the following expression
 
=IIF(Len(Fields!description.Value) >= 2000, cstr(Fields!description.Value).Substring(2000), "")
 
If the content included is less than 2000 characters in the first place itself, then to hide the blank row add the following expression to the visible property
 
=IIF(Len(ReportItems!txtDescription.Value) >= 2000,false,true)
 
Note ReportItems!txtDescription refers to the same textbox that we are hiding
 
This way we were able to increase the display limit to 4000 characters to increase it further add another text by using the same logic as above.

 
Hope this helps!


Friday, December 14, 2012

Developer Toolkit: "No Organization has been specified" error.


You may come across the following error when you try to open a project that was created using Developer toolkit

 
To resolve this problem you need to delete *.SUO(VS Solution User Option) file from Visual Studio Project folder.
(These file records all of the options that you might associate with your solution so that each time you open it, it includes customizations that you have made)
This .SUO file is hidden in the project folder next to solution file which you can see in below screenshot.
 
 
Simply delete the above selected red rectangle file(.SUO) and run solution file.
 Now it will prompt for Connect CRM Explorer.

 
Note: SUO (solution user options) are user settings files. Completely disposable, you can delete it and the most common thing you will lose are breakpoints.

Tuesday, December 11, 2012

Import attachments using OOB Import Wizard in Dynamics CRM 2011


As we all know that the there is no separate entity for the attachments in Dynamics CRM 2011. We can add the attachments into the Note (annotation) entity.
But in order to import Notes and attachments in the CRM 2011, it is essential that you must have the separate files for them.

For importing Notes with the attachments by the import wizard you need to Arrange all of your files and attachments into a zip folder as shown into the below screenshot.


Where the “Notes.csv” contains the data of the Notes as shown into the below screenshot.

 
And “Attachments” folder above contains all the attachment documents. The files contained in the Attachments folder are as shown below.


After that please zip both the Attachments folder and Notes.csv into a single folder, and then import with the following mappings.


After completing the import it will display the data as follows under the corresponding regarding records.

Important points to note:
 
  • Only map that column of the source file to the Document (documentbody) field of the Note record type which includes information about attachments. The mapped value in the source column to the document is the file name that is used to search a file in the Attachments folder in the .zip file.

  • Each note record can have one attached file. You cannot import attachments to e-mail messages, sales literature items, or to any record type that does not support notes. The types of files that can be attached are determined in the Set blocked file extensions for attachments section of the System Settings dialog box.

  • If you import file attachments, each attachment has two names: a physical name (Document in our case)and a logical name (File Name in our case). The logical names might not be unique. The physical names must be unique.

  • During import, you must map the column with physical names to the "Document" field of the Note record type. You must map the column with logical names to the "FileName" field of the Note record type.

  • The value in source column that is mapped to the Document is the file name that is used to search a file in the Attachments folder in the .zip file.

  •  Each attachment must have a unique name to import. It is mandatory to include a column for the physical names in the source file. Also include a logical names column assigned to the file that is imported. You must map the column containing the logical file name to the File Name attribute in the Note (annotation) record type.

  • We recommend that you map the column that contains information about the parent record to the Regarding field of the Note record type. This column creates the relationship between the note and the parent record to which the note is attached.

  • In the .zip file, the folder containing attachments must be named Attachments.
 
 
Hope you find this information helpful.
 

Monday, November 26, 2012

Maplytics Release Announcement !!


The much loved Geo-analytical tool for Dynamics CRM 2011 which uses Bing Maps API now has an update available that will make Maplytics a must have tool for Dynamics CRM

We have added the following new features in Maplytics 5.4 version,
    1.      Support for all entities defined in Dynamics CRM. Configurable entity maps
    2.      Ability to map the address fields to be used for Geo-coding
    3.      Color coding of pushpins based on configurable categorizations
    4.      Heat Maps added
    5.      Configurable tool-tips
    6.      Dashboards. You can now include Maplytics component as a Dashboard web resource
    7.      Dashboard   queries is configurable
    8.      Overlay of nearby locations like airports, restaurants etc. along with the Dynamics CRM search results
    9.      Ability to save the geographic search results as static views in Dynamics CRM for later use
    10.      Ability to export search results to external file
    11.      Ability to save the geographic search results as static views in Dynamics CRM for later use


For more details have a look at the White Paper

Maplytics supports all CRM Deployment models namely On-Premise, On-Line, Office 365 and Partner-Hosted.

It is supplied as a managed solution that is easy to install and un-install without affecting your existing customization.

We already have a 15 day fully functional trial available of our product. We are now also making available for a limited period only, a Community Light version of the product. This product is free to use for the next 6 months for up to 5 users after which you can order the product from us and upgrade to the unlimited full license of the product.

You can download the light version from http://www.inogic.com/Trial/DynaMapsCommunityVersion.zip. This is valid until 26th December 2012.

The light version has the following limitations.
    1.            Available for use with only account, contact and opportunity entities
    2.            Mapping capabilities restricted to plotting of 50 addresses at a time on the map
    3.            Only 5 dashboards can be configured
    4.            Only 5 way-points can be defined for routing


After downloading contact us with your CRM install details to avail the 6 month free license.

Contact us for the 15 day full trial of the product.

Note: Bing Maps API is chargeable and you need to purchase Bing Maps subscription from Microsoft. We have entered a contract with Microsoft Bing Maps partner to make this license available to you for use with Maplytics at a reasonable price.

Here is a complete list of features included in Maplytics:
    1.       Plot any entity record on the map
    2.       Street View for any address
    3.       Color coding of pushpins based on configurable categorizations
    4.       Routing using multiple way-points
    5.       Geo-spatial analysis of Opportunity and Sales data for summary analysis
    6.       Uses Dynamics CRM views that can be easily created using the Advanced Find feature of Dynamics CRM. No learning curve required
    7.       Print the Map and Driving directions
    8.       Configurable Entity maps and Dashboards to support any Dynamics CRM entity
    9.       Dashboards. You can now include Maplytics component as a Dashboard web resource
    10.       Dashboard queries is configurable
    11.       Overlay of nearby locations like airports, restaurants etc. along with the Dynamics CRM search results
    12.       Ability to save the geographic search results as static views in Dynamics CRM for later use
    13.       Ability to export search results to external file
    14.       Ability to save the geographic search results as static views in Dynamics CRM for later use

Go ahead and request the trials and pour in your valuable feedback!


Monday, October 22, 2012

Filter issue with Excelsheet exported from Report


As we all know, we can export the CRM report in various formats and one of them is “Excel sheet”. After exporting the report in the excel sheet, there are chances that you may not be able to see the filter on certain columns. You will also notice that two columns get merged in single column and have empty columns. Hence there are two issues, one with column filter and other with the merged columns, as you can see in the below :
 

The actual problem is with the report column and not with the excel sheet. The problem in report is the column width. If a column has width more than 1in then it adds a column extra in it.

Now you just need to set the column width to 1in which is default width of a column, which will solve these problems and there will be no extra column or filter issue.
Hope this help while designing the report which can be exported to the excel sheet.

Friday, October 12, 2012

Update Rollup 11 now available!

Update Rollup 11 for Dynamics CRM 2011 is now available for download from http://www.microsoft.com/en-us/download/details.aspx?id=34969

This update includes compatibility with Windows 8 and IE10 besides other fixes. A complete list of this can be found at http://support.microsoft.com/kb/2739504


In addition to this, a few days back new bits for UR10 were made available. These included fix for issues reported from the original version of UR10. This can be found at http://www.microsoft.com/en-in/download/details.aspx?id=30711


Monday, August 6, 2012

Tips to Install CCA for CRM 2011

The Customer Care Accelerator for Microsoft Dynamics CRM 2011 delivers contacts center functionality. The CCA for Microsoft Dynamics CRM will work with all deployment models for including on-premise and Microsoft Dynamics CRM Online.

You can follow below Steps to Install CCA:

1.       To install CCA you need to download the setup from Microsoft Marketplace. The installation package contains source code, binaries, customizations, and documentation.
2.       Unzip the downloaded file. It contains an Accelerator folder (CCA setup files) and a UII folder (the UII framework install files). You also get a couple deployment guides.

3.       From the UII folder run the executable file (32 bit or 64 bit). It is a simple installation process. While installing you will be asked to specify the organisation name where you intend install CCA. Please refer below screen. Specify the Organization Name and proceed with complete package install to use all features of CCA.


 4.       Now from the Accelerator folder run the 32 or 64 bit executable file. This will unzip few more files into the install folder. After this run, the “Microsoft UII” folder will contain all the source code and other files which are required to proceed with the further steps.
5.       In next step you need to import some solution files in CRM. Import the two solution files listed in below screen shot:
           a)      Import the solution “UiiForMicrosoftDynamicsCRM2011_1_0_managed.zip” from the location specified below:


b)      Import another solution “ReferenceImplementationforUII_1_0_managed.zip” from the location specified below.

 
  6)       After importing the above managed solution you need import below specified data files which you need to map with “UII Hosted Applications” entity as shown in below screen.
(Note: Please make sure that you have installed standard Sample Data in your CRM. Go to Settings -> Data Management -> Sample Data and install sample data into your system)


 While Importing these files you need to fix the 2 field mapping errors before you process the files which are listed below:


 Map the Above fields to their associated field and proceed with import.
7)      Next Step is to generate “RIConfigLoader” application. For this you need to follow the instructions from the UII Deployment Guide to Install UII Component.
8)      Open the “Microsoft.Crm.Accelerator.Cca.AgentDesktop.sln” solution file and build the solution.


To resolve this issue you need to download the “Microsoft.Practices.CompositeUI.Windows.dll”, add reference to the project and build the solution. This will generate the “RIConfigLoader“ application. Run the application shown in below screen shot.


9)      Once you run this, you will get the below screen to connect with CRM.


Provide the connection details required to connect to CRM. To get the CRM Service URL Go to Settings -> Customizations -> Developers Resources. Look for the Discovery Service URL. When the connection is successful you need to select CRM Organization and click on “Deploy” as shown in below screen.


10)      Go to the location where Agent Desktop’s “config” file is located and open it in Notepad. We only need to change the Organization Service URL and Authentication Mode in the “AgentDesktop.exe.config” file as shown in below screen shot.


11)      Run the Agent Desktop Application.


12)      You will get the pop up of CCA Agent Desktop screen as below.


13)      When you click the Case it will automatically navigate to the Customer i.e. Account page. You can also find the Task explorer where you can select workflow list from which you can initiate a CCA workflow as shown in below screen shot.


14)      When you select “Service Case By Phone” and follow the steps you will get the below screen to Dial a Number on the step of Call Customer.


15)      After this you can add your notes in the Text Box to update Notes in the Selected Case. Please see below screen shot.