Monday, August 8, 2011

Notify the dialog to end

When you design a Dialog, make sure you explicitly stop the dialog when all the steps of the dialog have completed using the “Stop Dialog” step


Failure to do so might result in you receiving the following error when all steps have been processed.


The above error is pretty misleading and we spent hours trying to identify which data is missing before we finally managed to get this to work after adding the “Stop Dialog” step.

Monday, August 1, 2011

Fault and Exception Handling in Dynamics CRM 2011

Microsoft Dynamics CRM Web service can throw a number of exceptions. When we use Microsoft Dynamics CRM Web service in application development we need to handle service related exceptions. All Web service method calls use a communication channel to the server based on the Windows Communication Foundation (WCF) technology. In WCF terms, exceptions returned from the channel are called faults.
Here we have listed some of the common exceptions that one should handle in the code:
- DiscoveryServiceFault: If you are accessing the discovery Web service, you need to catch DiscoveryServiceFault exception.(See below code)
catch (FaultException< Microsoft.Xrm.Sdk.DiscoveryServiceFault> ex)
{
Console.WriteLine("The application terminated with an error.");
}
- OrganizationServiceFault: If you are accessing the organization Web service, you need to catch OrganizationServiceFault exception.(See below code)

catch (FaultException ex)
{
Console.WriteLine("The application terminated with an error.");
}
- TimeoutException: This will occurred when take long time to execute CRM request.(See below code)
catch (System.TimeoutException ex)
{
Console.WriteLine("The application terminated with an error.");
}
- SecurityAccessDeniedException: When connecting to Microsoft Dynamics CRM Online, SecurityAccessDeniedException exception can be thrown if you use a valid Windows Live ID and your Live account is not associated with any Microsoft Dynamics CRM Online organization.(See below code)
catch (FaultException ex)
{
Console.WriteLine("The application terminated with an error.");
}
- MessageSecurityException: A MessageSecurityException can be thrown if your Windows Live ID is not valid or Windows Live failed to authenticate you.
catch (FaultException ex)
{
Console.WriteLine("The application terminated with an error.");
}

Wednesday, July 27, 2011

Json and Silverlight with ODataService in CRM 2011

Dynamics CRM 2011 now provides the ability to perform data operations on CRM entities using JSON and ODATA service.

Here we have tried to explain the various clauses of JSON that is supported by CRM ODATA and how this service can be used in Silverlight as well as in Scripts. Note not all standard ODATA clauses are supported by CRM.

To use these clauses in silverlight you need to add a reference to the ODataService of the CRM i.e. OrganizationData.svc.

$select: This clause is the Select part of any SQL statement where you can specify the list of attributes to be returned by the query. Note you can also provide the collection property of a 1:N or N:1 relationship.

Using JSON

If you write the following URL to read the opportunity.

http://://xrmservices/2011/organizationdata.svc/OpportunitySet

it will return all columns of the opportunity in XML but if you want to read only the name you can add the select as follows.

http://ad12:5555/crmorg1//xrmservices/2011/organizationdata.svc/OpportunitySet?$select=Name

It will return the folliwng XML


Using Silverlight:

To use the $select in the Silverlight app you need to write the query as follows.

DataServiceQuery query = (DataServiceQuery_context.OpportunitySet.AddQueryOption("$select", "Name");


$expand: Directs that related records should be retrieved in the record or collection being retrieved.

Using JSON:
If you want to read the customer information with the opportunity while we are reading the opportunity by JSON then we can use the expand, and then we can read the customer details with the opportunity. Below we have given the JSON url.

http://://xrmservices/2011/organizationdata.svc/OpportunitySet?$expand=opportunity_customer_accounts,opportunity_customer_contacts&$select=*,opportunity_customer_accounts,opportunity_customer_contacts

Using Silverlight:

To use this with the silverlight you need to write the following query in the silverlight.

DataServiceQuery query = (DataServiceQuery)_context.OpportunitySet.AddQueryOption("$select", "*,opportunity_customer_accounts,opportunity_customer_contacts")
.AddQueryOption("$expand", "opportunity_customer_accounts")
.AddQueryOption("$expand", "opportunity_customer_contacts");

$filter:

Using JSON:
To set the condition in the JSON query we can use the $filter clause in the url.
Suppose if you want read all accounts of an user the JSON url will be as follows.

http:// ://xrmservices/2011/organizationdata.svc/AccountSet?$filter=OwnerId/Id eq (guid'34fca7f5-d556-e011-b9a8-00155d005515')

Using Silverlight:
In silverlight we can use the AddQueryOption to add the $filter as we use for $expand or we can use the Where Condition as shown in the below.

DataServiceQuery query = (DataServiceQuery)_context.AccountSet.Where(a => a.OwnerId.Id == new Guid("34FCA7F5-D556-E011-B9A8-00155D005515"));

To do it through AddQueryOption you can generate the filter in a string and then pass that string a parameter to the filter option. This provides us to create dynamic filters as shown below


filter += "new_testId eq (guid'" + _userid + "') ";

DataServiceQuery query = (DataServiceQuery)

query = query.AddQueryOption("$filter", filter);

$orderby: We can use it to set the sort order. Use it same as $filter.

Using JSON:

http:// ://xrmservices/2011/organizationdata.svc/AccountSet?$orderby=Name, Address1_Country.

Using Silverlight:

DataServiceQuery query = (DataServiceQuery)_context.OpportunitySet.AddQueryOption("$orderby", "Name, Address1_Country")


$top: To define the range that how many record want to read. Max limit is 50.

Using JSON:

http:// ://xrmservices/2011/organizationdata.svc/AccountSet?$top=10

Using Silverlight:

DataServiceQuery query = (DataServiceQuery)_context.OpportunitySet.AddQueryOption("$top", 10)


$skip: To define the that how many record want to skip.
Using JSON:

http:// ://xrmservices/2011/organizationdata.svc/AccountSet?$skip=10

Using Silverlight:

DataServiceQuery query = (DataServiceQuery)_context.OpportunitySet.AddQueryOption("$skip", 10)


NOTE: By default any query executed using ODATA service will only return 50 records at a time. If we want to display All records that exist even if it is more than 50 records, then you can use a combination use of the $skip and $top clauses to read all records.

For this you can recursively call this Query where _top will be const with value 50. And at each recursion we can increase the value of the _skip by 50.

DataServiceQuery query = (DataServiceQuery)_context.OpportunitySet.AddQueryOption("$skip", _skip).AddQueryOption("$top", _top)

Friday, July 1, 2011

How to Enable and Disable the most recently used items for lookup field only.

In CRM 2011, we have found the new feature for the lookup type fields that you have the ability to see the most recently used items for that lookup while creating the records for entity.
Also you can disable this feature as well by default it is enable for all lookup types fields. If you like to see those items then, during creation of record, you need to “Double Click” on the lookup field.

See the below example for details:
• Below we have shown the account form which has the lookup field “Parent Location” and “Disable most recently used items” option is unchecked for this field as shown in below screen shot.


When you “Double Click” on Parent location field it will show you the below result.


To disable this feature you need to check the “Disable most recently used items” option then Save and publish the Form. It will disable above feature.

Thanks!

Sunday, May 29, 2011

How to get the Total Results returned Record Count for a given query

In CRM2011 it is now possible to get the Total count of records returned by a query using Fetch XML.

Using Query expression:

You can set the ReturnTotalRecordCount property to True.


Using FetchXml:

You can set the same property as shown below.

<fetch mapping='logical' count='10' returntotalrecordcount='true'>
<entity name='account'>
<attribute name='accountid' />
<attribute name='accountnumber' />
<attribute name='address1_city' />
<attribute name='address1_telephone1' />
<attribute name='name' />
<order attribute='name' />
<filter>
<condition attribute='address1_city' operator='like' value='a%' />
</filter>
</entity>
</fetch>

This can be helpful to show Record 1 of kind of status labels.

Hope this helps!

Wednesday, May 11, 2011

How to remove the default ISV buttons of CRM 4.0 from CRM 2011 after upgrade

Once you upgrade from CRM 4.0 to CRM 2011, you would find a new menu item ISV showing up in the CRM 2011 menu bar.

You never saw them before in CRM 4.0… that’s because by default CRM disables the showing up of these buttons in CRM 4.0. These buttons come along with CRM 4.0 to display the features and functionality of adding custom button.

Now you see them in CRM 2011 and you want that taken off…

Listed below are the steps to remove these buttons from your system.
- Create new solution which only contain the Application Ribbon component
- Now export this solution and extract the exported zip on your machine
- Open customization.xml file in edit mode
- You will find a similar code as shown below in the customization file


- You need to remove the Custom actions section so that this file now includes only the following nodes.

- Save the customization.xml file. Zip the file and import this customization.
- Refresh CRM to find the Menu items taken off.

Monday, May 2, 2011

How to pass field values to Form

Sometimes you have requirement to open the particular type of new record with some default values already filled. This can be achieved by passing the field values to the query string.

To open the new record form

https://<ServerUrl>/main.aspx?etn=<entity type code>&pagetype=entityrecord

Pass field values as query string parameters

http://<ServerUrl>/main.aspx?etn=<entity type code>&pagetype=entityrecord&extraqs=<fieldschemaname>=<value>

If you need to pass the multiple field values then just append those field-value combination string at the end with the “&” as a separator.

Note while generating the URL you need to take care of some characters. Instead of directly placing the character you need to use the ASCII code for that character. Below table will provide you with the list of mostly used characters while creating URL. You should prefix the “%” character before the ASCII code.


Now below example will give you an idea on how to generate URL for different type of fields, the name of the field (i.e. schema name) must be specified in lower case only.

(Blue is the actual field name and its related attribute name like for lookup there are 2 names and brown is the actual value)

Below is the total URL with all above field values passed to the new contact form,
"http://<ServerName>/main.aspx?etn=contact&pagetype=entityrecord&extraqs=birthdate%3D01%2F14%2F1984%26salutation%3DMr%26gendercode%3d1%26creditonhold%3d1%26defaultpricelevelid%3dD0B854EC-1E1A-E011-8D2B-D8D3855B354B%26defaultpricelevelidname%3dComputer%20Stationary%26parentcustomerid%3D%7b0D98B15F-0565-E011-8D90-1CC1DEE8CEB7%7d%26parentcustomeridname%3DInogic%26parentcustomeridtype%3Daccount"

Hope this helps!

Wednesday, April 27, 2011

Filtering in Crm 2011

In Crm 2011 new functionality provided that allows us to filter our views same as Microsoft Excel filtering functionality.

We can filter the columns from within the Grid as shown in below screen shot.


Click on Filter button that enables filtering for each column as shown in below screen shot.


The drop down shows the following options for filtering.


Click on Custom filter option and specify the conditions based on which records will be filtered.


Now records will be shown only for those potential customer whose name begins with “b” as shown in below screen shot.


We can save our views as shown in below screen shot.


Specify the name of your view and it will be shown to your views list as shown in below screen shot.


Hope this helps!!!

Saturday, April 23, 2011

Group by using FetchXML

In Microsoft Dynamics CRM 2011 FetchXML includes grouping and aggregation features which let us to use aggregate functions like sum, count etc.

Using Group by we can calculate sum, avg, min, max, count. But, Group by clause is not supported through LINQ in CRM.

You can only specify one aggregate attribute in a query and you cannot use the distinct keyword. To create an aggregate attribute, set the keyword aggregate to true, then specify valid entity name, attribute name and alias(variable name). You must also specify the type of aggregation you want to perform.

<fetch distinct='false' mapping='logical' aggregate='true'>
<entity name='entity name'>
<attribute name='attribute name' aggregate='count' alias='alias name'/>
</entity>
</fetch>"

Below is the example to get sum of total amount of all won quotes:
string quotes = @"
<fetch distinct='false' mapping='logical' aggregate='true'>
<entity name='quote'>
<attribute name='totalamount' alias='totalamount_sum' aggregate='sum'/>
<attribute name='statecode' groupby='true' alias='state' />
<filter type='and'>
<condition attribute=' statecode ' operator='eq' value='won' />"+
"</filter> "+
"</entity> "+
"</fetch>";

EntityCollection quotes_result = _service.RetrieveMultiple(new FetchExpression(quotes));
foreach (var q in quotes_result.Entities)
{
Decimal wonQuoteAmount = ((Money)((AliasedValue)q["totalamount_sum"]).Value).Value;
}

Wednesday, April 13, 2011

MessageSecurityException when connecting to the Web Services

When trying to establish connection with the organization service or discovery service in CRM 2011 you may receive the following exception

Unhandled Exception: System.ServiceModel.Security.MessageSecurityException: An unsecured or incorrectly secured fault was received from the other party. See the inner FaultException for the fault code and detail.

Solution: You need to Delete the device registration folder named LiveDeviceID in your profile folder C:\Users\<username>.

Alternatively you can navigate to “C:\Users\<username>\LiveDeviceID\” and rename the LiveDevice.xml file to LiveDeviceOld.xml.

Monday, March 28, 2011

Differences in Custom Workflow Assembly in CRM 4.0 and CRM 2011

We have listed the list of changes noticed for designing a custom workflow assembly in CRM 2011 and in CRM 4.0.

1. References

CRM 4.0
using System.Workflow.Activities;
using System.Workflow.ComponentModel;
using System.Workflow.ComponentModel.Compiler;
using Microsoft.Crm.Sdk;
using Microsoft.Crm.Sdk.Query;
using Microsoft.Crm.SdkTypeProxy;
using Microsoft.Crm.Workflow;

CRM 2011
using System.Activities;
using Microsoft.Crm.Sdk.Messages;
using Microsoft.Xrm.Sdk;
using Microsoft.Xrm.Sdk.Workflow;

2. Base Class

Base class definition has been changed from SequenceActivity to CodeActivity.

CRM 4.0: In CRM 4.0 we have to specify both Workflow name and Workflowactivitygroupname in the code as written in the following code.

[CrmWorkflowActivity("My Custom Workflow", "CRM Workflow")]
public class MyCustomWF: SequenceActivity

CRM 2011: In CRM 2011 that is done in different way.

public class MyCustomWF: CodeActivity

Both Workflow name and Workflowactivitygroupname can be specified at the time of registering the assembly as shown in below screen shot.


3. Execute Method

The overridden Execute method remains the same except parameter and return type.

CRM 4.0
protected override ActivityExecutionStatus Execute(ActivityExecutionContext executionContext)

CRM 2011
protected override void Execute(CodeActivityContext executionContext)

4. Create service

CRM 4.0
IContextService contextService = (IContextService)executionContext.GetService(typeof(IContextService));
IWorkflowContext context = contextService.Context;
ICrmService crmService = context.CreateCrmService();

CRM 2011
IWorkflowContext context = executionContext.GetExtension();
IOrganizationServiceFactory serviceFactory = executionContext.GetExtension();
IOrganizationService service = serviceFactory.CreateOrganizationService(context.UserId);

5. INPUT Parameters

CRM 4.0
Declaration: how to initialize the input parameter

// specified dependency property
public static DependencyProperty CaseIDProperty = DependencyProperty.Register("CaseID", typeof(Lookup), typeof(TotalTaskRetrieval));

// Specified Input property
[CrmInput("Enter Case ")]

// Set the reference Target for Property created
[CrmReferenceTarget("incident")]

// Property Defined for caseId
public Lookup CaseID
{
get
{
return (Lookup)base.GetValue(CaseIDProperty);
}
set
{
base.SetValue(CaseIDProperty, value);
}
}

Use: Access the input parameter declared above as,
Guid caseid=CaseID.Value

CRM 2011

Declaration: how to initialize the input parameter

[Input("Enter Case ")]
[ReferenceTarget("incident ")]
[Default("3B036E3E-94F9-DE11-B508-00155DBA2902", " incident ")]
public InArgument CaseID { get; set; }
Use: Access the input parameter declared above as,
Guid caseid = CaseID.Get(executionContext).Id

6. OUTPUT Parameters

CRM 4.0
[CrmOutput("outputSum")]
public CrmMoney Sum
{
get
{
return (CrmMoney)base.GetValue(SumProperty);
}
set
{
base.SetValue(SumProperty , value);
}
}

CRM 2011

[Output("outputSum")]
[Default("23.3")]
public OutArgument Sum { get; set; }

Hope this helps!!!

Monday, March 21, 2011

Reporting through BIDS in CRM Online 2011

In the CRM 2011 online if you want to create your custom SSRS report then here is the trouble, you cannot create the report directly using the SQL Queries as you do not have access to SQL Server. For this reason MS has provided BIDS tool for Dynamics CRM 2011. You can download this tool from http://www.microsoft.com/downloads/en/details.aspx?FamilyID=64a09b75-8376-4b9d-aea3-8a83a1837c4d

Using the BIDS tool, you can connect to Dynamics CRM Online service and use the CRM FetchXML queries to generate the queries required for the report.

To create the SSRS report for the CRM 2011 Online first you need to run the tool “CRM2011-Bids-ENU-i386” on the machine where you have installed the SQL Server Business Intelligence Development Studio.

After installing this, a new Data Source type gets added in the “Embedded connection type” option named “Microsoft Dynamics CRM Fetch”. To create the new report with fetch XML for the CRM 2011 you need to select this data type as shown in the below screenshot.

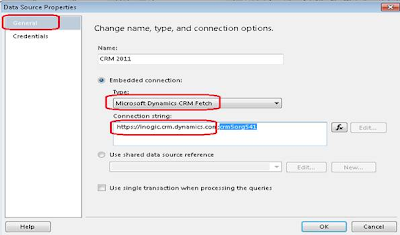
In the Connection string you need to provide your CRM 2011 online url and the org unique name, where the org unique name is optional and in the permissions section you need to provide the credentials of the CRM user.

In the SSRS report the main things are the Parameters, Query/Dataset and Design. Below is the explanation.

Parameters: You can simply defined the parameter as it is, but if you want to use the CRM filtered parameter and show this reports on the CRM grid or on the selected record, then you need to use the enableprefiltering in the fetchXML of this parameter. You can write the default fetchXML for this as follows.

Query/Dataset: Main thing in the Query is to pass the condition from the parameters. Generally in report the structure is that you have main-report and a sub-report, where you pass the parameter values of the main-report to the parameter of the sub-report.

Here we take an example to understand how it works in this scenario. For example: suppose we want to see all the contacts that is modified by a certain user, we want to run this report on the CRM user form and see the list of contacts.

For this purpose, we have created a Main report where we have a parameter named “@CRM_FilteredSystemuser” which is passed from CRM and it creates a dataset from this Parameter with three columns.
Fullname
Internamemailaddress
Systemuserid


The query for this dataset is shown in the above screenshot.
Note: If you have used the CRM parameter then it should be hidden.

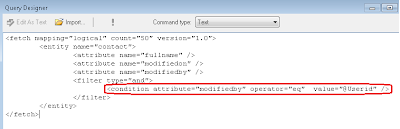
Now we need to create the sub-report which contains the list of the contacts, in the sub-report we have a parameter named @Userid, and the value for this parameter is passed from the Main Report. Now the Query for sub-report with condition is as shown below.


Once you execute the Query, the dataset will be generated. From there on you can go ahead and design the report like any other normal SSRS report.

Once designed, you can upload this report to CRM and run it through the CRM User entity form.

Through BIDS it is now really easy to design reports for CRM Online 2011. Good knowledge of FetchXML is required. However there are tools available that would let you convert/design FetchXML queries through Query designer interface.

Monday, March 7, 2011

Use of Web Resources in CRM 2011

With CRM 2011, you now have the concept of including resources within CRM that can they be used to display on CRM forms in IFRAMES and buttons and other customizable objects in CRM.

A web resource in CRM can be any of the following


Here we take an example of adding a custom html page that requires supporting javascript and images for it to work.

When you would have designed the page, there are chances that you have created a directory structure where the htm page would be in the root directory but the images would be in a folder called _img and scripts in a folder called scripts within the root directory.

To upload this entire application as resource within CRM, you will need to individually upload all of the files related to the application. However, what you need to take care is the way you name these resources in CRM while uploading. You can create a virtual directory structure by including the path in the name of the resource.

In case of our above example, the resources would be named as follows to represent the same directory structure

Suppose if you have created the following web resources.
1. New_/IMG/My.GIF
2. New_/Script/My.js

Now if you are going to use these webresources in the html web resource and the html web resource name is “new_/Pages/TestHtmlPage.html”.
Then you need to give the name as follows, because CRM takes the name as the virtual folder. Hence your script files exist in the Script folder and Html page exist in the Pages folder hence when you add the resources in your html page then first you come out from the “Pages” folder and then you give the path for the js file hence the src will be “../Script/My.js”.
< SCRIPT src=” ../Script/My.js” type =text/javascript>

Say you are developing an htm page from which you are going to create an account in CRM or need to access the controls placed on the CRM entity form, you will need to add the reference to the following script library and also ensure that you have uploaded this as a resource in CRM as well.
Once the resources have been added in CRM, you can now access them in CRM through IFRAME.


Tuesday, March 1, 2011

Addresses in CRM explained....


We recently came across a request for data correction where the customer had lost some of their address data. No addresses were displayed on the Account form. One would think all that was corrupt was the address and having them type in the address on the form should do the trick. But no, with the address missing even when they tried to manually re-enter the address in these records, they were unable to, it would throw an error. That’s when we found out the following

When you open an Account, you are presented with a set of fields for storing address. If you check the CRM account entity details, you will find there are actually two sets of address fields available. By default only address_1 set of fields are placed on the form, but you can also add the second set of address_2 fields.

Besides this we are also provided with the option to add multiple other addresses under the More Addresses section on the account form.

Common perception of this design would be that 2 default set of address fields have been added on the account entity for ease of access and use. They have the Customer Address entity to store the more addresses associated with the Account.

We just happened to find out that this is not really the case. All addresses are only stored in the Customer Address entity.

When you create a new account/contact, it would by default in the background add 2 entries in the Customer Address entity for the 2 set of address fields available on the Account form. CRM distinguishes these entries from the rest of the entries to be displayed in More addresses using the Address number column. Address number 1 and 2 are reserved for the 2 set of address fields available on the account form.

The reference to these is stored in the Account entity schema using the address1_addressid and address2_addressid.


Hope this would help someone out there understand the technical concept of addresses much better from now on

Saturday, February 19, 2011

Difference between CRM 4.0 and CRM2011 script for using on form customization

When working with CRM2011 Java script we found many difference about syntax/methods between CRM2011 and CRM4.0 Please check some of the comparisions we have listed. Please click on the Image below to enlarge view.

Monday, February 14, 2011

Create and Update events for the appointment entity

You will notice that if you register a plugin on the Create or Update event of an appointment in the Parent Pipeline, the plugins do not fire. When you create an appointment in CRM it is set to the status of “Scheduled” implying an appointment has been scheduled.


To trap create and update of Appointment through CRM you need to trap the Book Request and Reschedule request respectively.


When you run the diagnostic tool you would find that the Book Request is fired. It will show up the following xml.


Tuesday, February 8, 2011

Workflows vs Dialogs

CRM 2011 introduces the new concept of Dialogs. We have discussed this in detail in our earlier blog that can be found at http://inogic.blogspot.com/2010/11/crm-2011-dialogs-explored.html"
Here we list out the differences between Processes (Workflows) and Dialogs.

Thursday, February 3, 2011

Issue with Pulishing Workflow that use Custom Workflow Assembly

While there can be many other reasons for this, recently we came across a situation where a simple workflow assembly designed by us could not be used in a Workflow. If we added the reference to this workflow assembly in the Workflow, it wouldn’t publish. We would receive the following message "An error occured when the workflow was being created. Try to save the worflow again". Refer to the image below.


There was no further information to be found in the event log for this.

Upon further review of the code, it was noticed that the Namespace and Class name was the same.

Upon changing the namespace to something other than TestWorkflow the workflow designer accepted the workflow assembly and published it too.

Just wondering if this were an issue, it should not have allowed us to register the assembly in the first place. It would have been a better indicator of something being wrong with the class declarations.

For anyone else who face the same problem… it might help to check the class name.

Monday, January 17, 2011

Use Tracing in CRM 2011 Plugins

CRM SDK provides way for you to include the debug details about your plug-in in case you need to trace the plug-in execution. For this you will have to initialize the “ITracingService”. The service provides way to trace the details and display it whenever plug-in fails and throws an exception.

//Initialize the service
ITracingService tracingService = (ITracingService)serviceProvider.GetService(typeof(ITracingService));

Once initialized, you just need to add the logical and meaningful details as per your logic using below code,
tracingService.Trace(yourMessage);

Shown below is the example of message shown to the user when plug-in fails and throws exception.


Hope this helps you how to use Tracing in CRM 2011 plugins!

Wednesday, January 12, 2011

Connections Role in CRM 2011

CRM 4.0 provided the ability to define the relationship between entities using the Relationship feature. However this was only available for defining relations between Account, Contact and Opportunity. This concept has been enhanced further with the introduction of Connections in CRM 2011. Moreover, this has now been extended to include any entities including custom entities that you define.

Connections can basically be used to define the relation or the association between two entities. To give an example you can have an account with multiple contacts. With the help of connection you can define that one of the contact is actually the partner in the company and another an employee.

One can define any number labels for the relationships Like:

Family relationships (father, sister, brother, spouse/partner, cousin)
Social relationships (tennis partner, golf partner, club member, friend)
Sales relationships (champion, influencer, stakeholder, referrer, gatekeeper)
Business relationships (supplier, partner, consultant, contractor, competitor, former employer)

When you create a connection role, you can select the CRM entities for which this connection role can be used. In the below example we have created a role called “Employer” and made it available to be associated with the Account entity.


After users choose the records that will participate in the relationship, they can select from available labels in the respective relationship form. Only valid labels based on the definition of the entity types in the relationship role are displayed.

Managing Relationship roles is the task of choosing the labels that will represent valid options when users define these types of relationships. When you define the labels, you also define which combination of account, contact, or opportunity records will be valid for the label. Setting consistent relationship roles allows users to select meaningful labels for the relationship roles they set that can be used in a report or an Advanced Find query.

Users are not required to choose labels when they set relationships. They can just enter a description in the relationship.

To enable the Connections Role on any entity we need to permit to create connection at the entity level. As shown in the below screenshot.


Once Connections is enabled for an entity it cannot be disabled.

How to Create Connections for the Related records in the CRM 2011:

To Create the connection Open an account and go to Connections and click on the Connect  To Another. As shown in the below screenshot.

In the following window you can enter the related entity along with the role that needs to be associated.

You can see this same connection on the related record as well as shown below.


Hope this helps!

Friday, January 7, 2011

Sales Area Enhancements in CRM 2011

There have been considerable improvements in the functionality being offered in the Sales Area in CRM 2011.

Changes have been incorporated in the area of Opportunities, Orders and Invoices

CRM 4.0 Opportunities did not support adding of Write-In Products or Price Override. These attributes were present in the Opportunity entity in CRM 4.0 but not included on the forms. Even if you added them manually on the form, the functionality didn’t work. Here is a screenshot of the Opportunity Product in CRM 4.0


A major drawback was you could not create opportunities for write-in products.

But in the CRM 2011 the functionality of both Price Override and Product Override (Write-in Product) has been included.


Another change brought about in CRM 2011 is ability to enter negative quantity or amounts to create Negative Quotes/Orders/Invoices. This was sorely missed in CRM 4.0 when it came to being able to record Sales returns or Credit Memos.

In the below screenshot we added two products against the quote and it’s allow us to save it . One with write-in product with a negative Price Per Unit and another one is existing product which has negative Quantity assigned. This information flows down from Opportunity --> Quote --> Order --> Invoice as well.


As shown in below screen shot the totals are also updated on Quote header with amounts fields.


Note: You can’t set both the Price and Quantity to negative values when creating the line item otherwise it will display the following error to the user. You can set either the Quantity or Price Per Unit to negative value but not both.


With the inclusion of Negative orders and Invoices, Microsoft has tried to include a bit of accounting functionality to support recording of returns and credits. Payments is still something that has not been included in Sales Area. Yes it is CRM and not ERP but if it could go ahead and support Negative Sales, it would help if custom entity for Payments was included as well.

May be the next version :)

Tuesday, January 4, 2011

CRM 4 to CRM 2011 Upgrade.

Recently we tried to upgrade a highly customized CRM 4 install to CRM 2011 and thought it would be worthwhile to list out our findings for the benefit for all.

CRM 2011 supports both in-place upgrade as well as a fresh CRM 2011 install with a later CRM 4.0 organization import into CRM 2011. We attempted the second way, that a fresh install of CRM 2011 and then tried to import the customized organization of CRM 4.0.

If you install the CRM 2011 beta copy and try the import you will receive the following error.

…lead.Address1 Country length 160 more than original value 100…

This appears to be a bug of the beta version that is probably rectified in the CRM 2011 RC released recently.

After a successful install, you can try to import the CRM 4.0 organization, it auto detects that it is an upgrade and would performs all the necessary operations on the database. Make sure you have another backup of the CRM 4.0 in case the upgrade fails mid-way you will need to go back and restore the original copy and start over again.

After a successful upgrade we found the following items we auto-upgraded to CRM 2011 standards by the upgrade tool.

Scripts:

All the scripts written on form save, load and Change will be automatically converted into web Resource and saved as Library with the name Entityname_main .see the display name below.
Select any Web Resource it looks as shown below.


On click of Form properties for any entity you will find that library is already added on the form and it is called on load event with function name.


The code written on the Load event would be put into a function named Form_onload. The OnSave event is changed to function named Form_onsave and Onchange becomes
Attributename_onchange.

Images:

All the Images used in the Custom entities will be saved as Web resource.

ISV buttons:

Any script written on custom button added through ISV in CRM will be converted to Application Ribbons. Buttons of CRM 4.0 are moved to Ribbons in CRM 2011 as shown below.

Plugins:

Plug-in registered in the CRM for entities will be saved as Plug –In Assemblies and Sdk Message Processing

Plug –In Assemblies shows Name ,Version, Culture Public Key Token and the date on which it was created and last modified date.

Sdk Message Processing shows Message, Event Handler, object type code ,Stage and Status

Workflow:

The Workflows would be auto-upgraded as Processes in CRM 2011 as can be seen from the screenshot below


Form Layout

The form layout is carried over as is during the upgrade from CRM 4.0 to CRM 2011. We however found a conflicts tab added to a couple of forms but were unable to trace the controls placed in this section to any of the controls in the original CRM 4 form.

There are sure to be many more items that were upgraded behind the scenes and we will update the list in times to come. However this is a pretty good reference point to start with for a CRM 4 to 2011 upgrade.