Monday, May 11, 2009

Error "Sub reports within table/matrix cells are ignored" when exporting SRS Reports to Excel

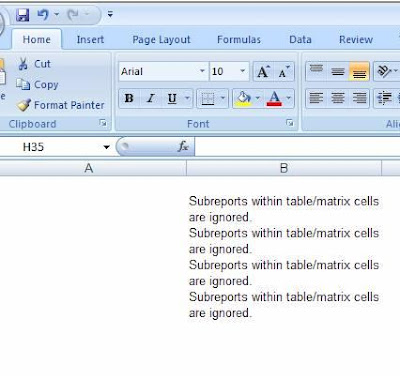
If you make an SRS report that uses Data table and has sub-reports included, you will see the below error when the report is exported to Excel.


Export to PDF format works just fine but when you export to Excel the excel file will not show the details included in the sub-report. Instead the sub-report will be replaced with a single line error "Sub reports within table/matrix cells are ignored".

To be able to export SRS reports using Sub-reports to Excel, it is advisable to use List controls instead of Data Table. Once you have made this little change, the export to excel is just perfect. Infact it will automatically even freeze the rows in the page header so that when you scroll through the data that was included in the report header stays static.

Hope this helps!

Thursday, May 7, 2009

Retrieve Marketing List Members

A Marketing list in CRM, can be a collection accounts or contacts or leads. Retrieving the members of a marketing list is not as as simple. We just realized that the list member entity only stores the link to the entity and Retrieve method is not supported by this entity.

Hence to retrieve the list members for a given entity we need to identify the type of entity being supported by the list i.e Leads/Accounts/Contacts and then using the link entity functionality link it with the listmember entity to get the list.

Following is the snippet of getting collection of accounts from a particular marketing list id.

//initialize QueryExpression for adding link entities
QueryExpression qe = new QueryExpression();
qe.EntityName = EntityName.account.ToString();
//Initialize columnset
ColumnSet col = new ColumnSet();

//add columns to columnset for the acc to retrieve each acc from the acc list
col.AddColumns(new string[] { "accountid", "name", "address1_line1", "address1_line2", "address1_city", "address1_stateorprovince", "address1_postalcode"});

qe.ColumnSet = col;

// link from account to listmember
LinkEntity le = new LinkEntity();
le.LinkFromEntityName =
EntityName.account.ToString();
le.LinkFromAttributeName = "accountid";
le.LinkToEntityName = EntityName.listmember.ToString();
le.LinkToAttributeName = "entityid";

//link from listmember to list
LinkEntity le2 = new LinkEntity();
le2.LinkFromEntityName = EntityName.listmember.ToString();
le2.LinkFromAttributeName = "listid";
le2.LinkToEntityName = EntityName.list.ToString();
le2.LinkToAttributeName = "listid";

// add condition for listid
ConditionExpression ce = new ConditionExpression();
ce.AttributeName = "listid";
ce.Operator = ConditionOperator.Equal;
ce.Values = new object[] { strList };//here “strList” is the marketing list id provided to this function.

//add condition to linkentity
le2.LinkCriteria = new FilterExpression();
le2.LinkCriteria.Conditions.Add(ce);

//add linkentity2 to linkentity
le.LinkEntities.Add(le2);

//add linkentities to Query Expression which is passed for getting collection of accounts
qe.LinkEntities.Add(le);

//above query expression is passed to retrieve multiple for getting BusinessEntityCollection of accounts.
BusinessEntityCollection bec = service.RetrieveMultiple(qe);

Similarly you could link with Contacts/Leads to get the list of members from a Contact/Lead Marketing list.

Monday, May 4, 2009

Freeze header and the first column of the GridView control

There have been often times when the customers (familiar with Excel Freeze Options) have asked for the same functionality on ASP .NET forms.

There is no direct property that would allow users to either fix the header or the column. The html concept of was hard to find with GridView control.

We found a solution that used stylesheet to freeze the header and the columns. This code really helped us achieve our goals.

Here it is...
Place your gridview under DIV. This div should contains style value as

style="height:500px; width:100%; overflow:auto;"

overflow:auto: to display the scroll bars when grid contents exceeds the grid height


Instead of hard coding div height if you need to apply the height as the page height you can refer to the following article, http://inogic.blogspot.com/2009/02/automatically-resize-iframe-to-adjust.html

In gridview header provide class name from stylesheet i.e. Freezing
< cssclass="FreezeHeader" id="”">
The above line will freeze the header row

To freeze the first column use below code for first column at run time
gvFix.HeaderRow.Cells[0].CssClass = "locked";

foreach (GridViewRow row in gvFix.Rows)
{ //stylesheet to firstcol
row.Cells[0].CssClass = "locked";
}
Here are the Stylesheet classes that are being referred above


/* Locks the left column */
td.locked, th.locked {
position:relative;
cursor: default;
left: expression(document.getElementById("div_gridholder").scrollLeft); /* div_gridholder : name of the div which holds gridview*/
}


/* Locks the header */
.FreezeHeader {
position:relative ;
top:expression(this.offsetParent.scrollTop - 2);
z-index: 20;
}


Hope this helps others give the option of Freezing rows and columns in grid controls.

Thursday, April 30, 2009

CS0433 Error in Dynamics CRM and its resolution

To incorporate a custom .NET application in Dynamics CRM, you are required to copy the custom forms to ISV folder and the compiled library to the bin folder. Sometimes it may so happen that after you have copied the dll to the bin folder and refresh CRM, it would just not load. One small custom application has brought down your CRM.

If you enable DevErrors in the web.config file, you would see a screen similar to this when you open CRM.


Cause: When developing the custom application, the project had a Global.asax added to it. When you compiled the project into a DLL the global.asax class was included in the compiled library. CRM 4.0 only requires a single Global.asax file and it has already included that in its own libraries.

Resolution: You need to remove the Global.asax from your project and compile it again. Put the revised dll in the bin folder and your CRM and the custom application is up and running.

Monday, April 27, 2009

Maps Integration for Dynamics CRM 4

There has often been a need especially when you have Sales rep requiring to visit the clients on-site to be able to get the directions to the customer location. Google Maps, Live Maps, Mappoint are some of the services that you can use to incorporate this feature in CRM. While Mappoint is a paid service, the other two are free services and can be used to plot the customer address on the map.

One of the important pre-requisites while plotting a customer address would be to geo-code (get the latitude and longitude) the addresses. It is using these geo-coding that the addresses are plotted on Map. Since a customer’s address would not change often, it is a good idea to write a workflow that will geo-code the customer addresses each time a new customer is created or its address updated.

The following webservice from Google can be used for geo-coding addresses.
http://maps.google.com/maps/geo?q=address&Key=abcd&output=xml&sensor=false

Once the addresses are geo-coded, we can add a tab on CRM account/contact form and display the customer address in a map. The map will place a pushpin at the customer location.

This can further be extended to get the Route and Directions to the customer location from a base location.

Using Live Maps it can be done using the following code

locations = new Array(‘addr1’,’addr2’);

//Make an object of RouteOptions
var options = new VERouteOptions;

// Draw the route
options.DrawRoute = true;

// So the map doesn't change:
options.SetBestMapView = true;

// Call this function when map route is determined:
//options.RouteCallback = ShowTurns;

// Show as miles
options.DistanceUnit = VERouteDistanceUnit.Mile;

// Show the disambiguation dialog
options.ShowDisambiguation = true;

//Show the directions on the map
map.GetDirections(locations, options);";

This will show a map with the route marked starting from the start point to the end location.


Another use of integrating maps would be to search of location within a given distance range. So you are visiting a customer in “Redmond” and would want to find out the other customers that are in and around this location so that you could schedule an appointment with them. Or it could be used for schedule service requests for a sales rep. If a salesrep was already scheduled for a call in Redmond area and there was another ticket raised for that area it could be handed to the same sales rep for servicing.

This could be done by finding the distance between the base location and other customer addresses and plotting the customers that fall within the requested distance on the map. One pushpin will be placed on the map for each customer address that is being shown in the map.


There is so much you can do with Maps :) And it is pretty easy to as its shown above and requires a bit SDK skills and programming knowledge. The web is full of details as to how to use various maps functionality to achieve the same. We at Inogic were debating whether to come up with an add-on for Live Maps integration at all or just leave it for you people to figure out on your after giving you the above methodology.