Monday, August 24, 2009

Converting ACT! Legacy data to Dynamics CRM

There has always been a request for bringing in legacy data to Dynamics CRM before they migrate to you. One of the key points for going through with the shift from one system to another is the ability to have access to all the records in their legacy system in Dynamics CRM.

The easy way out most often is to look for Data Export options from the current system to generic file formats like XML, CSV, XLS etc. Same is the case with ACT! as well. However though a quick and easy way out this does not necessarily guarantee the quality of the data migrated. Often not all data is exported from the ACT! System and sometimes the data exported is not in a format that can be easily imported to CRM.

ACT! however has its own SDK made available that allows us to read every entity data from ACT! And this way we have more control over the data and format in which we want to bring it into CRM.

Writing information to CRM is not a difficult task for a proficient Dynamics developer. With good knowledge of the SDK of both systems we have been able to successfully bring in not just the Account/Contact and basic details but also bring in Opportunities and history as well.

A couple of tips that would help you when writing your own import tool for ACT!

1. When importing activities, ACT! Allows you to store the activity description in rich text format. In CRM the activity details is a plain text attribute. So it is essential to make sure that all the RTF tags from the activity description read from ACT! are stripped off before writing the data to CRM.

//read act history details to RTF

RichTextBox rtf = new RichTextBox();

rtf.Rtf = oHistory.Details;

//Get the plain text desc from RTf to add to CRM

Desc = rtf.Text

2. When processing history be carefully while parsing the duration field of ACT! CRM requires duration to be specified in minutes.

3. ACT! allows to associate Primary contact as well as additional Secondary contacts with a company. The main contact of ACT can be set as the primary contact in CRM and additional contacts can be made as Contacts by setting the Parent account of these correctly.

4. ACT! provides for creating custom attributes and often you would want to bring to CRM as well. The custom attributes in ACT! are available just as any other field of ACT! and is not stored separately in a different entity.

There are a number of migration tools available in the market to take care of ACT migration if you do not like to reinvent the wheel. One of the unique tools is available here with us, where we offer it as a service / product by testing with your data and verifying the details as well as making small changes according to your specific needs. Check this tool out here.

Wednesday, August 19, 2009

Maplytics for Dynamics CRM

Further to our post on Maps integration for Dynamics CRM using Live Maps https://community.dynamics.com/blogs/crminogic/archive/2009/04/27/maps-integration-for-dynamics-crm-4.aspx we have been able to compile a list of mapping components that can be made available on different entities of CRM with the aim of enabling Geo analysis of the data stored in CRM.The entities covered are:
1. Lead/Account/Contact – Plotting of the primary address of these on the map. It also provides the directions to the customer address starting from the organization address.

2. Plotting of Accounts from a selected range of Accounts that come within the specified distance. The aim here it to be able to list out all accounts that are within a given range from the Starting point.

3. Geo mapping of Leads/Accounts on the map with the aim to allow the users to analyze their customer based on geographical regions.

4. Geo mapping of Sales/Opportunity on the map with the aim to allow the users to analyze their sales by geographical regions and thereby be able to design strategies focusing on a given region.
Some of the features are:
Ø Each of these when plotted on the map allow the users to drill down ability and also be able to open Contact/Lead/Account etc CRM form to check further details of these.

Ø While searching for directions, you can specify the Route that you want to take and you would get the direction via the specified location.

Ø View Summary or Detail information

Ø Use of Advanced find view for providing the record selection to be plotted on the map.

Preview:

Here clicking on Get Direction one can see the following screen.

Click here to check further details.

Thursday, August 6, 2009

Adding Money type attributes in Advanced Find causes error

If you were to add a money type of an attribute as one of the columns of a view you are designing, when you try to run the view, the results page will show an error message.


This is because the money type attributes require that the currency always be specified along with the money type attribute. To fix the above error all you need to do is include the currency attribute in the view and it will work just fine.


If you design a new custom Entity in CRM, the moment you add a money type of attribute, it automatically adds an attribute for currency called “transactioncurrencyid”.


If you forget to add the currency attribute on the form, when you try to provide a value in the money type attribute it will throw an error.


We have had various requests from customers who find the “Currency” attribute unnecessary as they work in a single currency and would like to avoid it. It is possible to remove the currency attribute from the form. But you can hide the currency attribute through scripting.

So in short… Money attributes require Currency attribute to tag along with them for them to function correctly.

Friday, July 31, 2009

CRM Quick Campaign - Unsubscribe option

We can create a marketing list for group of contacts, accounts or leads and against these records we can create a Quick Campaign. This Quick Campaign would ask for the type of activity to be created for these selected records.

We were required to setup a marketing list of our contacts for a mailer to be sent to them frequently. We created a Quick campaign for these contacts and selected the activity as Email. The email template provided includes an “Unsubscribe” option which can be used for getting mails back from the contact who don’t wish to receive mails thereafter.

Below is the screenshot where an activity type is selected along with the assign to options. Here, you can set the “Assign” accordingly. “Me” option says that the owner/sender of all the emails would be the logged in user while “Assign to another user or queue” option would allow you to select a particular user and this user would be the owner/sender of these emails.
When any of the contact clicks on unsubscribe link, the “To” field will get set to this selected user.


In body of this template email you can set the template message with Unsubscribe link. To provide the Unsubscribe link select the Text and click on Unsubscribe button.


This wizard ends with creating campaign and the process of sending of mails starts. The success/failures can be evaluated from the Quick Campaign just created.
When the contact clicks on Unsubscribe link the unsubscribe subjected mail would be mailed back to the sender of these mails as set above.

When the unsubscribe mail is received that particular contact from the marketing list gets updated automatically and its “Do Not send marketing materials” is set to”No” as shown in the screenshot below.


But this auto subscribe may not work and can be reasoned due to two factors:

1) The “set auto unsubscribe option” in the System settings under Marketing tab should be set and to do this follow these below steps:
a) Go to Settings ==> Administration ==> System Settings
b) In system settings go to Marketing tab and set auto unsubscribe option to “Yes”.


2) The contact for which the auto unsubscribe should have worked must not have duplicate email address duplicating with another contact, account, lead, or user. Knowing this, even resolving the email address will not set the “Do Not send marketing materials” to “No” i.e. would not auto unsubscribe this contact.

Wednesday, July 29, 2009

How to use Parameters in Workflows/Plugins

CRM Plugins and Workflows provide the ability to pass external information to the plugins as well as receive information from plugin that can be used for further processing.

Plugins:


In case of Plugins, you can use the Secured Parameter and Unsecured Parameter that is available during Plugin registration to pass static information that can be used by the Plugin.
It is better to use the unsecured parameter as this is available in offline as well.


These parameters are available as parameters to the constructor of the Plugin.

public class AccountCreateHandler: IPlugin
{
public AccountCreateHandler(string unsecure, string secure)
{
// Do something with the parameter strings.
}
public void Execute(IPluginExecutionContext context)
{
// Do something here.
}
}

Workflows:

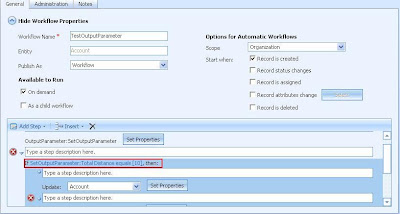
Workflows are allow for Input as well as Output Parameters. You can use the Input Parameters to pass static information to the Workflows. The Output parameter feature of Workflow is very interesting. The Output parameter defined in the Workflow Plugin, becomes available in the CRM Workflow window. You can use this output parameter in any of the Workflow steps.
It can be used in Wait/If condition block as a value to be checked for.


It can also be used in Create/Update step. Here the Output parameter becomes available only for the attributes that match the parameter data type.


If you had some complex logic to be evaluated before you decide who to assign the records to… you can create a Lookup type of Output parameter and assign the record to this.