Wednesday, October 20, 2010

Multiple Form Layouts for a single entity in CRM 2011

Another of CRM 4 shortcomings covered in CRM 2011.

There is often a request to have certain fields available/shown to only a certain set of users based on their security role. CRM 2011 have brought in field level security but it has also added the concept of designing multiple forms for a single entity.

While in CRM 4.0 requests for hiding or displaying a field was taken care of through scripting, this is now available in CRM 2011 as a feature. You can create multiple forms and then assign a particular form to a certain security role.

You can create a new form by choosing the Main Form option


Design the form as required and then assign security role to the form


Note: You can notice the checkbox shown on this form at bottom “Enabled for fallback”. This notifies that the form will be shown to the users with roles which did not have any form explicitly assigned for them. There will always be one form that has this option enabled.


If a user has different roles as a result of which there are multiple forms for an entity that can be used by the user, the form that gets displayed by defult depends on the order provided for the forms.


The default form displayed can be changed by the user who has access to more than one form layout by choosing the appropriate form from the Form Navigator. The form last chosen is recorded as the form to be used by the user for the next time.


Note each individual form supports its layout and is independent of the other form layouts. Changes done to the form like left navigation, header, footer, body changes will get applied to individual form only.

Check back with us soon for more features to be explained…

Monday, October 18, 2010

How to Show address using Bing Map in CRM 2011?

CRM 2011 provides a different feature to use java script as compared to CRM 4. In CRM 2011 you cannot write script directly in form event. Here they have provided a facility to create form library where you can write your own java script function. Only after creating a form library user will be able to call the function on form or field event.

To use the script on field or form event you will need to add a event handler, where you can specify the web resource library file and function name.

Follow the steps to create a form library file as shown below in the Screen shot.

• Click on Add button to add new form library


• You can add existing web resource or can add new web resource. Fill the details as below screen shot. To add the script click on Text Editor button and write the script.


• To use this function on Form load event you need to add event Handler and write the function as below screen shot.

• Select the library name in which you have write the script function and function name as below screen shot.

• Now save and publish the entity.

Note: if user is doing any modification on form library file then you need to go to web resource and select file and Publish it.

When you will open records, the Bing map will plot location in map.

Hope this help to understand how to use Bing map in CRM 2011.

Wednesday, October 6, 2010

Unveiling CRM 2011 features

Blog – 2: CRM 2011 features continued…
Welcome back! and we are pleased again to share some more CRM 2011 features with you.

Document Management

This provides the ability to integrate SharePoint site with CRM. By using this feature you can store the documents related to CRM in SharePoint and to manage this documents from within CRM itself. It also provides ability to create folder automatically but it needs SharePoint Server 2010 site and base site collection, this site hosted must have the Microsoft Dynamics CRM List component installed.

Goals

CRM 4.0 had the concept of defining a quota for the sales people but this was more of an information only kind of an area. There was no actual calculation or evaluation being performed behind the scenes to evaluate the sales person performance.

Now you can specify the goals for the fiscal quarter, fiscal year or for custom defined period. You can specify the timeframe and target at Goal level and criteria can be specified at Goal Metric level. Goal Metric holds the Actual and In Progress details. To calculate the actual value of the goal you can provide goal criteria. Similarly you can provide details for In Progress condition, for instance currently active but not yet completed. Check below example for more details,

We specified Goal for Quarter 3. Target is to meet the amount total as $325,000.00. Now here we specified the Time frame and Target.

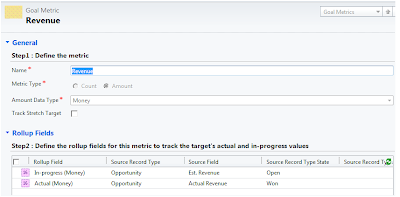
Now goal Metric “Revenue” will provide details on criteria’s,

In Goal Metric you can specify is it the Count/Amount type of metric? The Rollup Fields section specifies criteria’s,
- First criteria for In-Progress: for calculation purpose use field “Est. Revenue” and for condition status = Open
- Second criteria for Actual: for calculation purpose use field “Actual Revenue” and for condition status = Won


This has given the scope to the users to define the Goals that need to be monitored. It need not necessarily be Revenue Goals, you could also define Goals for the Sales rep based on the number of cases resolved…

CRM 2011 has brought out a lot of other changes and we are still into exploring them in detail.
We will post again with some more exciting details on CRM 2011 soon in our next blog …

Monday, October 4, 2010

Exploring the new CRM 2011

Finally! We are rolling into the much awaited beta version of CRM 2011.While we are still exploring its new features; we are pleased to share some great features. You can find some of these new useful features of CRM 2011 listed below.

- Ability to create a custom Activity type
- Dynamic Marketing List
- Bulk Delete feature
- Recurring Appointment
- Auditing feature
- Document management feature that can be integrated with SharePoint
- Goal Feature
- Rollup

New activity Type

Now you can create new type of activity: ‘message’ like shown in below screen shot.


Dynamic Marketing List

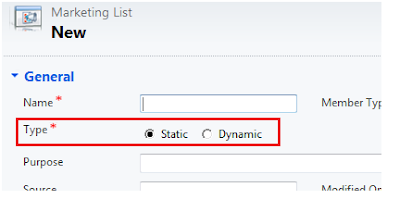
As the name suggests, it is a Marketing List which holds the members that can be added or removed dynamically. For this MS provides an ability to associate user query with the marketing list and the members are identified based on the query results.

For a Dynamic marketing list, you can specify a query that is evaluated to populate the updated list of members each time you open the marketing list.
Under Static, the members in the marketing list will change only when you manually add or remove members from the marketing list.


Bulk Delete

To relieve us of the trouble of manual deletion of records, finally we have the ability to delete multiple records using Bulk deletion wizard. The feature was earlier provided in CRM 4.0 live but not in on-premise version. Now it is included in CRM 2011 on-premise as well. Here you need to specify the criteria for an entity. The records found in specified criteria will be deleted from system. Also CRM provides ability to schedule this Job so it periodically runs and deletes the records automatically.

Recurring Appointment

Now you can create appointment which will be scheduled recursively as in MS outlook.
Example: Creating appointments for services in calendar on a periodic interval (recurrence)
You can specify the recurrence duration. The recurring appointments are created in the system immediately. If you edit a recurrence the existing appointments already created for this schedule is altered accordingly.


Auditing

Auditing Data featured in CRM 2011 provides you the ability to audit multiple entities. When you enable auditing, you can keep a track of the changes done to a particular record, a particular field, or by a particular user. This will also create logs for the changes that are tracked. By default system tracks all fields, but if needed you can specify which attributes to use for auditing.


CRM 2011 has brought out a lot of other changes and we are still into exploring them in detail.
We will post again with some more exciting details on CRM 2011 soon in our next blog 2…

Friday, August 6, 2010

Odd/Even Page Header/Footer using SRS Reports

There have been times where you need to provide a different header on one page and another on the second page or say every alternate page. This concept has been provided in MS Word, where you are allowed to setup a Odd Page Header and an Even Page Header. Should you want to incorporate this same feature in your Reports designed using SRS Reports, there is no easy way out as setting up a odd page header and an even page header.

To set up an Odd/Even page header in SRS Reports, you can make use of the Global Field Page Number. This field auto-sets the Page Number depending on the page on which the control is placed for reading the page number.

Say you want a separate image or text to be displayed on odd and even pages, you can place both the text and images on the header section of the report. You can then set the visibility property of the controls to conditionally evaluate the Page Number and display the control only if the condition evaluates to true.