We were recently working on designing a tool that deletes workflow job. We thought it would be easy to just filter out all job that related to a workflow by the workflow id and then delete that’s it.
But like always we were in for a surprise. Just thought putting it down would help others in resolving this mystery.
Each Workflow has a unique id just like any other entity. But if you search for workflow jobs using this id to look for all jobs related to this workflow, you would be in for a surprise. It would not return all of the jobs that you are expecting. The reason being each time you revise a workflow i.e unpublish and publish the workflow once again, it creates a new workflow entry in the tables. If you want to look for the workflow jobs related to a particular workflow then you need to look for the workflow id assigned to each of its versions.
For workflow, you would find the following definitions available in the tables.
There will be only 1 definition record in CRM for a workflow no matter how many times you revise it.
But each time you publish a workflow it will create a new activation record.
The activation workflow record will have its parent workflowid set to the workflow definition id.
The workflow definition record will store the id of the currently active version of the workflow.
If you unpublish a worklfow and publish it again, it will add another row to the table and the status would now be as follows:
Note the activeworkflowid of the Definition record now refers the Guid of the latest version of the workflow that is published.
Now if you want to look for system jobs for this workflow, you will need to search for jobs that have their workflowactivationid set to any of the workflowid listed above in the table.
Hope this helps you find your way through the maze of workflows!!!
Inogic is a hub of like minded professionals who believe in innovativeness and are committed to putting our time and efforts to R & D on Dynamics CRM.We endeavor to share some of our work on this blog by introducing Tips, Tricks and products from our labs.
Tuesday, November 30, 2010
Tuesday, November 23, 2010
Debug script in Microsoft Dynamics CRM
In Internet Explorer 8 (IE 8 )Microsoft provided a way to debug the scripts.
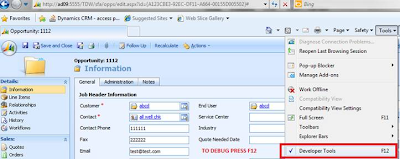
With Internet Explorer 8 and JScript Libraries, debugging scripts has become much easier. To debug the script, Please follow the step below.
Hope this helps!
With Internet Explorer 8 and JScript Libraries, debugging scripts has become much easier. To debug the script, Please follow the step below.
- When working with Microsoft Dynamics CRM try to reproduce the conditions where an error is occurring press F12 to open the Internet Explorer developer tools.
- On the Script tab, to the right of the Start Debugging button, use the drop-down to locate your JScript library.
- Set a breakpoint by clicking on the left margin within your function.
- Click Stop Debugging to stop debug.
- If your script is in the Onload event, you may need to select the Microsoft Dynamics CRM window and press F5 to reload the window.
Hope this helps!
Friday, November 19, 2010
CRM 2011 - Dialogs Explored
Dialogs are the new feature addition to CRM 2011.
Just like we had the ability to extend CRM using plugins and workflows, we now have the option of Dialogs as well.
What is different in Dialog?
Dialog runs synchronously like the Plugins but they have the option of providing user interface to accept custom information required for processing.
I took an example of a situation where, you want to add custom logic that will do the following if the user tries to make an Account inactive.
Dialogs let you design a wizard like user interface for user input. In this example we have tried to use all the features that the dialog offers. The aim here is to demonstrate the various features of Dialogs.
Check if it has a parent account associated with it, if so let the user know about it
This can be done through the if condition that was available within workflows as well.
Confirm if they want to de-activate the parent account as well.
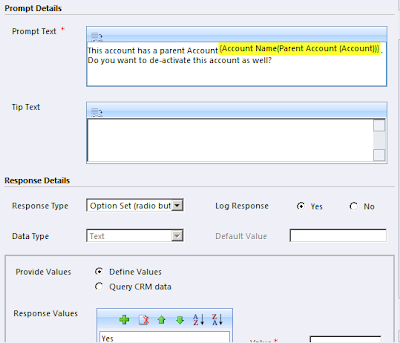
Here we shall make you of the Page feature that has been added within dialogs. We shall design a user interface that will ask the user the question and get the Yes/No response back.
For response we have set the type to be Option Set (Radio button). We have defined the values as Yes and No.
This page is then called from the Dialog as the next step
If yes go ahead and de-activate it
We can check the user response to our question in the earlier step and based on that proceed further. Here we have called another Child workflow that is designed to de-activate the account passed to it. The parameter can be passed by selecting the attribute of the Account entity on which the workflow needs to be executed.
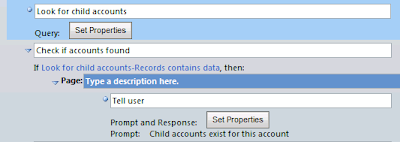
Check if the account has Child accounts associated with it, if so let the user know
We need to design a query that will let you search for child accounts.
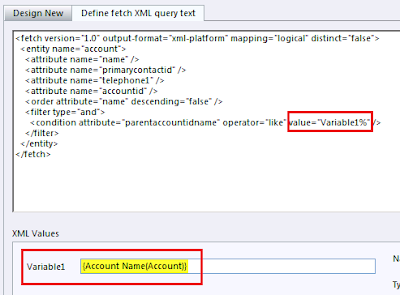
Here is the trick to designing a parameterized query. When designing the query, user the like condition and specify a dummy name in the query as shown below
There after switch to the Define fetch XML query text tab.
Change the query value to Variable1%. Once you write that, you have the Variable1 showing up on the XML values section. There select the Account Name attribute of the account entity.
This will now search for accounts where parent account = current account.
To see if the query returned results, use the following condition
Disable the Child accounts as well if the users wants
The dialogs do not allow us to loop through the query results and perform action on each of the record found. But it supports calling of Workflows. So the last step is performed by making a call to a workflow assembly.
You can pass the responses received from the user on a page designed in the dialog to the Custom Workflow Assembly.
Dialogs are fun and if put to correct use, it is a very strong tool that has been provided to us.
Just like we had the ability to extend CRM using plugins and workflows, we now have the option of Dialogs as well.
What is different in Dialog?
Dialog runs synchronously like the Plugins but they have the option of providing user interface to accept custom information required for processing.
I took an example of a situation where, you want to add custom logic that will do the following if the user tries to make an Account inactive.
- Check if it has a parent account associated with it, if so let the user know about it
- Confirm if they want to de-activate the parent account as well.
- If yes go ahead and de-activate it
- Check if the account has Child accounts associated with it, if so let the user know
- Disable the Child accounts as well if the users wants.
Dialogs let you design a wizard like user interface for user input. In this example we have tried to use all the features that the dialog offers. The aim here is to demonstrate the various features of Dialogs.
Check if it has a parent account associated with it, if so let the user know about it
This can be done through the if condition that was available within workflows as well.
Confirm if they want to de-activate the parent account as well.
Here we shall make you of the Page feature that has been added within dialogs. We shall design a user interface that will ask the user the question and get the Yes/No response back.
For response we have set the type to be Option Set (Radio button). We have defined the values as Yes and No.
This page is then called from the Dialog as the next step
If yes go ahead and de-activate it
We can check the user response to our question in the earlier step and based on that proceed further. Here we have called another Child workflow that is designed to de-activate the account passed to it. The parameter can be passed by selecting the attribute of the Account entity on which the workflow needs to be executed.
Check if the account has Child accounts associated with it, if so let the user know
We need to design a query that will let you search for child accounts.
Here is the trick to designing a parameterized query. When designing the query, user the like condition and specify a dummy name in the query as shown below
There after switch to the Define fetch XML query text tab.
Change the query value to Variable1%. Once you write that, you have the Variable1 showing up on the XML values section. There select the Account Name attribute of the account entity.
This will now search for accounts where parent account = current account.
To see if the query returned results, use the following condition
Disable the Child accounts as well if the users wants
The dialogs do not allow us to loop through the query results and perform action on each of the record found. But it supports calling of Workflows. So the last step is performed by making a call to a workflow assembly.
You can pass the responses received from the user on a page designed in the dialog to the Custom Workflow Assembly.
Dialogs are fun and if put to correct use, it is a very strong tool that has been provided to us.
Wednesday, November 3, 2010
Displaying CRM emails using SSRS 2008
Email body in Dynamics CRM is stored in HTML format and when we try to display the data as is in the SRS report, it shows up with all the HTML tags.
Microsoft Dynamics CRM reports strip the HTML content and display it in Plain text format.
Now with SSRS 2008, you can display them with part of the HTML formatting. It does not support all the HTML tags as yet, but some basic tags are supported that help provide a presentable view of the email body.
Let’s take an example, we will create sample email as shown below.
To show same content in SSRS report 2008 we need to follow the below steps:
Hope this helps...Time to move on to SSRS 2008!
Microsoft Dynamics CRM reports strip the HTML content and display it in Plain text format.
Now with SSRS 2008, you can display them with part of the HTML formatting. It does not support all the HTML tags as yet, but some basic tags are supported that help provide a presentable view of the email body.
Let’s take an example, we will create sample email as shown below.
To show same content in SSRS report 2008 we need to follow the below steps:
- Place a textbox control on report and within it place the PlaceHolder by right clicking inside textbox and choose PlaceHolder.
- Set the properties of the 'PlaceHolder', change Markup type to HTML.
- Extract description(body) of email by query eg. Select description from filteredemail where activityid='A0773451-3DE3-DF11-9EAB-0003FFD4167C'
- Set the expression value of the placeholder to description, from dataset fields.( For e.g. Fields!description.Value).
- Review the report to see the following result.
Hope this helps...Time to move on to SSRS 2008!
Tuesday, October 26, 2010
Field Level Security in CRM 2011
CRM 2011 will now allow to decide permissions not just at the record level but also “Field Level”. This means that you can decide if a user has the permission to that attribute at the time of Create or Update or simply view the data for that attribute.
Currently, this feature is only available for the custom attributes that you add. They are not available for the system attributes. When you create a new attribute you can enable “Field Level Security” for that attribute.
Once the attribute has been defined for Field Security, it becomes available for defining the security levels for different roles.
Similar to the Security roles, you can now create Field Security Profiles
The profile lists out all the attributes setup for Field Security and you can edit the permission to Read, Update and Create.
Note any security that you apply here is not just available/applicable on the CRM forms, but also programmatically. So if you try to edit a custom attribute of an entity for which you do not have permission to edit, field security will be enforced and you will not be allowed to update the record. You will receive an error.
Field security can also be specified at the time of sharing a record.
You can specify the permission to each user with which the record has been shared and the permission for the secured fields.
Subscribe to:
Posts (Atom)