Tuesday, June 2, 2009

IFD Login code for Custom apps

With CRM 4.0 and IFD getting popular by the day. We have had to work on the Login function for CRM to support IFD install. In case of IFD the authentication type is changed to Forms Authentication where you are presented with a Sign-in page for login.

Further to our post on
Login for various CRM deployments here is the code for IFD that has been added to the list.

The code below should help users developing application that need to work from an IFD environment.

/////////////////////////////////////////////////////////////////////////////////////////////////////////////
///


/// login to crm with Default Credential for IFD

//set orgname and url to properties
strOrg = strOrgName;
strserverurl = strCRMURL; // It must have on- premise url for example http://moss:5555

//init CrmImpersonator object
_impersonator = new CrmImpersonator();

//Initialize CrmAuthenticationToken token
token = CrmAuthenticationToken.ExtractCrmAuthenticationToken(context, strOrgName);
token.OrganizationName = strOrgName;
token.AuthenticationType = 0;

//initialize the Service
service = new CrmService();

//pass DefaultCredentials
service.Credentials = System.Net.CredentialCache.DefaultCredentials;

//pass CrmAuthenticationTokenValue
service.CrmAuthenticationTokenValue = token;
service.Url = strCRMURL + "/mscrmservices/2007/crmservice.asmx";


Thursday, May 28, 2009

How to login in console mode through Remote Desktop

Recently we came across a situation where we had to logon to a windows server remotely and yet open it in console mode. This means that we needed to be identified as being locally logged on instead of being treated as a remote desktop user.
We found that remote desktop command has various commandline arguments that can be used to connect. One of the arguments is /console which did the trick for us.
The command is mstsc /console
I hope this tip helps others with similar neeeds.

Monday, May 18, 2009

Form assistant

In CRM 3.0 there was no easy way to control the Form assistant window. We could get it done by making some changes to the customization file before importing into CRM.


In CRM 4.0, we have now been given the option to decide the Form Assistant settings for each entity. You are most likely to miss it and I have seen many queries on this.

To alter the Form assistant settings, follow the steps below:

1) Go to Settings => Customizations => Customize the entity in our case it is Product
2) Open product entity and go to Forms and views. Select the Form
3) Here, go to Form Properties => Display tab


Now, if both these checkboxes are checked you can see the form assistant open by default.

If, you uncheck the “Expanded by Default” checkbox, then the form assistant will be there but will not be open up by default as shown in the screen below:


Whereas, if you uncheck both the checkboxes i.e. “Expanded by Default” and “Enable form assistant”, then the form assistant will not be visible at all as shown in the screen below:


It is important to publish the entity after any customization change is made to it.

Tuesday, May 12, 2009

Bulk Delete Operations for Dynamics CRM 4 On-Premise


It is often that have you come across when you wanted to delete records from CRM in bulk.

The only option you have to delete multiple records in CRM is by selecting all records available in one page of a view and then hit delete. A view can have at max 250 records displayed. So if you need to delete more than that you have no choice but to navigate through each page and delete the records.

Since we do a lot of conversion projects we need to delete previously imported records before running the conversion. And this was too much of a task...

We started working on developing our own little project that will do the job. CRM has made available the BulkDeleteRequest Message in CRM SDK that allows us to delete more than one entity records at a time.

The BulkDelete Message will create an asynchronous job that can be monitored through the System Jobs Menu option.

You can provide the record selection criteria by specifying the query that needs to be executed to get the records over which the action needs to be performed.

If you want this to a recurring job to be executed say every x days, you can set the RecurrencePatern of the BulkDeleteRequest Message.

Since the bulk delete operation can be run on any entity and it requires a query to be provided, we thought of generalizing this. We developed a small tool that allows the users to specify the parameters for the Bulk Delete Job in user friendly interface. These jobs can be monitored in the system jobs window.

Anyone who would like to get this tool without having to re-invent the wheel can check details at http://www.inogic.com/addons_bulk_delete.htm

Monday, May 11, 2009

Error "Sub reports within table/matrix cells are ignored" when exporting SRS Reports to Excel

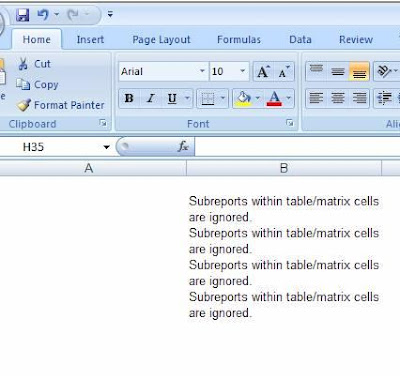
If you make an SRS report that uses Data table and has sub-reports included, you will see the below error when the report is exported to Excel.


Export to PDF format works just fine but when you export to Excel the excel file will not show the details included in the sub-report. Instead the sub-report will be replaced with a single line error "Sub reports within table/matrix cells are ignored".

To be able to export SRS reports using Sub-reports to Excel, it is advisable to use List controls instead of Data Table. Once you have made this little change, the export to excel is just perfect. Infact it will automatically even freeze the rows in the page header so that when you scroll through the data that was included in the report header stays static.

Hope this helps!