Global Functions:
There are various global functions which provide information about the client system.
IsOnline: This will return if the form has been opened from an Online or Offline system. This could be helpful if you would want a particular feature to be made available in a specific mode only.
Example:
if (IsOnline())
{
alert("You are working online");
}
These above are available through scripting. If you would like to check this in your server side app, you need to add reference to the Microsoft.Crm.Outlook.Sdk assembly. The assembly contains a class named CrmOutlookService that can be used to check the status of the Outlook client.
IsCrmClientLoaded: This will return if the Microsoft Dynamics CRM for Outlook client has been loaded by Microsoft Outlook
IsCrmClientOffline: This will return true if Microsoft Dynamics CRM for Outlook with offline Access is currently in offline mode
GenerateAuthenticationHeader:
When you call webservice through scripting, you need to pass the authentication information along with the SOAP header. This function returns the appropriate Microsoft Dynamics CRM authentication header based on each deployment type: on-premise, Internet-facing deployment (IFD), or Microsoft Dynamics CRM Online.
Example:
var soapBody = "<soap:Body>"+
"<Execute xmlns='http://schemas.microsoft.com/crm/2007/"+
"WebServices'>"+
"<Request xsi:type='WhoAmIRequest' />"+
"</Execute> </soap:Body>";
var soapXml = "<soap:Envelope " +
"xmlns:soap='http://schemas.xmlsoap.org/soap/envelope/' "+
"xmlns:xsi='http://www.w3.org/2001/XMLSchema-instance' "+
"xmlns:xsd='http://www.w3.org/2001/XMLSchema'>";
soapXml += GenerateAuthenticationHeader();
soapXml += soapBody;
soapXml += "</soap:Envelope>";
PrependOrgName: The CRM URL by default adds the CRM Organization name when you browse CRM. It is important that if you are displaying a custom page in an IFRAME, the path to the page should also include the current Organization name. This function automatically determines the current organization name and adds it to generate the URL specific to the current organization.
Example:
var url = prependOrgName("/isv/app/myapp.aspx");
results: If you were logged into Contoso organization “/Contoso/isv/app/myapp.aspx”
Global Variables:
Some of the Global variables that can really come in handy are
1. SERVER_URL: This will return the base Server URL.
2. ORG_UNIQUE_NAME: This will return the unique text value of the organizations name. This is the same value to you also receive in custom forms if you set the PassParams to be true.
Sunday, October 18, 2009
Tuesday, October 13, 2009
How to edit the list of entities displayed in the Look for picklist in Lookup window
The regarding lookup windows generally displays a list of all entities that can be associated with an activity. Quite often this feature becomes quite an issue with the users always having to select the appropriate entity from the list before applying the search. The longer the list of entities the more time consuming it is to search using the lookup window.
It would be a boon to have only a selected few listed that you use and do away with the rest. Well this is not available for customization through the CRM customization area. But it could be done with a couple of lines of script added to the onload of the form to manipulate the default properties of a lookup control to get the desired results.
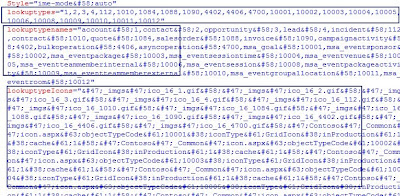
For better understanding of how this works, it would be good to check the source of one of the CRM form that has a lookup control. In our example we are using the source of the Email form. Here when you search for regardingobjectid, you will find the “Lookup Types”, “Lookup Type names” ,”Lookup Type Icons” and “default type” properties of the Lookup control being set.
It would be a boon to have only a selected few listed that you use and do away with the rest. Well this is not available for customization through the CRM customization area. But it could be done with a couple of lines of script added to the onload of the form to manipulate the default properties of a lookup control to get the desired results.
For better understanding of how this works, it would be good to check the source of one of the CRM form that has a lookup control. In our example we are using the source of the Email form. Here when you search for regardingobjectid, you will find the “Lookup Types”, “Lookup Type names” ,”Lookup Type Icons” and “default type” properties of the Lookup control being set.

This provides the list of the entities that shall be displayed in the Look for entity list. To edit this to set your specific list of entities to show up in the Look for section you need to set these properties appropriately through scripting.
//Give the entity type code that you want in below script we want to show account, contact, contract and order in the list //codes
crmForm.all.regardingobjectid.lookuptypes = "1,2,1010,1088";
//Make sure you set the path of the entity images correctly for the list specified above. If you notice it is generally in the form of /imgs_ico_16_
crmForm.all.regardingobjectid.lookuptypeIcons = "/_imgs/ico_16_1.gif:/_imgs/ico_16_2.gif: :/_imgs/ico_16_1010.gif : :/_imgs/ico_16_1088.gif ";
//The below script is to set default entity in the multiple entity lookup. Here we set the default entity to be contact. If you want contract then write 1010 in place of 2 in //below script
crmForm.all.regardingobjectid.defaulttype = "2";
You need to add the above 3 lines of code in the onload event of the email form and publish it. Next time the lookup window for regarding will only list the 4 entities listed above.
Friday, October 9, 2009
Using IE Developer tool to extract information from CRM forms.
CRM forms use lots of stylesheets to design their forms. It can be a very tough job to be able to design a custom form with the same look as that of standard CRM Forms. IE developer tool can be of great help in getting you closer to be being able to design similar looking forms.
The tool is made available by Microsoft and it help you to review the properties and stylesheet of specific element of the pages being displayed in your IE browser.
Once you install the tool it would be available on the IE standard toolbar as shown below.
 Clicking on this button will show up the tool IDE with all the information. It is more organized way of what we get after view source.
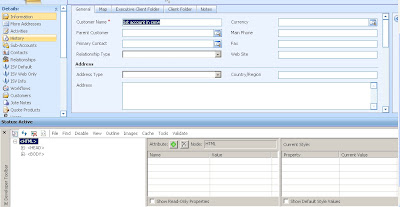
If need to know properties (id/stylesheet info) of any field, area, left nav on form then choose select element option

Now select your field/region/area and its details shall be displayed like the color, id, css class names etc…
For the images you could get the control source
 To get the URL of the left nav options
 Stylesheet classes applied

The tool is made available by Microsoft and it help you to review the properties and stylesheet of specific element of the pages being displayed in your IE browser.
Once you install the tool it would be available on the IE standard toolbar as shown below.
 Clicking on this button will show up the tool IDE with all the information. It is more organized way of what we get after view source.
If need to know properties (id/stylesheet info) of any field, area, left nav on form then choose select element option

Now select your field/region/area and its details shall be displayed like the color, id, css class names etc…
For the images you could get the control source
 To get the URL of the left nav options
 Stylesheet classes applied
Thursday, October 8, 2009
Working with Volume Discounts in Dynamics CRM
Though CRM is not an accounting system, it has worked towards coming pretty close to working as Quoting solution as well. It has incorporated the concept of Discount lists that is widely available in accounting systems to enable Volume discounting.
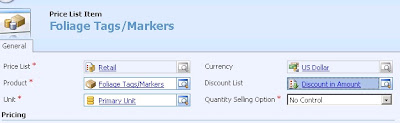
There are two types of Discount List that can be created in Dynamics CRM (i.e. Percentage OR Currency Amount. As shown in the below screenshot.

Discount lists is available under Product Catalog. You can create your discount list and add the various qty brackets for volume discounts as shown below.

As shown in the above screenshot, this discount is applied only when this item is ordered for the specified # of qty provided in the Discount bracket above.
So if you purchase 5 units of an item with its Price Per Unit = $100 and per unit Discount available would be $10 so the calculation would be
Qty = 5
Price per unit = $100
Total Price = $500
Volume Discount = $10
Total Discount = $50
Amount = $450
To apply the discount for a product you need to associate the discount list with the appropriate price list. Unless this association is made, no discounts shall be calculated.
There are two types of Discount List that can be created in Dynamics CRM (i.e. Percentage OR Currency Amount. As shown in the below screenshot.
Discount lists is available under Product Catalog. You can create your discount list and add the various qty brackets for volume discounts as shown below.
As shown in the above screenshot, this discount is applied only when this item is ordered for the specified # of qty provided in the Discount bracket above.
So if you purchase 5 units of an item with its Price Per Unit = $100 and per unit Discount available would be $10 so the calculation would be
Qty = 5
Price per unit = $100
Total Price = $500
Volume Discount = $10
Total Discount = $50
Amount = $450
To apply the discount for a product you need to associate the discount list with the appropriate price list. Unless this association is made, no discounts shall be calculated.
Wednesday, September 30, 2009
Designing Simple Dashboards with .NET ASP Chart Controls and web parts
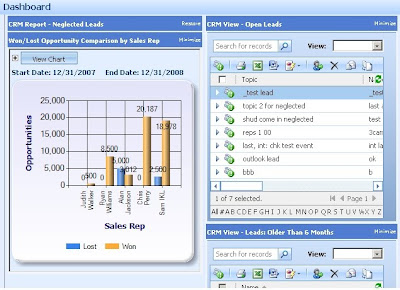
In our last post, we had explained how we could integrate SRS reports in Web Parts and make a user friendly Dashboard easily.
The Dashboard work just great… but on the presentation front, SRS report is not that flexible and it takes up a lot of space with the additional toolbars that the Reportviewer bring along. Yes there are few options that can be passed along in the querystring to hide these additional toolbars but then it doesn’t seem to work across all versions.
You must have come across a number of third party chart tools that help you create fancy looking charts. We decided to use the freely available .NET Chart controls available from Microsoft. Today we explain how we could use these controls to make easy to use and fancy looking charts that can be integrated in the webparts to enhance our Dashboard.
.NET charts enable you to design various types of charts
Lets pickup a simple column chart example that shows Won/Lost Opportunity comparison by Sales Rep.
1. The first step is to design the SQL query to retrieve the required information. We would need to design the query to return the result in the following table format
Sales Rep Won Opp $ Lost Opp $
2. So we have 2 series that need to plotted the Won Opp series and the Lost Opp series. The two series would be assigned to the Y-Axis. The Sales Rep being on the X-axis.
3. Once you have the query ready and you have decided on the X and Y axis series, you just have to go ahead and set these as the chart properties.
// Set chart data source
chart1.DataSource = myCommand;
//Set the Chart Type
chart1.Series["Series 1"]. ChartType = SeriesChartType.Column;
chart1.Series["Series 2"]. ChartType = SeriesChartType. Column;
// Set series members names for the X and Y values
chart1.Series["Series 1"].XValueMember = "Sales Rep";
chart1.Series["Series 1"].YValueMembers = "Won Opp $";
chart1.Series["Series 2"].YValueMembers = "Lost Opp $";
// Data bind to the selected data source
chart1.DataBind();
The ValueMember above needs to refer to a column of the SQL query designed.
Note: If you wanted this to be a Bar chart instead… no fuss just change the chart type of series to bar chart
chart1.Series["Series 1"]. ChartType = SeriesChartType.Bar;
chart1.Series["Series 2"]. ChartType = SeriesChartType.Bar;
4. Placing a chart control on a web form and binding it with the data as explained above, you should have a web page ready that displays a fancy looking chart ready.
5. Next step would be to add the URL to this page in your Web part Dashboard and voila you have integrated this with Web Parts as well and now you can benefit from the features of both the tools.
Hope you get going!!!
Subscribe to:
Posts (Atom)