Wednesday, January 13, 2010

Increasing the length of address1_line1 attribute does not work - FIX

We once happened to increase the length of the adress1_line1 attribute of account to 200. We had done this before with other attributes and it had worked just fine.

So we were surprised when even after publishing the account entity after make the above change, we still received an error.

To Fix this Error we had to instead increase the length of line1 attribute of the “customeraddress” entity and publish this entity.

Once the above change was published we did not receive any more errors related to street1 attribute on the account entity.

Monday, January 11, 2010

Change left navigation lable ,display order on custom entity

This blog will help you to customize your left navigation pane settings found on entity record. Like shown in below screen shot. You can change the order as well as label shown over here but note that this functionality will only apply on custom entity and not on system entity.

This is CRM functionality where you can change the display label and order of the list on the left navigation. Following below steps for this:

- Go to Settings --> Customization --> Customize entities and open the entity of which the related entities label you need to change. (see below the screen) here we have displayed changes in the account-opportunity bid.


- Go to 1:n relationships and open the related entity and find “Navigation pane item for primary entity” section on page (see below the screen).


- In this section you have see four fields as follows:
o Display Option: In this fields contain three option select “Use Custom label”.
o Custom label: Enter your text
o Display area : Select the display area such as details, Service, sales , marketing .
o Display Order: Enter order number which is set the order of the displayed list.
- After that publish it and open the record and check the changes.

Thursday, January 7, 2010

Debugging Script with CRM events

Writing JavaScript in CRM is a tedious job and finding the error in your script is even more difficult. The best way to find the error cause is to debug it. The blog will give you the steps to debug the scripts added on form events in CRM.

Steps to enable debugging script:

- Go to Internet Explorer settings.
- Click on Tools and select Internet Options. You will we see following screen.


- On the Advanced Tab, under Browsing find the Disable script debugging (Internet Explorer) option and uncheck it.
- In the script use “Debugger”, just before the statement where you want to start your debugging session.
- For example: you can write script under the CRM events such as onLoad, Onsave etc.
debugger;
//after start to write script
- After add script ,save it and publish. Refresh the page, you will see following screen.


- Select new instance of visual studio 2008/2005 and click on yes. After this open script code on visual studio for debugging mode where you can debug own script. (See below the screen)

Monday, January 4, 2010

How to change the properties of the Primary Attribute of an Entity

The blog will help you change the properties of primary attribute of an entity. Modifying properties of primary attribute is disabled when you try to do it from “Primary Attribute” tab. However you can change the properties if you opened the attribute from Attributes left navigation instead.


Follow the steps below to change the requirement level for account entities primary attribute “name”. (Note the Ownership of entity does not matter here i.e. as “User” or “Organization”)

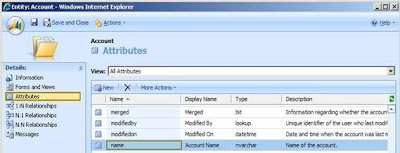
1. Go to Attributes and select “name” i.e. primary attribute of entity. As shown in below screen shot.


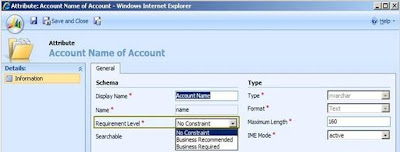
2. Open primary attribute i.e. name and change its Requirement Level to “No Constraint” then Save and Close.


3. The changes will also get reflected in Primary Attribute tab. Publish account and test the changes.

Monday, December 28, 2009

CRM Relationship Behavior

The blog will help you in the scenarios when you requires to move records from one user to another user with some conditions. Like in scenario one of your sales rep leave the organization and you need to assign his records to the newly joined rep but you also need to keep the history of this old rep (completed work like activities etc) in such scenario you need to check what type relationship behavior is applied in your entity relationship.

The relationship behavior feature of CRM handles action output as per specified settings. Like you can decide major actions Assign, Delete, Share to be handled properly. Say you assigned accounts from one user to another user and in this action you also need to assign all active calls to new user but not need to assign completed call then in such scenario you need to provide relationship behavior of Account-Phone Call entity to Configurable Cascading and set apply rule as “Cascade Active” for Assign action. This will apply changes as per discussed above.


The different type of behaviors provided are,
Parental
o In a parental relationship between two entities, any action taken on a record of the parent entity is also taken on any child entity records that are related to the parent entity record. if you delete a record in the parent entity, the related child entity records are also deleted; or if you share a parent entity record, the related records from the child entity are also shared. All option are disable for Parental relationship
Referential
o In a referential relationship between two entities, you can navigate to any related records, but actions taken on one will not affect the other
Referential, Restrict Delete
o Actions taken on parent will not affect child record but parent record cannot be deleted till the child record exists. i.e you cannot delete a record when related records exist.
Configurable Cascading
o You need to specify your setting here.

The type we are interested here is “Configurable Cascading”. It allows you to decide what type of behavior we need to apply.

The useful details of different cascading rules are (note here me is referred to the user on whom you will perform actions)
• Cascade All: Perform action on all of my child records. Like if assigned my account to another user then all my activities, orders, invoices etc are assign to new user including open, completed and other user owned records
• Cascade Active: Perform action on only my active child records
• Cascade User-Owned: Perform action on all my child records which is owned by me
• Cascade None: do nothing to my child records
• Remove Link: remove link from child record
• Restrict: Applies to Delete. The delete is not allowed if there are other entity instances that reference the ID of the entity instance being deleted.