The story goes, the system had only one user that was assigned the System Administrator Role, to avoid giving blanket rights to many in the organization.
 Unfortunately, this user (the only System Administrator) goes ahead and takes the role off their user. Cool… Now we are left with no System administrator user in our CRM system.
System Administrator happens to be the only user with the privileges to assign roles to a user in CRM.
With no System administrator in the entire system, it was as if we were locked out as no one had any rights to make anybody the system administrator.
 The only workaround, though unsupported, worked for us is to make a couple of updates to the tables directly from the backend.
select * from SystemUserBase where FullName='System Administrator'
From this query we was able to get the “Systemuserid” of the “System Administrator”
These are the two distinct ways that you can query CRM using CRM SDK to retrieve the required information.
QueryExpression is the mostly commonly used way for querying information in CRM. Probably because it uses the object oriented style of coding and so you have distinct classes for query, condition, columns etc. Youhave intellisense to support you when writing a query using QueryExpression.
However, it has its own limitations, one of them being the inability to provide a column of a linked entity to be returned as the query result. This perhaps because the Query Expression would return a dynamic entity or a strongly typed base entity and so it is unable to return columns of related entity.
So you are not able to execute a query similar to the following
Select Opportunity.name, Opportunity.estimatedvalue, Account.address1_city from FilteredOpportunity Opportunity
Inner join
FilteredAccount Account on Opportunity.customerid = Account.accountis
Where account.address1_country = “US”
This is however possible using FetchXML. FetchXML requires the query to be specified in XML format and the resultset is returned in XML format as well. This allows FetchXML to return related entity columns as well as this is just another node in the xml doc.
The above select query can written as follows using FetchXML
<fetch version="1.0" output-format="xml-platform" mapping="logical" distinct="false">
<entity name="opportunity">
<attribute name="name"/>
<attribute name="estimatedvalue"/>
<attribute name="opportunityid"/>
<order attribute="name" descending="false"/>
<link-entity name="account" from="accountid" to="customerid" alias="aa">
<attribute name="address1_city"/>
<filter type="and">
<condition attribute="address1_country" operator="eq" value="US"/>
</filter>
</link-entity>
</entity>
</fetch>
Note: CRM Views allow you to select columns of related entity to be displayed in the view… how do you think they do it??? FectchXML ofcourse. The query of the view created is stored as a FetchXML query in the SavedQuery entity.
CRM also provides the following messages to convert FetchXML to QueryExpression and vice versa.
- FetchXmlToQueryExpression : Converts from FetchXML to query expression.
- QueryExpressionToFetchXml : Converts from query expression to FetchXML.
Note again, if you are to convert a FetchXML that has select columns specified from related entity, to Query Expression, the related entity columns are not included in the QueryExpression columns list.
Hope this helps to smart querying!!!
The finalizer for the LogonManager instance should not be called directly, use a “using” statement instead. At LogonManager.Finalize()
If you are writing code for CRM Online install, chances are that you would receive the above error when trying to execute your code.
Currently you would have used a similar code block
// Retrieve a Windows Live ticket from the Live service.
LogonManager lm = new LogonManager();
string passportTicket = lm.Logon("someone@microsoft.com",
"password", "crm.dynamics.com", policyResponse.Policy, "Production");
Try instead to use the using block as advised. Change this section of the code to
using(LogonManager lm = new LogonManager())
{
string passportTicket = lm.Logon("someone@microsoft.com",
"password", "crm.dynamics.com", policyResponse.Policy, "Production");
}
Precautions to be taken when installing a CRM Online piece of code on any system.
1. Make sure you have copied the msidcrl40.dll to the system32 folder.
2. Use the Microsoft.CRM.SDK.dll and Microsoft.CRM.SDK.dll provided in the sdk for specifically CRM Online
3. The idcrlwrapper comes along with a supporting registry file in the SDK folder. Make sure you install the registry entries.
4. Be sure to use the 64 bit version for all of the above if trying to install it on a 64 bit platform.
Good luck!
In Dynamics CRM, if you were to create a related entity from within the Parent entity, take for example you create a new contact from within the Account form, the account address and other related information is automatically copied over to the new Contact as well.
If CRM does this, there sure must be a way to get this done programmatically as well, and yes there is a message that helps you do just this.
The message is InitializeFromRequest. You need to need to provide the following details to this request to have it create the related entity with all the related information from the Parent entity copied over.
EntityMoniker = The moniker data type of the source/parent entity from which details need to be copied over.
TargetEntityName = The type of entity that you want to create from the given parent entity
Once this message is executed it will return the requested entity object. Note that at this stage only the details have been copied over but this record has not yet been created in CRM. You can process this instance further to set other properties if required and then use the Service.Create message to create the entity instance in CRM.
You can check out the SDK (hyperlink sdk to the following url http://msdn.microsoft.com/en-us/library/bb956722.aspx) for further details on this message.
It is common knowledge that Dynamics CRM is based on Windows authentication. This means that for the users to be able to access Dynamics CRM, they should exist in Active Directory (AD) before they can be added as Users in Dynamics CRM.
At the time of adding a System User in CRM, it asks you to enter the windows logon id, with that entered, it automatically auto populates the other information for the user like user name, email address etc. This information is picked from the AD User account that was created.
If suppose, you would like some additional custom information to be brought over from AD when the user is created, you will need to read the AD account and have the plugin set the information in your custom attribute.
You will need to access the LDAP functions made available to read the AD user account. Read the information required and update it in CRM attributes.
Sample code:
//Get AD root path
objRootEntry = new DirectoryEntry(strRootPath);
//Init object for ADsearcher
objADSearcher = new DirectorySearcher(objRootEntry);
// search for a given user name
objADSearcher.Filter = String.Format(@"(&(objectClass=user)(anr={0}))", strLogin);
// Find
objResult = objADSearcher.FindOne();
//get the emaiid from the AD user properties //You can use your custom attribute property to read its value
if (objResult.GetDirectoryEntry().Properties["mail"] != null)
{
strUserEmail = objResult.GetDirectoryEntry().Properties["mail"].Value.ToString();
}
References:
http://msdn.microsoft.com/en-us/library/aa367033(VS.85).aspx
 The only workaround, though unsupported, worked for us is to make a couple of updates to the tables directly from the backend.
 Now use this “systemuserid” in the below query:
 Now find the roleid of “System Administrator” role by the below query.
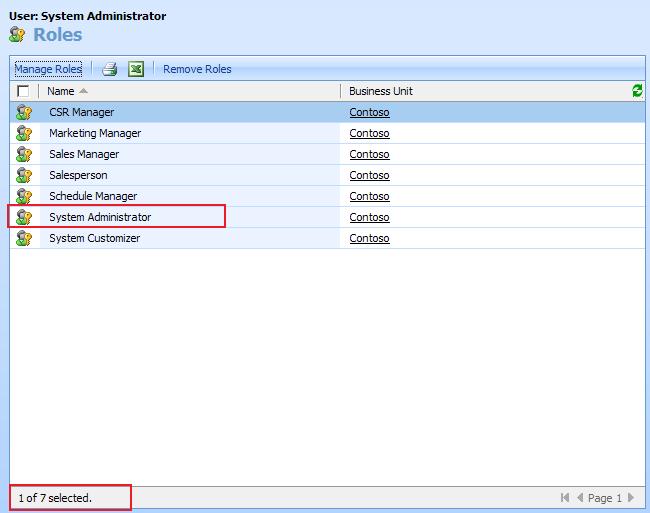
 update SystemUserRoles set RoleId='B6F673CE-A5EE-DD11-BDF0-0003FFEB167C' where SystemUserId='3B0574CE-A5EE-DD11-BDF0-0003FFEB167C'
 However, the “CSR Manager” role is missing because we have updated this roleid by “System Administrator” roleid in “SystemUserRoles” table.