Monday, February 14, 2011

Create and Update events for the appointment entity

You will notice that if you register a plugin on the Create or Update event of an appointment in the Parent Pipeline, the plugins do not fire. When you create an appointment in CRM it is set to the status of “Scheduled” implying an appointment has been scheduled.


To trap create and update of Appointment through CRM you need to trap the Book Request and Reschedule request respectively.


When you run the diagnostic tool you would find that the Book Request is fired. It will show up the following xml.


Tuesday, February 8, 2011

Workflows vs Dialogs

CRM 2011 introduces the new concept of Dialogs. We have discussed this in detail in our earlier blog that can be found at http://inogic.blogspot.com/2010/11/crm-2011-dialogs-explored.html"
Here we list out the differences between Processes (Workflows) and Dialogs.

Thursday, February 3, 2011

Issue with Pulishing Workflow that use Custom Workflow Assembly

While there can be many other reasons for this, recently we came across a situation where a simple workflow assembly designed by us could not be used in a Workflow. If we added the reference to this workflow assembly in the Workflow, it wouldn’t publish. We would receive the following message "An error occured when the workflow was being created. Try to save the worflow again". Refer to the image below.


There was no further information to be found in the event log for this.

Upon further review of the code, it was noticed that the Namespace and Class name was the same.

Upon changing the namespace to something other than TestWorkflow the workflow designer accepted the workflow assembly and published it too.

Just wondering if this were an issue, it should not have allowed us to register the assembly in the first place. It would have been a better indicator of something being wrong with the class declarations.

For anyone else who face the same problem… it might help to check the class name.

Monday, January 17, 2011

Use Tracing in CRM 2011 Plugins

CRM SDK provides way for you to include the debug details about your plug-in in case you need to trace the plug-in execution. For this you will have to initialize the “ITracingService”. The service provides way to trace the details and display it whenever plug-in fails and throws an exception.

//Initialize the service
ITracingService tracingService = (ITracingService)serviceProvider.GetService(typeof(ITracingService));

Once initialized, you just need to add the logical and meaningful details as per your logic using below code,
tracingService.Trace(yourMessage);

Shown below is the example of message shown to the user when plug-in fails and throws exception.


Hope this helps you how to use Tracing in CRM 2011 plugins!

Wednesday, January 12, 2011

Connections Role in CRM 2011

CRM 4.0 provided the ability to define the relationship between entities using the Relationship feature. However this was only available for defining relations between Account, Contact and Opportunity. This concept has been enhanced further with the introduction of Connections in CRM 2011. Moreover, this has now been extended to include any entities including custom entities that you define.

Connections can basically be used to define the relation or the association between two entities. To give an example you can have an account with multiple contacts. With the help of connection you can define that one of the contact is actually the partner in the company and another an employee.

One can define any number labels for the relationships Like:

Family relationships (father, sister, brother, spouse/partner, cousin)
Social relationships (tennis partner, golf partner, club member, friend)
Sales relationships (champion, influencer, stakeholder, referrer, gatekeeper)
Business relationships (supplier, partner, consultant, contractor, competitor, former employer)

When you create a connection role, you can select the CRM entities for which this connection role can be used. In the below example we have created a role called “Employer” and made it available to be associated with the Account entity.


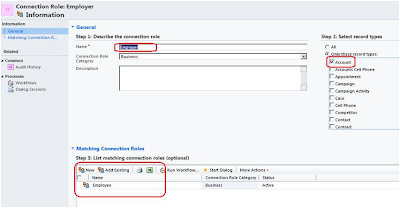
After users choose the records that will participate in the relationship, they can select from available labels in the respective relationship form. Only valid labels based on the definition of the entity types in the relationship role are displayed.

Managing Relationship roles is the task of choosing the labels that will represent valid options when users define these types of relationships. When you define the labels, you also define which combination of account, contact, or opportunity records will be valid for the label. Setting consistent relationship roles allows users to select meaningful labels for the relationship roles they set that can be used in a report or an Advanced Find query.

Users are not required to choose labels when they set relationships. They can just enter a description in the relationship.

To enable the Connections Role on any entity we need to permit to create connection at the entity level. As shown in the below screenshot.


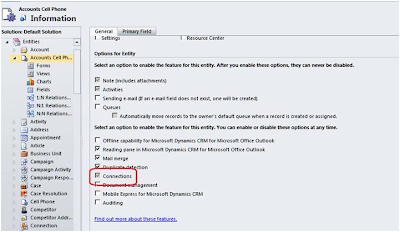
Once Connections is enabled for an entity it cannot be disabled.

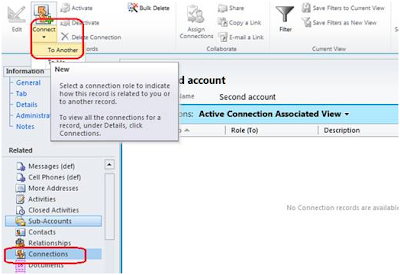
How to Create Connections for the Related records in the CRM 2011:

To Create the connection Open an account and go to Connections and click on the Connect  To Another. As shown in the below screenshot.

In the following window you can enter the related entity along with the role that needs to be associated.

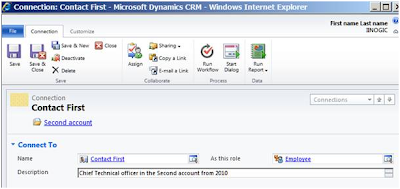
You can see this same connection on the related record as well as shown below.


Hope this helps!