Wednesday, September 11, 2013

Business Rules introduced in CRM 2013 (Orion)

In CRM 2013 Microsoft introduced many more interesting features one of them being Business Rules. Business Rules is a way to provide custom business logic through a simple to use UI and eliminate the need to write scripts to handle such UI driven business logic. Examples of such business logic includes enable/disable or show/hide logic or business required or set the value of one field based on the value entered by user in another field.

How to create Business Rules in CRM 2013
  • The ability to add Business rules has been included as a part of the entity design and can be handled from the Entity customization screen.

Once you click on “New Business Rule” it will open following window.


Let us look at each of the fields available on this screen.
Scope: Using scope you can define the Forms that you would like to apply the business logic on. You can choose a single or all forms to apply this business rule on.
Name: Provide a descriptive name for the rule.
Conditions:  In this section you can specify the conditions if any to check. You can provide multiple conditions and currently all conditions are combined using “AND”. It does not provide support for “OR”.
  1. Field : Select the Field for comparison. This will list out all the fields from selected entity.
  2. Operator : Select the comparison operator.         


  3. Type : it allow us to specify the type of data with which comparison should be done. It has options as Field and Value as shown below.
  • Field : if you select type as field it allows to do comparison with another field on the same entity as shown below. It will only allow for comparison between fields of the same data type.
  • Value : if you select type as value it will allow you to enter the value to be compared with. Depending on the data type of the field selected you will be allowed to enter the values.

Once condition is set click on tick mark button as shown above so it will save the condition.
Now as you can see in below example we have set Business Rule name as “Account number required” and condition as “If Relationship Type equals Customer” and “Account Number does not contain data” Going further after specifying condition now set the action need to be performed when condition is true.
Action : it allows us to set the actions which will get triggered when condition is true.

1. Show error message: if condition is true and if you set action as “Show error message” it will show/throw error. Here you can select the field on which you would like to set error message and give specific error message. And save those changes.


It will show error as follows.

2. Set field value: if condition is true and if you set action as “Set field value” it will set specific field to default field value or to another field value. This could be used in scenarios where the Probability % is driven by the sales stages on opportunity.

For example, if you have sales stage selected as “Qualify” then you can set probability of that opportunity as 30, If sales stage is “Develop” then probability is 50, If sales stage is “Propose” then probability is 80 and when sales stage is “Close” then probability is 100.

Note: consider for each condition you need to create different Business Rule. then only it will set different values for different sales stages.


It will set value as follow.

3. Set business required: if condition is true and if you set action as “Set business required” it will set another field as “Business Required” or “Not Business Required”. As shown in below select field which you would like to set business required and then set status as per requirement. Click on save.


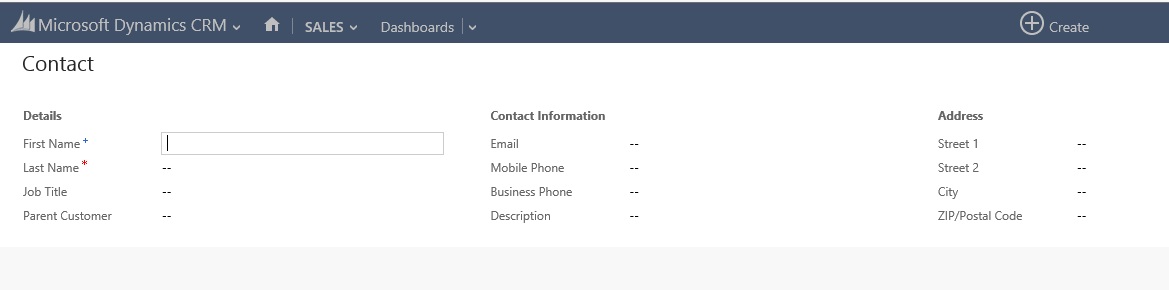
It will set field business required as follow. Once you select Relationship type as “Customer”, it will set Account Number as Business Required.


4. Set visibility: if condition is true and if you set action as “Set visibility” it will either hide the field or show the field on form. As shown below select field for which you would like to set visibility then select the status of field either “Show field” or “Hide field”. And save those changes.


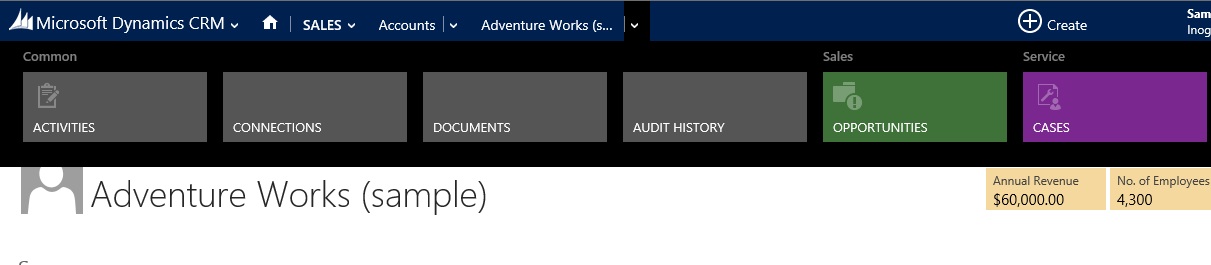
By default it will show Account number field on account form but once you select relationship type as Customer it will get hide as shown below.

5. Lock or unlock the field: if condition is true and if you set action as “Lock or unlock the field” it will either lock the field or unlock the field on form. As shown below select the field and then set its status either “Lock” or “Unlock”.


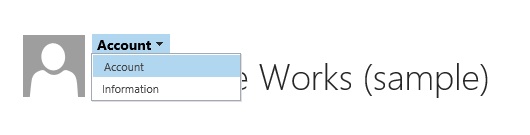
By default the Account number field is Unlocked but once you select Relationship type as customer, the Account number field get Locked as shown below.

Note: There is no way to provide for an “Else” condition right now. So if you would like the action to differ when the relation type is “Customer” and when it is something else, you need to create another rule for the else condition. If another rule is not created and you change the value of the relation type from Customer to something else, the error being displayed on Account number would not be immediately refreshed similar to onchange scripts written with if.. else condition to handle immediate updates.
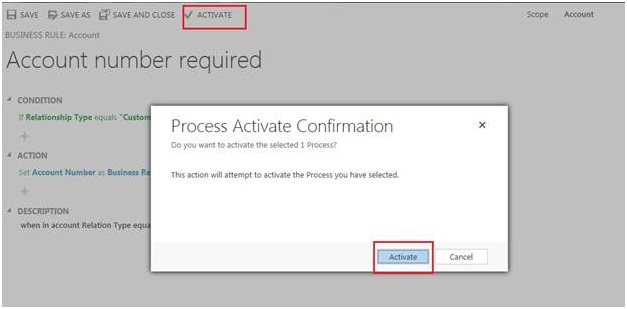
After this you can specify the Description about the rule as shown in below screen shot. Click on save and Activate the Rule.

Once you click on Activate button it will prompt for Process Activate Confirmation window here select Activate.

Once Rule is activated its status is changed from draft to Activated as shown below.

Note :
1) consider whenever you require to do changes in rule you need to first deactivate it and then do the changes, save those changes and Activate that rule again.
2) Business rules being a part of entity customization can be shipped along with the entity.
3) Since the tablet UI is rendered based on the entity forms defined, the business rules would also be applied on Tablet devices.

Conclusion
Business Rules is a very strong tool in the hands of System Administrators where by they can easily implement custom UI logic. The fact that rules defined here are applied universally on all UI interfaces web client/outlook client/Tablet client makes it easier to implement standard UI behavior across all devices.

Friday, September 6, 2013

CRM vNext / Orion / CRM 2013/ Fall '13 Update

CRM vNext announced appears to be round the corner. Code-named “Orion” the next release of Dynamics CRM is also the next major version of CRM to be called CRM 2013.

Update/Upgrade Options:

For the On-Premise Customers it would be an “Upgrade” from CRM 2011 to CRM 2013 similar to CRM 4.0 to CRM 2011. We still have the options to choose from an In-place upgrade or a Fresh new install and importing of a CRM 2011 Organization database in CRM 2013.Though I have not tried an in-place upgrade, it was interesting to note that when we try to import a CRM 2011 organization in CRM 2013, it validates the database for customizations that would break in CRM 2013 and would not allow the database to be upgraded to 2013. This is a very impressive feature as it checks not only the scripts but also web resources and plugins and reports the issues. It could have been made better where it could actually list out the individual libraries that are unsupported. But nevertheless to be told even before import that the customizations in the organization would break and not allowing for the import is great step forward. You can also use the CRM Code Validation Tool made available by the CRM Team to manually identify any resources that would break upon upgrade to 2013. You can download this tool from http://www.microsoft.com/en-in/download/details.aspx?id=30151

There is no direct upgrade path from CRM 4.0 to CRM 2013 and would require a temporary upgrade from CRM 4.0 to CRM 2011 (fix all the customizations) and then move on to CRM 2013. Note CRM 2011 organizations need to have RU 12 and above installed for it to be eligible for upgrade to CRM 2013.

For CRM Online customer CRM 2013 would be available at Fall ’13 “Update”. Some of the customers have already started receiving reminders/mailers informing them of the tentative date that the update would be applied to their individual organization. There is an option for the customers to schedule the update at their convenience within 90 days of the original update date proposed by Microsoft. That once again is in line with the earlier Microsoft Policy of providing the Polaris Update as an Opt-In to the users so that they could decide as and when they are ready to move to the new Process-driven UI.

The new CRM 2013 extends the Polaris UI to most other entities with the exception of a few that are not commonly used for end user facing.

First Look:

The first time you open CRM you would have a welcome surprise in the form of a Welcome screen that offers a quick tour of the new system.


With CRM 2013, look for more real estate, with the left Wonderbar (Navigation Pane/ SiteMap) moved as sliding menus at the top. 


Individual areas would have their sub-areas be visible similar once you navigate the area.
  

The navigation has moved to Tiles. While they look good, they do end up taking up a lot of space and would require scrolling to move to a particular menu item at the end of the scroll.

Quick Create:

The Always available Create button at the top is the Quick Create button. Use this button to quickly create a record by entering minimum details.


Images:

And Images are now available!!! 
The activity feeds allowed you to add a profile picture. This feature has now been extended in the form of a new image attribute that can be added to any entity. This will allow associating one image per record. So now you can add that picture to the user/contact.


Flat In-page UI Rendering:

And finally no more popups!!! The CRM Team has done its best to do away with popups wherever possible. So when you open a record from the list view, it does not open the record in the new window but instead it opens it in the same window.


Use the back button to go back to the view.

Composite Control:

Do you notice the Address displayed as a block in the above screenshot… Yes it is a single block on text. Composite control only for Address has been introduced. You cannot use this for your custom attributes however at least as yet.

And when on a record, to access record related navigation's, again click on the arrow at the top in the blue bar.


Customization Changes:

So does the form designing change? Has the ribbon design been changed? No neither has the form designing changed and you can still continue to use the ribbonXML to modify the ribbons. Only the rendering of the forms and ribbons have changed. What happens to role based form and form selector, you can still select between multiple forms as shown below

Auto-Save:

The Quick Save button has now been made as an option for the user to choose in System Settings.


If you choose Auto-Save, the records will be auto-saved. But if you choose to not enable this feature, you would have your Save button back on the top of the form for you to manually click to save the record.

There are a lot of new features and enhancements introduced in CRM 2013 and I will discuss more about the other features in the coming days. Everyone though would agree this first look of CRM 2013 makes you wanting for more…