Wednesday, June 10, 2009

How to create a new User Role in CRM that actually works :)

Its always recommended that we use the user roles already provided by CRM and edit them as per our needs.


Well instead of taking the easy way out, we decided to go ahead and create a new Role from the scratch and there were times I thought, easy way out was a better option :)


Let us share a couple of our findings that should help anyone who decided to take the path less trodden.


When you create a New Role, you will notice that some of the previleges are provided by default. The default privileges added cannot be removed.

We just wanted to make a role that gives the user the permisison to view all accounts and nothing else.


So we created a role with the following privileges


However when we login with the user that has ONLY this role assigned to it, we receive the following error

We spent a lot of time trying our various combinations, when finally we found that the problem was with the user settings entity "Write" permission. By default CRM provided the "Read" permission for this entity, but not the write permission.

Once this permission was added. Run iisreset. Login as the user and it should be just fine now.

In the process we also learnt that System Administrator has certain special privileges that are not presented on the Role user interface, so there is no way to can provide these permissions to any other user.

One of the permissions is to allow users to "Bulk Delete" records. Only System Administrator users have the permission to create "Bulk Delete" Jobs. This helped when we were developing one of the add-ons for Bulk Delete Operations. Details of this add-on has been posted on an earlier post

One of the workarounds though, is to Copy the System Administrator Role and create a new Role which will inherit these hidden privileges from the System Administrator Role.
Sunday, June 7, 2009

Call Workflow from ISV button

We had once given an option to one of our customers to perform an action using on-demand workflow. We provided them with the steps to run the workflow from the "Run Workflow..." button that is added to the entity in case and entity has on-demand workflows published against them.

The customer however wanted that we add a button with a descriptive lable that performed the job so that the users are not burdened with having to select the correct workflow from the list and it was a one-click solution.

We found that CRM has an inbuilt function made available that calls the workflow "launchOnDemandWorkflow"

The syntax of the function is
launchOnDemandWorkflow('crmGrid',ObjectTypeCode,Workflow ID) //when called from grid

launchOnDemandWorkflow('',ObjectTypeCode,Workflow ID) //when called from entity form

This function has 3 parameters.
The first one is left blank only if the button is on the record of that entity and workflow needs to be called on that record only. whereas, if the button is placed on the grid of CRM entity view then first parameter should be 'crmGrid' so that the workflow will get called for the records selected in that view.


Second parameter contains object type code of that entity

Third parameter is the id of the workflow to be fired

To get the workflow id, follow the below steps.

1. Go to Setting --> Workflow form.
2. Here open the workflow that you want to run on button click.
3. Now press "Ctrl + N" which will open the same page in the IE.
4. In the Address bar of IE you can find the id of workflow.

This should help provide users with the most familiar option of clicking a button to perform an action.

Friday, June 5, 2009

How to re-assign records of one user to another user in Dynamics CRM

Sometimes when one of the users is no longer associated with the company or if the responsibilities of a user is changed, there is a need to re-assign all records of this user to another user.

Steps to re-assign records:

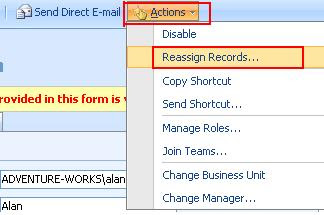
1. Open the User Form of the user whose records need to be re-assigned.

2. Choose the Re-assign Records menu option from the Actions menu


3. From the form options that come up choose the option to select the user.


This will re-assign all records of the user to another user. This does away with the need to manually create views for each type of entities and then assign it to other users.


Tuesday, June 2, 2009

IFD Login code for Custom apps

With CRM 4.0 and IFD getting popular by the day. We have had to work on the Login function for CRM to support IFD install. In case of IFD the authentication type is changed to Forms Authentication where you are presented with a Sign-in page for login.

Further to our post on
Login for various CRM deployments here is the code for IFD that has been added to the list.

The code below should help users developing application that need to work from an IFD environment.

/////////////////////////////////////////////////////////////////////////////////////////////////////////////
///


/// login to crm with Default Credential for IFD

//set orgname and url to properties
strOrg = strOrgName;
strserverurl = strCRMURL; // It must have on- premise url for example http://moss:5555

//init CrmImpersonator object
_impersonator = new CrmImpersonator();

//Initialize CrmAuthenticationToken token
token = CrmAuthenticationToken.ExtractCrmAuthenticationToken(context, strOrgName);
token.OrganizationName = strOrgName;
token.AuthenticationType = 0;

//initialize the Service
service = new CrmService();

//pass DefaultCredentials
service.Credentials = System.Net.CredentialCache.DefaultCredentials;

//pass CrmAuthenticationTokenValue
service.CrmAuthenticationTokenValue = token;
service.Url = strCRMURL + "/mscrmservices/2007/crmservice.asmx";


Thursday, May 28, 2009

How to login in console mode through Remote Desktop

Recently we came across a situation where we had to logon to a windows server remotely and yet open it in console mode. This means that we needed to be identified as being locally logged on instead of being treated as a remote desktop user.
We found that remote desktop command has various commandline arguments that can be used to connect. One of the arguments is /console which did the trick for us.
The command is mstsc /console
I hope this tip helps others with similar neeeds.