Thursday, April 9, 2009

Edit CRM Messages

Its quite often that we need to change the default nomenclature of CRM to customer specific normal like renaming Account to Customer, Lead to Prospect and so on.

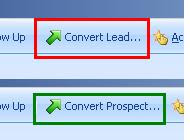
When you change the entity name the name is reflected on most places. However in the messages and other related functionality of CRM it still reflects the old name so for e.g. even though you have changed the entity name of Lead to Prospect it would still show “Convert Lead…” on the button.


To change such labels and other related messages that CRM displays related to this entity it is important that will also change the Messages section of the entity.

You can follow the steps below:

1. Go to Settings => Customization
2. Edit the Lead Entity
3. Choose the Messages navigation option.You will find a list of all messages displayed/used by CRM for this entity.


4. Edit the message as required and save and Publish the entity to see the changes.

Monday, April 6, 2009

Integrating DOTNETNUKE with Self Service Portal for Dynamics CRM


DotNetNuke:

This is a widely used Open source framework available to develop websites without requiring much technical knowledge. Its framework provides for developing custom modules that can integrate seamlessly with the main DNN website. DNN also takes care of security by providing website owners to provide access to different sets of users to different functionalities on the portal.

Self Service Portal:

Any self service portal (in our case Inogic has a product for Self Service portal/Customer Portal) to allow CRM users to allow their customers to register tickets through the Portal and monitor its progress online. These customers use the portal to register incidents that are directly created in CRM and any updates by the company on their case is reflected to them through the portal.


Linking the two:

We need to create a DNN module for our Self Service Portal that can be installed within DNN. DNN uses the concept of User Controls. We needed to convert each of the web forms that we had to user controls.

Once they were converted to User controls you can add these Controls to DNN and associate it with your module. Once the controls have been uploaded, user can use these controls to add on their pages as and where they wish. can include these in your DNN module. These controls can then be used by end users to add on the pages they wish.

The Self Service Portal had its inbuilt security that was integrated with CRM by adding custom attributes to store the login id and password of the customers. This was taken care of in DNN module by using the DNN security. So only users that are registered on the DNN site had access to the Portal. We could well do away with this security check from CRM as DNN already has a robust security architecture.

Advantages of linking:

A customer centric website can be designed using DNN by the users easily while also utilizing the entire features of CRM's customer service portal.

Tuesday, March 17, 2009

How to merge records in Dynamics CRM

In one of our earlier posts we had explained the Duplicate Detection Feature that is now available in Dynamics CRM 4.0. However suppose there was not Duplication detection rule setup and it resulted in you have duplicate records of Accounts in your CRM.

For this CRM provides the option to Merge 2 records.


This feature is available only on below entities:
- Account
- Contact
- Lead

Using merge functionality user can merge two records and can deactivate the duplicate record. Below is the screen shot which will show you the button to merge the selected two records.


When user clicks on merge button user will be prompted with following window using which user can choose fields which are latest one and update record with latest values while other record will get deactivated.

- User can choose master record which is at the end will remain active and other will get deactivated.

- Also there is an option to directly choose the filled values from two records. If for a field there is value present in both the records then master records value will get selected here. For this user need to checked on check box as shown in below screen shot.

Thursday, March 12, 2009

New Plugin Messages made available by Microsoft in Dynamics CRM 4.0

Execute: The execute event always gets fired when you open the views. Like from Main application view, lookup view, Advanced search view etc. (but not from associated views).
While registering this event, no primary entity name is required.
Input parameter: fetchxml - The fetchXML query sent.
Output parameter: fetchxmlresult - The resultant records of the fetchXML query

Retrieve: The event is available for each of the entities like account, contact, custom entities etc. When user opens CRM record (CRM form) this event is fired
Input parameter: columnset - the attributes requested in the Retrieve Message
Output parameter: businessentity - The resultant business entity found.

Retrieve Multiple: The event will fire when user goes to associated view of Contacts or Custom entities that do not use the Rollup message. So it works for all associated views that does not provide the “Related Regarding Records” option.
Input parameter: query - Query passed to the Retrieve Multiple message
Output parameter: businessentitycollection - The resultset business entity collection.

Rollup message can be used for associated views that provide the option of displaying related records. However the Plugin registration tool does not provide for registering on the Rollup message. So that is something we still need to find out how it works.

Route: Route event gets fired when any of below entity instance moves from one queue to another.
Appointment
CampaignActivity
CampaignResponse
Email
Fax
Incident
Letter
PhoneCall
ServiceAppointment
Task

For email entity new events introduced are,
Assign, BackgroundSend, CheckIncoming, CheckPromote, Create, Delete, DeliverIncoming, DeliverPromote, DetachFromQueue, GrantAccess, Handle, ModifyAccess, Retrieve, RetrieveMultiple, RetrievePrincipalAccess, RetrieveSharedPrincipalsAndAccess, RevokeAccess, Route, Send, SendFromTemplate, SetState, SetStateDynamicEntity, Update

So with Dynamics CRM 4.0 Microsoft has given greater control to the developers to trap appropriate messages and perform custom actions.

Monday, March 9, 2009

How to use the Duplicate Detection Feature of CRM

CRM 4.0 provides a facility to detect duplicate records with same attribute value. To enable the duplicate detection you have to create a duplicate rule.

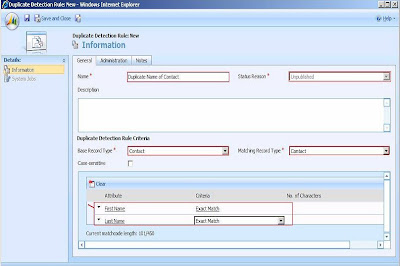
To create duplicate rule GoTo ->Settings->Data Management->Duplicate Detection Rule->New. Then you will get below window.


In above screen shot The fields which are covered with red rectangle are as follows :

1. Name : Name of the rule.
2. Status Reason : Status reason is by default unpublished. When you published this rule then status reason get Published automatically.
3. Base Record Type : In this we choose an entity by which we can find duplicate records.
4. Matching Record Type : In this we choose an entity on which we check the duplicate records.
5. Now we define the attributes on which we want duplicate detection.

Here I select contact in both “Base Record Type” and “Matching Record Type” because I want to compare “First Name” and “Last Name” of contact only.
If you want to check Is there any existing Contact With “First Name” and “Last Name” that you fill in the lead. Then do the following


Select Lead as “Base Record Type” and Contact as “Matching Record Type” and select the attribute of both entities on which you want to duplicate detection.
In this case whenever you want to save a lead then duplicate detection will run if a contact exists with the lead’s “First Name and “Last Name”.

When you create a record then duplicate rule will search for any existing record With “First Name and “Last Name”. If any existing record is found then The following pop up is generated.


Now if you want to save the duplicated record then click on Save Record if not then click on Cancel.

Note : Please Start Asynchronous Service before running the duplicate detection.